KEY TAKEAWAYS:
Save the project through “save project as” in the file menu. Check the options for the subdirectory and copy the media files. Now you can open that project using the folder we created on a new computer with REAPER on it without any issues.
New Computer and REAPER
How exciting! You have a new computer.
The musical world is at your fingertips. You can do more than you could before in REAPER with this new power.
But first, you need to get REAPER on your new computer and licensed to it. Plus, restore all the projects you’ve worked hard on to your new computer.
This article will discuss how to transfer REAPER to your new computer, including the projects. And as an extra, we shall show you a workaround for exporting REAPER projects to a different DAW.
Moving REAPER Projects To Another Computer: Step-By-Step Guide
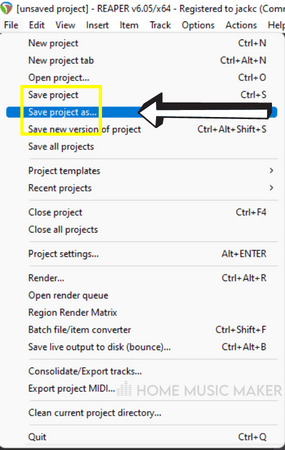
Step 1: Click “save project as” in the file menu.
Step 2: Within the window that appears, check the options “create subdirectory for project” and “copy all media into project.”
This means that when you save the project, it will create a project directory in that location. The project file and all media files will be within the project folder. So that when you open up your REAPER project on another computer, there will be audio in the audio tracks.
This is essential as you want to keep these audio files and not have to re-record certain parts.
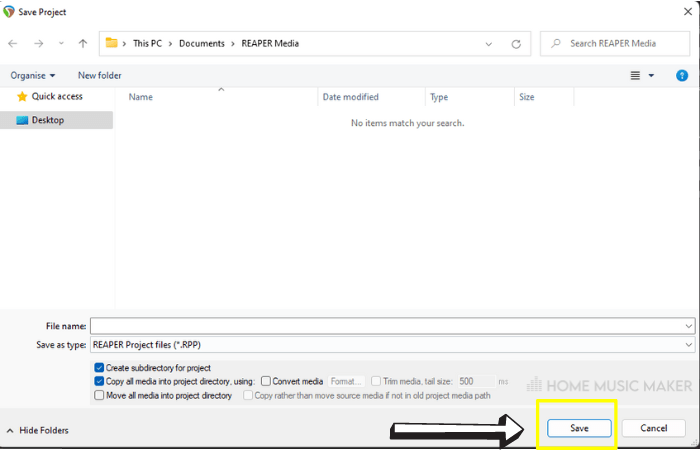
Step 3: Click Save. Now you have everything you need to open the project on another computer inside that folder.
How To Save REAPER Project Files To An External Hard Drive
You can save the project directly to an external hard drive in step 3 above. Alternatively, you can Copy/Cut it after it’s saved and move it onto your external hard drive.
How To Load REAPER Project Files From An External Hard Drive
Step 4: Select Open Project from the file menu.
Locate the project folder that you saved to the hard drive.
Go into the folder and open the REAPER project file that’s there.
If you follow these steps correctly, your project will look the same in REAPER on this other computer.
Can You Export REAPER Session Files For Use In Different DAWs?
You can’t directly use a REAPER project file in another digital audio workstation. You can, however, export the stems and import them into another DAW, such as Pro Tools.
This is where you export the audio from multiple tracks, if not all of the tracks, for each channel.
The issue with this is when you already have audio effects applied to a track or multiple tracks. You have to decide whether you want to commit the sounds to the audio files and not be able to adjust them later in the other DAW you’re moving to.
You can also eliminate all of the effects on the tracks and recreate them in the different DAW. Of course, you could do a mixture of both.
Whatever you choose, please make a note of it and note how you have the project set up. This will help you get set up in a different DAW without remembering every detail.
Once ready, select consolidate/export tracks from the file menu.
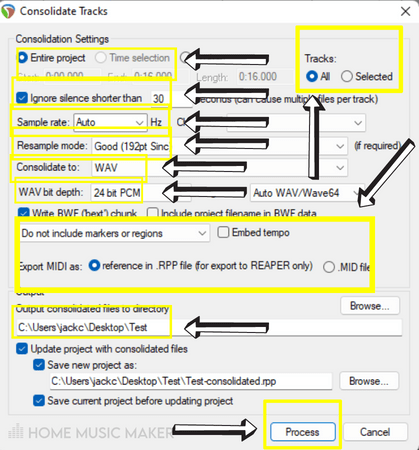
It can look overwhelming initially; however, most of these settings are very useful and intuitive.
Let’s first look at the Consolidation Settings. Here we can export the stems for the whole project or a specific section. We can also decide whether to consolidate all of the tracks or just the selected tracks.
For exporting this project to a different DAW, I recommend setting the entire project’s length and the tracks to all.
Uncheck the option to Ignore Silence, as this can cause multiple files per track, which will complicate the transfer of the project to a different DAW.
Depending on your setup and preferred sample rate, I would choose 44100Hz or 48000Hz. You can leave the channels option as Auto.
You can increase the Resample Mode if you want to, but this will cause a longer consolidation process. The default setting here is more than adequate.
You can choose what file format to consolidate the tracks to. Check what types of audio files the other DAW accepts but a safe bet is always a WAV file. It has a larger file size than an MP3 file, but it’s much higher-quality audio.
You can choose the WAV bit depth again based on your setup and preference. I am happy with 24bit.
You can ignore the rest of the consolidation settings other than the Export MIDI section. You want to ensure that you are exporting MIDI as a “.MID file“. Otherwise, it won’t work in other DAWs.
All that is left to do is choose your output directory for the consolidated tracks and click process.
You can load these audio files into the other DAW and organize them based on your notes from the REAPER session.
READ NEXT:
Speaking of other DAWs, maybe you’ve questioned using REAPER. For more, check out our article on the drawbacks of REAPER.
How To Transfer REAPER To A New Computer
Firstly, download the REAPER installer from their website. This is to get the software installed on your computer.
Once it’s downloaded, install REAPER. But wait to open it on the new computer as we need a couple of things first.
You first need your config file from REAPER on your old computer. This will mean that your setup for REAPER on this computer will be transferred to the new one.
Open Preferences by going to the bottom of the options menu, in the right-hand sidebar, select general.
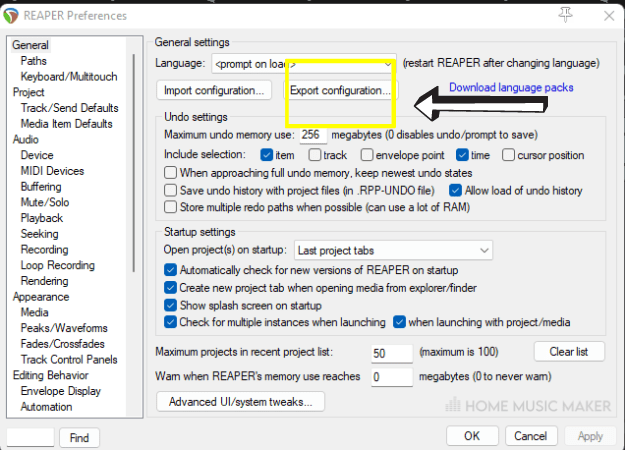
Click the button labeled Export configuration. The window that appears will allow you to choose which of your configuration settings you want to import to the new computer.
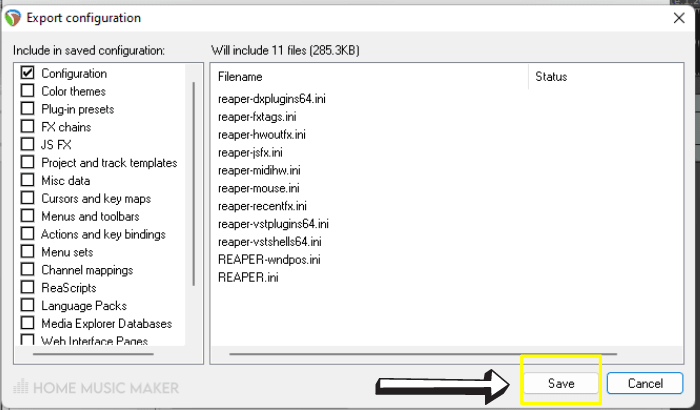
Click Save and save it to external storage of some kind so that you can access it on your new computer.
The second thing you need is the REAPER license.
How To Transfer A REAPER License To A Different Computer
Locate your REAPER license and copy it to an external storage device or a cloud service accessible from your new computer. It is usually found in the REAPER program files if you need clarification on where your license key is. This is also where the REAPER executable file is.
The license is labeled “license.txt,” and its file format is a text document.
Once you have your configuration file and license on the new computer, you can open up REAPER.
Upon opening, REAPER will ask for your license key. Provide it, and the license will be transferred.
Finally, open up Preferences again to the same place where we went to export the configuration file. This time, press Import configuration and locate the configuration file we created.
Now REAPER is licensed on your new computer with all the configuration settings you chose to keep.
Why Aren’t DAW Files Interchangeable?
Each DAW does the same thing. However, they can go about it in different ways. Sure some are more similar than others, but they still won’t be able to open each other’s files.
This is because the way each DAW functions is different. There are different features, the project settings are different, and some DAWs only work with a specific type of audio file.
We can get close to transferring projects over to another DAW, but only with having to either commit effects to the sound or recreate them and the project’s structure in the new DAW.
I also suspect that DAW files aren’t interchangeable for monetary reasons. The creators of any digital audio workstation are a part of the music production business. It’s one of the ways they will incentivize you to stay with them.
Moving an entire project to a new computer is crucial to music production, whether it’s a new computer or someone else’s, for the next stage of the music-making process.
READ NEXT:
Another important aspect of music production is knowing how to move things within your DAW. To learn this in REAPER, check out our article on how to move everything in REAPER.
Related Questions
How Do You Export A REAPER project to Pro Tools?
You can’t directly export the file for it to work seamlessly with Pro Tools. You’ll have to export/consolidate all of the tracks (i.e., the stems) and then import them into Pro Tools.
How Do You Bounce A Session In REAPER?
In REAPER, bouncing the session is called rendering. Select render from the file menu. Here you can adjust how you want it to render and where to. When you’re happy, add it to the render queue using the button near the bottom.
Now select open render queue in the file menu. You can render the selected rows in the list or render them all. Then you will have a render of the REAPER session, which is the same as bouncing it.
Can You Use REAPER On 2 Computers?
You can use your REAPER license on two different computers. However, you cannot use both simultaneously with the discounted license.
How Do You Send A Project In REAPER?
To send another person your REAPER project, you can follow the steps above about moving it into a new computer. Instead of uploading it to an external storage device, compress the folder into a zip and send it through your favorite means of file sharing.
Where Are REAPER Files Saved?
For each REAPER project, the files for that project are saved in its project folder. You can change where the project folders are typically saved within the project settings. You can also further organize the files in the project settings.
READ NEXT:
For a more in-depth look at REAPER, check out this article on whether REAPER Is Good For Making Beats.

 Want to connect with other music producers for help and guidance?