KEY TAKEAWAYS:
Find the default recording path in preferences and then check this directory. Is the folder there? If not, then create it or change the default recording path. If it is there, then see if your antivirus is blocking REAPER. You should also ensure that the directory is not in a protected folder.
REAPER And Recording Errors
It’s so frustrating when you finally get an idea for a song, and then, of course, that’s when you get a recording error.
There are a few causes for a recording files error where the directory is unreachable, so it’s okay to get overwhelmed with the information.
In this article, I will discuss the possible causes of the error, how to test each reason, and most importantly, how to fix it.

Why Am I Getting The Can’t Write To Recording Files? Does The Directory Exist Error In REAPER?
When REAPER gives you this error message, it tells you what is wrong. The default directory REAPER uses to save the files after they are finished recording is missing, or REAPER doesn’t have permission to write in there.
When REAPER doesn’t have permission to write in the folder, this can happen if you’ve updated REAPER. It’s not usually what happens when you update, but it can sometimes cause it.
When REAPER can’t find the folder, then that means that that folder has either been moved, renamed, or deleted.
This means that when you’re trying to record audio on an audio track, it won’t work, and this error appears. This shouldn’t affect your ability to record MIDI data on a MIDI track using a MIDI instrument through a MIDI keyboard or MIDI editor/piano roll.
Of course, here I am discussing the issues of recording in a file. However, you may want to import audio files into REAPER. In this case, check out our article on importing WAV files into REAPER.
How To Fix Can’t Write To Recording Files, Does The Directory Exist Error
Check the REAPER preferences to find what folder you should be looking for. You can find this by pressing CTRL+P/CMD+P. Then in the left-hand sidebar, click on Paths.
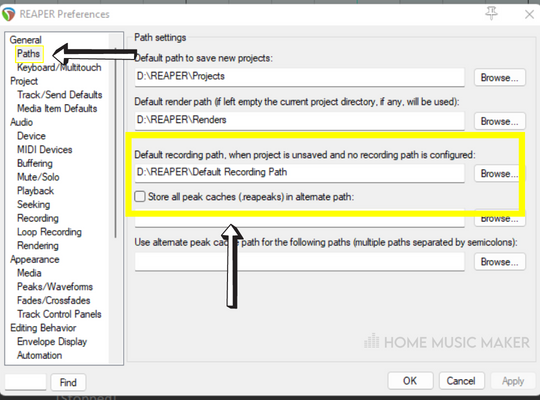
Here we can see what paths are set for REAPER and, more specifically, what the default recording path is.
Go to the path that is stated as the default recording path. If it’s not there, then we know it’s missing. If it’s there, then REAPER doesn’t have permission to write the recording files. We will discuss both scenarios.
The Directory Folder Is Missing
There are two ways you can go about this. You can either create a folder or set of folders so that the default recording path stated does exist. The other way is to change the default recording path by clicking the browse button next to the path definition. Both are valid, so it’s up to you what you prefer.
REAPER Doesn’t Have Permission To Write Recording Files In This Folder
Now that you know the location of your default recording path and the tips above didn’t solve the issue, we need to check if it’s in a protected folder.
A protected folder is a folder that can’t be written into, typically because they contain system files that are critical to the operating system and software on your computer. The easiest solution is to change your default recording path to an unprotected folder.
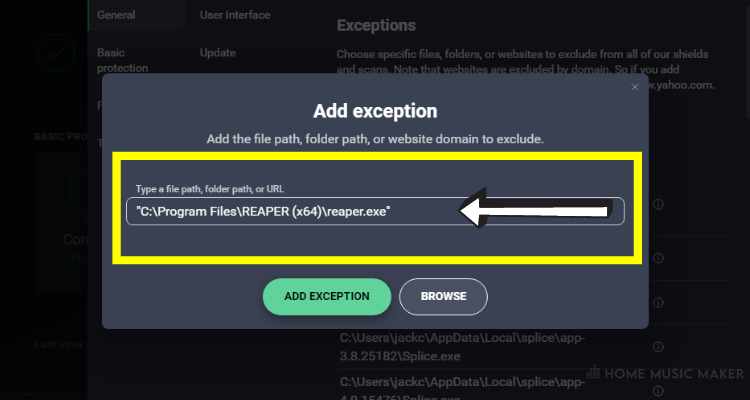
If that doesn’t work, then it could be possible that your antivirus software is blocking REAPER from writing in that folder or maybe even any folder. To check this, turn off your antivirus and see if it works.
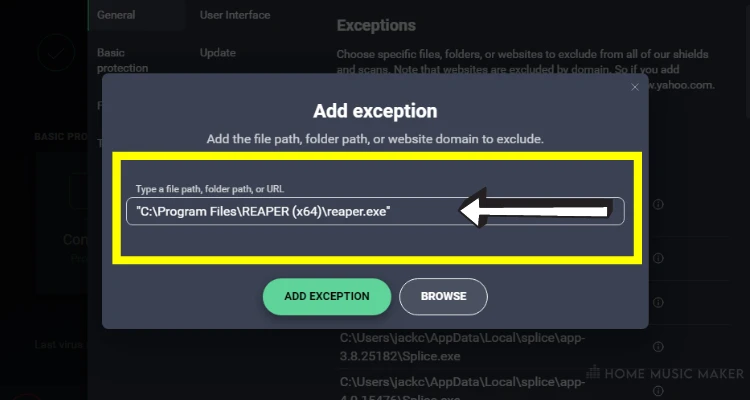
Of course, you want to leave your computer with an antivirus. If this fixes the error, create an exception in your antivirus by looking at what it is currently blocking. Look for REAPER and allow an exception. This way, you can have the antivirus running while recording on REAPER.
READ NEXT:
Maybe you’re also having other issues with recording in REAPER. Check out our article on how to arm a track in REAPER.
Where Does REAPER Save Audio Files?
There are typically two locations where the audio files can be saved. This is based on whether you’ve started recording before or after saving the project file.
This is typically the case within a digital audio workstation, such as Pro Tools, Logic Pro, Adobe Audition, and FL Studio.
Before Saving
If you are recording music before saving the project file, it will go to REAPER’s default recording path. This can be found in the folder setting section of preferences.
Generally, this is bad practice because it’s not as secure as saving the project. However, we all do it. It’s easy to forget to save when you’re in the moment and inspired to make a great tune.
After Saving
By default, the audio files are all saved to My Documents\Reaper Media, regardless of what project you’re in. This is very messy, so I’d recommend changing the default to save the audio files separately for each project.
What Audio File Formats Does REAPER Support?
There are audio file formats that REAPER can read and that REAPER can write (i.e., the recording file).
Audio File Formats That REAPER Can Read
ACID, AIFF, AVI, BWF, CAF, CDDA, EDL, FLAC, KAR, MIDI file, MOGG, MOV, MUSIC XML, MP3, MPEG, OGG VORBIS, OGG OPUS, QT, RAW/PCM, RADAR, REX2, RF64, SD2, SYX, W64, WAV file, WAVPACK, WMV.
Related Questions
Why Is Your REAPER Not Recording?
Firstly, check that you have armed your track in REAPER. If no tracks are armed, then nothing will be recorded. Next, have you set up your audio interface correctly? Have you checked that the inputs and outputs are correctly assigned?
Why Do Your REAPER Tracks Say Offline?
This happens when REAPER can’t find the files associated with those audio tracks. This is usually due to moving, deleting, or renaming the files. This can be fixed by showing REAPER the new location of the files, restoring the files, or renaming the files back, respectively.
How Do You Save A File In REAPER?
Press CTRL+S/CMD+S to save a REAPER project file.
Where Does REAPER Save Audio?
To find this out, press CTRL+P/CMD+P to open preferences. Then go to the tab called paths in the left-hand sidebar. You can see where the audio is saved when the REAPER project has been saved under “Default path to save new projects.”
For unsaved projects, the audio files are saved under “Default recording path, when the project is unsaved, and no recording path is configured.”
How Do You Change The Recording Path In REAPER?
To change the recording path, go to preferences, as in the question before, and go to the paths tab. You can change the recording path for saved and unsaved projects here.
READ NEXT:
To broaden your knowledge of other issues, check out our article on how to stop REAPER cracking during recording.