Record arming a track in REAPER is as simple as clicking the ‘Record Arm’ button (circular red button with a white ring inside) on the track you want to record with. From here, you can also select the desired input from the drop-down input menu.
Record Arming In REAPER
If you don’t know how to record arm a track in REAPER, you will not be able to record any audio or MIDI; this is an obvious problem if you want to produce any music.
Thankfully, record arming a track in REAPER couldn’t be any easier!
This two-step guide will show you the ins and outs of arming a track to record in REAPER.
What You Will Need To Follow This Tutorial
Here is a list of everything that you will need to follow in this tutorial:
- The REAPER DAW (Digital Audio Workstation)
- An audio track or MIDI track to record arm
What Does It Mean To ‘Record Arm’ a Track?
‘Record Arming’ a track is essentially just setting up a track for recording.
Once a track is ‘Record Armed,’ it will start recording when you hit the record button.
You can record arm one track or multiple tracks simultaneously, depending on what you are trying to accomplish.


How To Record Arm a Track In REAPER
Let’s dive right into record arming an individual track in REAPER.
Step One – Press The Record Arm Button
The first step for arming a track to record in REAPER is to locate the track that you want to arm and press the ‘Record Arm’ button.
The Record Arm button is a circular red button with a small white ring inside.
Once you press it, it will illuminate to a brighter red.
Now you have armed your track to record.
Not so fast, though. Let’s adjust the track’s parameters.
Step Two – Select Your Track’s Input
Now that you have armed your track to record, let’s designate the track’s MIDI/audio input.
A drop-down menu appears once you arm your track to record.
You can use this menu to select a different input for your track.
With your input set and track ready to record, all that’s left to do is press the record button and start tracking.
As you can see, arming a track to record in REAPER is as simple as it gets.
How To Arm Multiple Tracks In REAPER
To arm multiple tracks in REAPER at once, highlight all the tracks you want to arm by shift-clicking them and then press the ‘Record Arm’ button on any selected tracks.
This simple process will allow you to arm as many tracks at once as you need.
How To Auto-Arm Tracks Upon Selection
Let’s now look at how you can auto-arm a track upon selection in REAPER.
To make it so that your selected track arms for recording, start by right-clicking the record arm button on the track that you want to affect and select ‘Automatic record arm when track selected’ from the drop-down menu.
Now, this track will be ready to record whenever you select it.
You can also Shift>Click to select multiple tracks and set them to auto-arm upon selection at the same time.
Setting the tracks within your project to auto-arm upon selection can help save you time and effort while producing!
How To Auto-Arm A New Track Upon Addition To Your REAPER Project
Let’s dive into the process of making tracks that you add to your REAPER project auto-arm for recording.
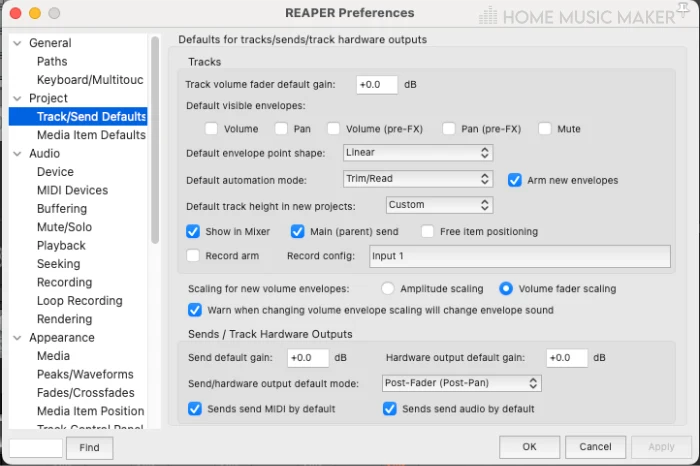
To make it so that any new track you add to your project is set to auto-arm, click Options>Preferences>Track/Send Defaults and open up the Record config drop-down menu.
From here, select ‘Automatic record arm when track selected.’
Now, any new track you add to your project will auto-arm upon selection.
The menu you can find under Options>Preferences>Track/Send Defaults is a massive help for customizing your own track template for new tracks.

How Many Tracks Can REAPER Handle?
This depends on how powerful your computer is in processing power and RAM and how many plugins and virtual instruments you will use on each track.
From my experience, though, REAPER can handle several hundred tracks with plugins if your computer is up to par.
For a frame of reference, I have a MAC Mini with 32GB RAM and a 3.2 GHz processor.
There is no stock answer for this question because it depends on your computer and the project.
Related Questions
How Do You Insert a New Track In REAPER?
There are a couple of ways that you can quickly and easily insert a new track in REAPER.
To insert a new track into a REAPER project, double-click in the tracklist area to the left of the REAPER DAW window or press Insert>New Track.
From here, you can edit and adjust the parameters of this track, such as input, volume, panning, FX, etc.
Does REAPER Have a Guitar Tuner?
REAPER has a plugin called ‘ReaTune’ with several functions, including a tuner feature.
On top of the tuner, ReaTune also has autotune and manual pitch correction capabilities that you can use to tune your vocal tracks.
Is REAPER Good For Recording?
I think REAPER is an excellent DAW for recording audio and MIDI.
I have used REAPER for all types of recording sessions, including small one-instrument sessions to full band sessions with numerous tracks.
REAPER’s recording functions have never let me down or left me wanting more!
How Do You Record In REAPER?
To record in REAPER (audio or MIDI), start by inserting a new track on your track list to the left of the REAPER DAW.
Next, press the ‘Record Arm‘ button and select your desired input from the drop-down input menu.
Now that you are ready to record, all you have to do is press the record button, and just like that, you are recording in REAPER!
Want to learn more? Check out this guide on loop recording in REAPER.