In REAPER, you can record over the same section of a track in a loop by using loop recording. Select the area you want to loop record, click the loop button, and now when you press record, you will record over that section in a loop.
Loop Recording In REAPER
Loop recording is a technique that is very handy when you want to record multiple takes of something in a row.
If you do not know how to loop record in REAPER, you will have to waste time between every take fiddling with your mouse and keyboard, and there is no time to waste in the studio.
Learning to loop record properly has been a total game-changer for my music production workflow.
In this step-by-step tutorial, I will show you the ins and outs of REAPER loop recording!
To Follow This Tutorial, You Will Need:
- REAPER DAW (Digital Audio Workstation)
- A microphone, virtual instrument, etc. that you can record with
Can You Loop Record In REAPER?
Yes! Thankfully there is a quick and easy way to loop record in REAPER.
Let’s take a look at how it’s done.
Step One – Set Up a Track To Record With
The first step for loop recording in REAPER is to set up the track you want to loop record with.
To do this, insert a new track in your REAPER project by double-clicking on the tracklist to the left of the DAW. Then set the input on that track to your desired input, and arm the track to record.
Now that your track is ready to go, let’s move on.
Step Two – Select The Section That You Want To Loop Record
The next step is selecting the section you wish to loop record over.
Simply use your mouse to drag and select a section to do this.
You can select as small or big a section as you wish.
With our desired section selected, we’re ready to move along.
Step Three – Turn On Looping
The final step for setting up loop recording in REAPER is to turn on looping.
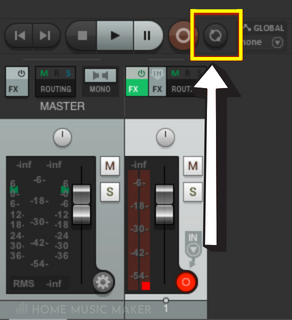
All you have to do is click the ‘Toggle Repeat‘ AKA loop button, and you will activate looping.
You will find the looping button directly to the right of the record button in REAPER.

Just like that, you are all set up for loop recording in REAPER!
Step Four – Loop Record
All you have to do now to loop is press the record button.
Because you have taken the time to set up loop recording in REAPER properly, you will be recording the selected section repeatedly when you press the record button.
Now you will be able to use this technique to quickly and efficiently record multiple takes of the same part in REAPER!
What Is Loop Recording Mode?
Loop recording mode is a way that you can record a single section of a track over and over again in REAPER without having to do any mouse and keyboard work in between.
To loop record in REAPER, select the area you want to loop record by dragging the mouse and turning on looping by pressing the ‘Toggle Repeat‘ AKA loop button.
When you press record, the selected section will repeatedly record until you press stop.
How Do I Loop a Recording In REAPER?
To loop a recording in REAPER, start by selecting the area you want to loop by dragging your cursor to make the selection.
Now all you have to do is press the ‘Toggle Repeat‘ AKA loop button to turn on loop mode.
You will find the looping button directly to the right of the record button in REAPER.
Now, because you have turned on loop mode when you press play, the selected area will loop.
Related Questions
Does REAPER Support Video File Formats?
Yes, REAPER does support video file formats.
Not only can you import video files into REAPER to write music over them or edit the audio in the video, but you can also export them to video file formats in REAPER.
How Do You Add a Count-In Before Recording In REAPER?
To add a count-in before recording in REAPER, right-click the metronome button located on the top right of the toolbar.
Once this window is open, check the ‘Count-in before recording‘ box and enter the desired number of measures you would like for the count-in under the ‘Count-in measures‘ box. Now, you will have a count-in before recording begins in REAPER.
How Do You Listen to A Section of Your Track Over and Over Again in REAPER?
To listen to a section of your track over and over again in REAPER, you will have to loop it.
To do this, select the desired section of your track and then press the ‘Toggle Repeat‘ AKA loop button to engage looping. That section of your track will play in a loop when you press play.
What DAWs Support Loop Recording?
You can use most modern DAWs (Digital Audio Workstations) for loop recording, such as Pro Tools, Logic Pro, FL Studio, Studio One, etc.
Loop recording is a powerful audio production technique that you can use to record the same part of a song without stopping repeatedly.
What Can You Loop in REAPER?
In REAPER, you can loop anything such as an audio recording, a MIDI clip, a third-party audio track, etc.
Cockos REAPER is a very flexible DAW, especially when editing different parts of a track.
Click here for a complete guide on looping in REAPER.