The performance meter is a menu within REAPER that you can use to view your CPU usage, RAM usage, etc. To open up the REAPER Performance Meter, click ‘View>Performance Meter.’ From there, you can monitor REAPER’s stress on your computer’s processing.
Metering Performance In REAPER
Music production has nothing more frustrating than your computer’s performance impeding your workflow.
Knowing how to monitor the stress your DAW (Digital Audio Workstation) puts on your computer’s processing potential is very important in figuring out what your computer can handle.
Thankfully, REAPER has a menu that you can use for the ‘Performance Meter.’
In this deep dive article, I will be showing you the REAPER Performance Meter and how you can use it!
To Follow This Tutorial, You’ll Need
Everything you will need to follow along with this tutorial comes with the REAPER DAW.
However, if you want to get the most out of this article, I recommend following along with a REAPER project file that is chock-full of plugins and virtual instrument plugins.
Alright, now let’s move on!
Step One – Open Up The Performance Meter
The first step for monitoring your performance in REAPER is to open up the performance meter.
All you have to do is click View>Performance Meter, and the window will open up.
You can view REAPER’s performance and its strain on your computer.
Now that you have opened up the REAPER Performance Meter, we can move on.
Step Two – Use The Performance Meter
With the REAPER Performance Meter now opened up, we can use it to monitor REAPER’s performance and check for any potential performance issues.
Let’s take a close look at what the REAPER performance Meter is telling us about our REAPER project.
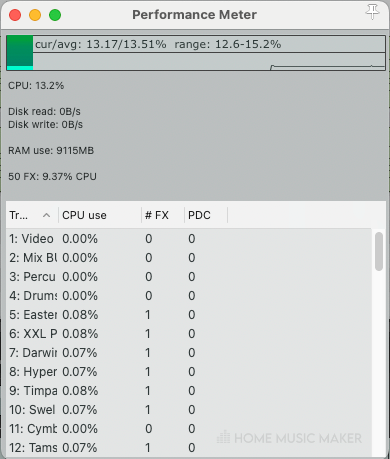
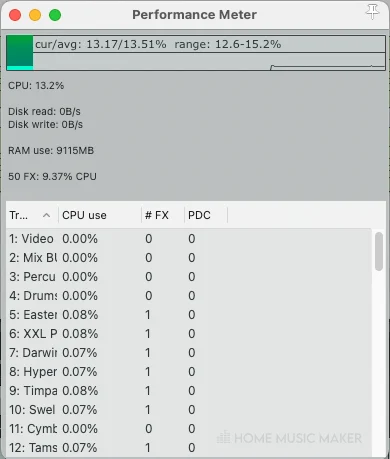
What Does The Performance Meter Tell You?
The REAPER Performance Meter tells you the following:
CPU use in % form


Disk read/Disk write occurring in REAPER


RAM use in MB form


System free in MB form (you will only see this on Windows. Therefore, I don’t see it since I have a Mac)
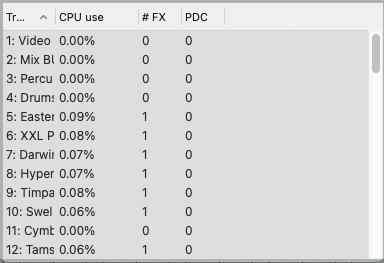
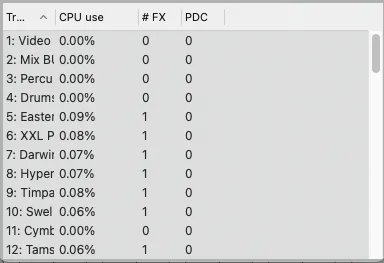
CPU that FX (plugins) are using


The FX (plugins) in your REAPER project and how much CPU each one is using
You can use this information displayed in the REAPER Performance Meter to monitor REAPER’s strain on your computer and make educated decisions while working on a track.
Where Is The Performance Meter In REAPER?
To open up the REAPER Performance Meter, click View>Performance Meter.
From here, you can view certain things such as CPU load, RAM load, what plugins are on your project, etc.
Why Does REAPER Lag?
From my experience using REAPER, the leading cause of lag when working on a track is the use of plugins.
Although plugins and virtual instrument plugins are an essential part of modern music production, they can slow down your operating system if you do not have a high-performance computer with a powerful processor and plenty of RAM.
In my opinion, the most significant investment that you can make if you are a serious music producer is a reliable computer with specs geared towards music/audio production.
Check out the following article for our complete guide to building a music production computer.
How Do I Make REAPER Use Less CPU?
To make REAPER use less CPU, try these few things:
- Increase your audio device buffer size under your ‘Audio device settings‘ in REAPER. If your goal is to reduce CPU, I recommend a buffer size of 1024 or more.
- Render plugins onto your tracks. This will be a massive help in reducing CPU load.
- You can move certain tracks into a subproject. I do not recommend this method as much as the other two. You should be careful when using it.
How Do I Make REAPER Run Better?
Here are a few things that can make REAPER run more efficiently:
- Increasing your audio device buffer size
- Rendering plugins onto tracks in your project as you go
- Moving certain tracks in your project to a subproject (be careful with this one)
If you cannot afford a high-performance computer for music production, try these tips to help make REAPER run better.
What Buffer Size Should I Use In REAPER?
This depends on whether you are recording or mixing and if your computer has trouble running REAPER smoothly.
For example, you want a lower buffer size when recording. Still, a higher buffer size will help you when mixing since you’ll be bogging your computer down with a bunch of plugins.
I recommend a buffer size of 64 if your computer can handle it for recording.
For mixing, I recommend a buffer size of 1024 or higher if you need it.
Generally speaking, a lower buffer size is best, but it depends on whether your computer can handle it.
How Do I Get Zero Latency In REAPER?
To eliminate latency in REAPER, start by trying to download and install the ASIO4ALL Asio driver onto your system if you are a Windows user.
This audio driver has always done the trick for me by eliminating latency in REAPER.
If you are a Mac user or the Asio driver did not work for you, you can also manually offset latency in REAPER under Options>Preferences>Recording.
You can find the latency offset settings on the bottom right of this menu.
How Many Cores Can REAPER Use?
In my opinion, REAPER’s default settings work best with an eight-core CPU or less.
If your computer’s CPU has more than an eight-core CPU, you will still be just fine using REAPER, but in terms of efficiency, REAPER only needs about eight cores; anything more is a bit overkill.
Related Questions
How Do You Enable Audio Monitoring in REAPER?
To enable audio monitoring on a track you are recording on in REAPER, simply click the ‘Record Monitoring‘ button on the desired track until it is in the ‘ON‘ position.
You can find the ‘Record Monitoring‘ button directly under the volume knob of any given track in the REAPER tracklist.
Can I use REAPER Plugins in Other DAWs?
If you want to use REAPER plugins in other DAWs, you can use this link to find a collection of stock REAPER plugins that are available for other DAWs in VST plugin form.
This is not the entire collection of REAPER plugins; just a few of the more popular ones.
Can You Use REAPER Without an Audio Interface?
Yes, although having an audio interface or some type of external audio unit is ideal in the world of music production, you can use REAPER without an audio interface.
However, this will limit the type of microphones and audio monitoring devices you will be able to use. I strongly recommend acquiring an audio interface if you are serious about music production.
Can You Use REAPER Without a MIDI Keyboard/MIDI Controller?
Yes, you can =use REAPER without having a MIDI keyboard/MIDI controller.
Without a MIDI keyboard, you will still be able to record and mix audio tracks. Also, REAPER has a virtual MIDI keyboard that you can use to record virtual instrument plugins. Remember that the virtual MIDI keyboard in REAPER is not as good as an actual MIDI keyboard.
What Could Be Causing REAPER To Run Poorly for Me?
In my experience, the leading cause of REAPER running poorly is using too many plugins on a project.
If you do not have a high-performance computer to use for music production, you might notice that your system becomes easily bogged down as you start to add plugins or virtual instrument plugins onto your REAPER project.
Using the REAPER Performance Meter, you can view REAPER’s strain on your computer’s processor and overall performance. You can open this window by clicking View>Performance Meter in REAPER.
Is REAPER The only Digital Audio Workstation that Has a Performance Meter?
No, most DAWs, including Pro Tools, FL Studio, Logic Pro, etc., all have ways to monitor performance and check for performance issues.
Performance metering is an integral part of modern music production because of how computer-based it has become.
What Buffer Size Do You Use in REAPER?
The buffer size you should use in REAPER depends on your computer’s strength and whether you are recording or mixing. For example, my computer is pretty powerful, and I generally run a low buffer size.
For recording, I recommend a buffer size of 64. Depending on your computer, I recommend a buffer size of 1024 or more for mixing.
Is 512 Buffer Size Good?
In my opinion, 512 is a pretty solid buffer size that you can use for both recording and mixing because of how in the middle it is.
I recommend a buffer size of 64 for recording and 1024 for mixing, so 512 is pretty close to falling right between those two numbers.
However, keep in mind that it is best to run a low buffer size as long as your computer can handle it without lagging or other issues.
If you’d like to learn more, check out this guide to REAPER VST folders.