Importing a WAV file into REAPER is as simple as dragging and dropping the WAV file(s) into a REAPER project. REAPER will automatically create a track for it from there. You can also press Insert>Media file and import a WAV file.
REAPER Importing WAV Files

If you don’t know how to import WAV files into REAPER, you will have difficulty working with external audio samples. This will hinder your music production!
Thankfully, importing WAV files into REAPER is about as easy as it gets.
In this quick and simple guide, we will dive in and look at how to import WAV files into REAPER.
What You Will Need To Follow This Tutorial
Here is a list of everything that you will need to follow along with this tutorial:
- The REAPER DAW (Digital Audio Workstation)
- WAV files to work with
How To Import WAV Files Into REAPER
Let’s dive into importing a WAV file into your REAPER project!
Step One – Find Your WAV File(s)
The first step for importing WAV file types into REAPER is locating the desired file on your computer using the Finder (Macintosh) or the File/Media Explorer (Windows).
Once you have located the WAV file you want to import, you are ready to move on to the next step.
Step Two – Drag and Drop
Now that you have found the WAV file that you want to import into REAPER, select it, click it, drag it, and drop it into your REAPER project.
Just like that, you have successfully imported your WAV file(s) into REAPER.
All that’s left to do is clean it up a bit!
Step Three – Organize
The final step for importing a WAV sound file into REAPER is to organize the track into your project how you see fit.
Once you drop the file into your project, REAPER will automatically create a track for it. However, you will still have to group, name, and maybe change the color of your track depending on your workflow and the project at hand.
Once you have organized your file amongst your REAPER project, you are completely done importing your WAV file.
Alternate Method (Not As Quick)
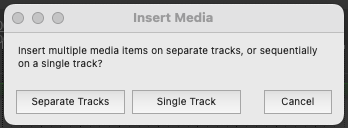
Another way that you can import a WAV file into REAPER is by clicking Insert>Media file and then locating your file that way.
While you can definitely import a WAV file using this method, I prefer the first method because it saves you a step but gives you the same results.
Can You Import Multiple Audio Files Into REAPER?
Yes, you can insert more than one WAV file into REAPER at a time by locating the files on your computer, selecting them all at once, and dragging/dropping them all at once into your REAPER project.
As you can see, importing multiple WAV files into REAPER is quick and easy!
Why Can’t I Import Wav Files Into REAPER?
The process of importing WAV files into REAPER is so simple that it is most likely an issue with the file itself if you cannot import the file.
If you are having trouble importing a WAV file into your REAPER project, I recommend analyzing the WAV file itself and ensuring that it is not corrupt or has no coding issues.
Go back to the WAV file’s source and ensure that you or someone else exported and sent it correctly.
The only real reason you might be unable to import a WAV file into REAPER is problems with the audio file itself.
Why Does REAPER Automatically Save WAV Files After Recording?
Although the function can be a bit irritating, REAPER automatically saves a WAV file after each recording to back up and protect the audio files in your projects.
REAPER is a non-destructive audio editing software that will not delete any audio files from your computer without you asking it to. This makes it so that you can ‘Undo’ almost infinitely (this has saved my behind so many times)!
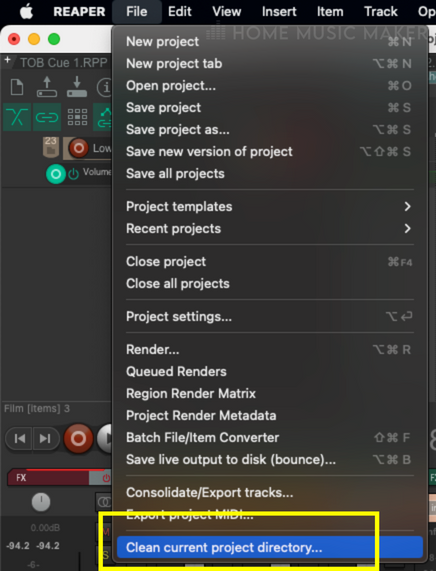
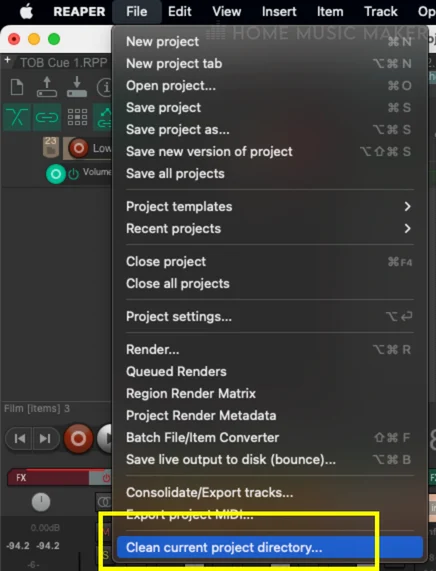
Also, suppose you want to clean up the number of audio files in your REAPER project’s media directory. In that case, you can click File>Clean current project directory.
This function will delete all of the audio files in the REAPER project’s media directory that are not directly referenced in the project.
If you want to use this function, make sure your desired REAPER project is saved in its own folder without any other REAPER projects.
If you do not, this function will delete the audio files for all other REAPER projects in that folder since they are not referenced in your target project; this will be a horrible time.
So once again, tread lightly using this function and only do so if you save each individual REAPER project in its own unique folder separate from your other projects!
Although it might be annoying to deal with a ton of audio files on your system, keep in mind that they hardly take up any space, and it is for your own good!
Related Questions
Should I Export My Track as WAV Or MP3?
You should always export the final version of your track as a high-fidelity WAV file. WAV files have much higher audio quality than MP3 files, so you should always use the WAV output format for the final version of your track. You should avoid using MP3 audio whenever possible while producing music.
Is WAV a Form Of Lossless Audio?
WAV is a form of lossless audio. The term lossless audio describes audio formats with no data loss; this means they are of high audio quality.
Can You Import MP3 Files Into REAPER?
Yes, you can import an MP3 file into REAPER by either dragging and dropping the file from your computer into a REAPER project or by clicking Insert>Media file and locating the file.
However, the MP3 file format is of lower audio quality than WAV files or other lossless audio formats. It’s best to work with lossless audio whenever possible.
Check this following guide if you are having problems importing items in REAPER.