KEY TAKEAWAYS:
You can normalize audio in FL Studio using the Edison audio editor or enabling normalization as a precomputed effect on an audio clip. You could also normalize a mixer channel by adjusting the volume while watching a peak level meter.
Normalizing In FL Studio
Audio normalization is an essential step in the audio production process. And it’s a lifesaver for electronic music producers using FL Studio.
It ensures that all audio files in a project have a consistent volume level. Which helps prevent audio clipping and distortion in the final output.
This article will discuss the importance of audio normalization and how to normalize audio in FL Studio properly. We will also cover some tips and best practices to keep in mind while normalizing audio in FL Studio.

What Is Normalizing Audio?
First, it’s essential to understand what audio normalization even is. It is a process of adjusting the volume level of an audio file to a desired level. A lot of times, this is 0 dB. But you can normalize audio to any level you want.
It is done by analyzing the audio file and adjusting its amplitude (volume) to reach the desired level.
The main benefit of normalizing audio is that it ensures that all audio files in a project have a consistent volume level. This helps prevent audio clipping and distortion in the final output, which can damage the overall quality of the audio.
It’s essential to remember that normalizing audio can cause issues if you are not careful. Check your audio levels before and after normalizing. This will ensure that the audio is comfortable listening and does not clip.
Also, it’s important to note that normalizing audio should not be used as a substitute for proper gain staging.
Gain staging is adjusting the volume of individual tracks and groups in a project to ensure they are at the correct level. Gain staging is performed in stages, in between every plugin in a track’s FX chain.
READ NEXT:
Many basic functions in FL Studio are super useful. For example, check out our guide on zooming in FL Studio.
Understanding The Different Types Of Audio Normalization
There are two main types of audio normalization: peak normalization and loudness normalization.
Peak normalization adjusts the volume of an audio file to a specific peak level, such as -0.1 dB. This ensures that all audio files have a consistent peak level. But it doesn’t take into account the perceived loudness of the audio.
Loudness normalization adjusts the volume of an audio file based on its perceived loudness. This is useful for ensuring that all audio files have a consistent perceived loudness.
Setting Up Your Audio Normalization Workflow In Fl Studio
I recommend keeping normalization separate from your workflow. Instead, I would only use normalization when it is needed most.
One method is to normalize all your tracks when you begin the process of mixing. Or before sending your stems to a mixing engineer. But it is best to check with your mixing engineer first.
Normalizing Audio Clips With Edison
One way to normalize audio in FL Studio is by using the Edison audio editing tool. To do this, add the Edison plugin to an audio clip you want to normalize.
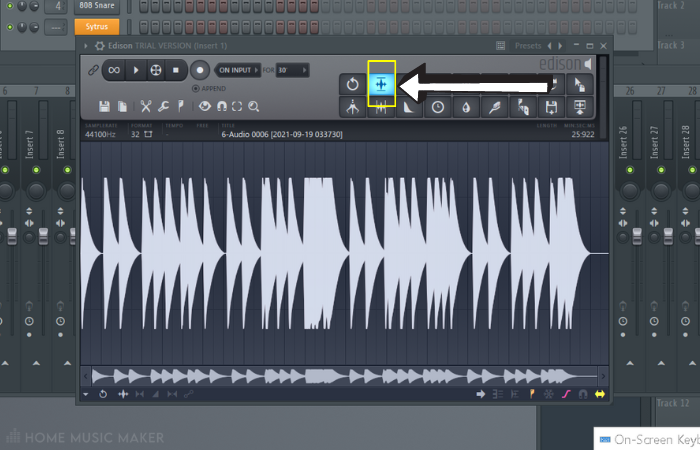
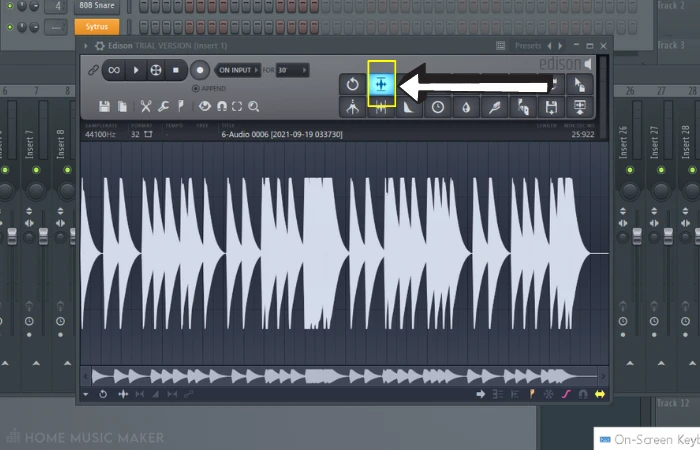
Next, open the Edison interface, and select the “Normalize” option from the processing menu.
This should normalize the sample to 0 dB.
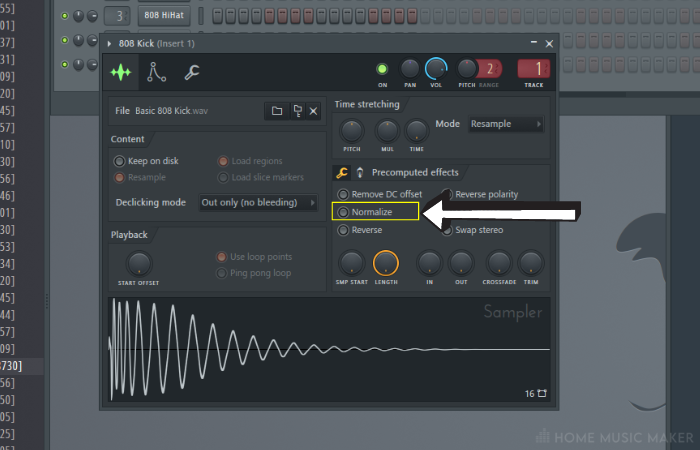
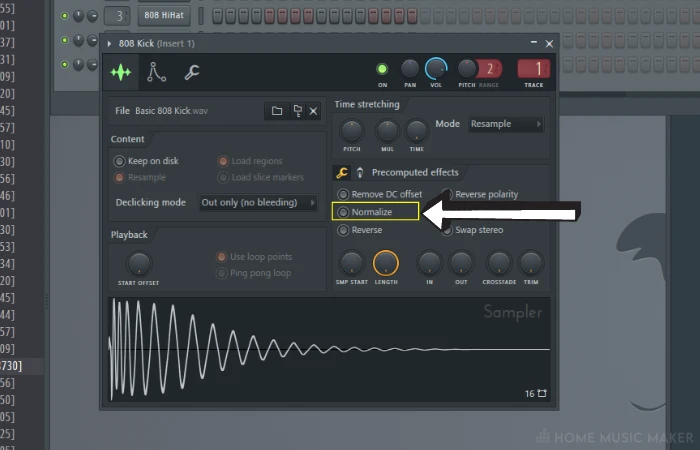
Normalizing Audio Clips As Precomputed Effect
Another way to normalize audio in FL Studio is by applying the normalization effect as a precomputed effect on an audio clip. To do this, right-click on the audio clip in the playlist and select “Precomputed Effects”> “Normalize.”
Normalizing The Overall Mix In FL Studio
The Fruity Peak Meter plugin can normalize the mix in FL Studio. To do this, add the Fruity Peak Meter plugin to the master channel in the mixer.
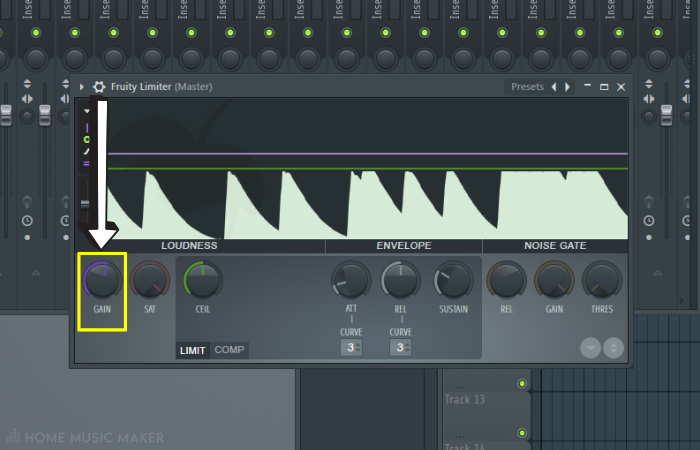
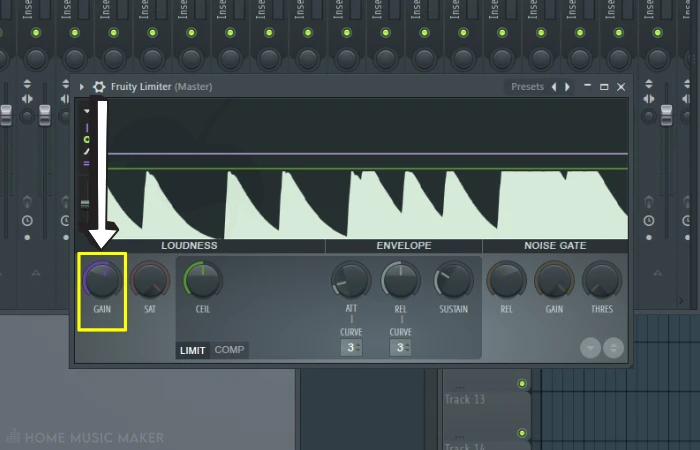
Next, play back your project and make a note of the peak level of the master channel. Finally, use the Fruity Limiter plugin to adjust the gain of the master channel until it reaches your target peak level.
Advanced Techniques For Normalizing Audio In Fl Studio
Once you understand how to normalize audio in FL Studio, you can start experimenting with more advanced techniques.
For example, you can use multiband compression to selectively normalize different frequency ranges of an audio file. This can be useful for bringing out some aspects of a track, such as the bass or vocals.
Common Mistakes To Avoid When Normalizing Audio
Normalizing when it is not necessary will do more harm than good. One common mistake is normalizing your mixdown and then calling it a day.
Normalization is not a substitute for mastering. This will leave your song lacking when compared to other tracks.
READ NEXT:
Another key thing to check for is distortion in your tracks that you don’t want. To learn more, read our tutorial on how to stop clipping in FL Studio.
Related Questions
What Are The Disadvantages Of Normalization?
There are a few potential disadvantages to normalizing audio:
Normalizing audio can result in a loss of dynamic range, which is the difference in volume between the quietest and loudest parts of a track. This can make the audio sound less dynamic and less enjoyable.
Also, it will bring up the noise floor along with the rest of the audio.
Is Normalization Always Necessary, Never Necessary, Or Only Applicable To Certain Situations?
Normalization may only sometimes be necessary. But it is often recommended in certain situations where consistency of volume level is needed. Especially when working with many audio files in a project.
Do You Ever Normalize Vocals?
Normalizing vocals can be a helpful technique in certain situations. Especially when working with many vocal tracks in a project. Or when there are many vocal takes.
By normalizing vocals, you can ensure that all vocal tracks have a consistent volume level. Making it easier to balance the vocals with the other elements of the mix.
What Is The Difference Between Normalize And Compression In Terms Of Audio Editing?
In summary, normalization is used to adjust the volume level of an audio file to a specific level. At the same time, compression is used to reduce the dynamic range of an audio file and make it sound more consistent.
Both techniques can be helpful in audio editing, but they serve different purposes. They should be used in conjunction with each other to achieve the desired sound.
Should I Normalize Audio Before Mixing?
You can, but it’s pointless since, while mixing, you will be changing the levels anyway.
Your tracks, when mixing, should be at most ~-6 dB peak.
Plus, you want to record at the proper levels, so you don’t have to normalize.
Final Words
By understanding how to normalize audio clips with Edison and normalizing the overall mix with Fruity Peak Meter and Fruity Limiter, you can take your audio to the next level. No pun intended.
Always be mindful of the target loudness level and avoid common mistakes, such as normalizing your mixdown instead of properly mastering it. So go ahead, and give your audio the professional touch it deserves!
READ NEXT:
Does your session feel slow and sluggish? Check out this guide on stopping FL Studio from lagging.