You can affect a vocal sample on its own, record voice directly into FL Studio, or use voice changer plugins to manipulate the audio, such as “Vocodex” or “Edison.” Alternatively, the vocal can be manipulated within its sampler window using the pitch shifter and time-shifting or Edison’s many effects.
How Can I Use FL Studio as a Voice Changer?
Working with a voice in FL Studio can seem daunting, confusing, and challenging, especially when considering the endless voice changer software options to choose from online.
That’s why I recommend proficiently using the stock tools and effects.
I’ve often worked with vocalists and rappers and find that accessing tools that work every time is essential for speeding up your workflow and creating superb effects.
In this guide, I’ll explain step-by-step how to use FL Studio as a voice changer and some tips I’ve picked up.
The first one is this… Go nuts – EXPERIMENTATION IS KEY!
Sometimes pressing each button randomly is a great way to pick up things you may not have in specified tutorials.
What You’ll Need To Follow This Tutorial:
- FL Studio
- Voice/vocal audio file(s) from packs or recordings
- (Optional) A microphone, either USB, via an audio interface, or even your computer mic!
How To Affect Voice Using The Sampler
Step 1 – Select Sample And Open The Sampler
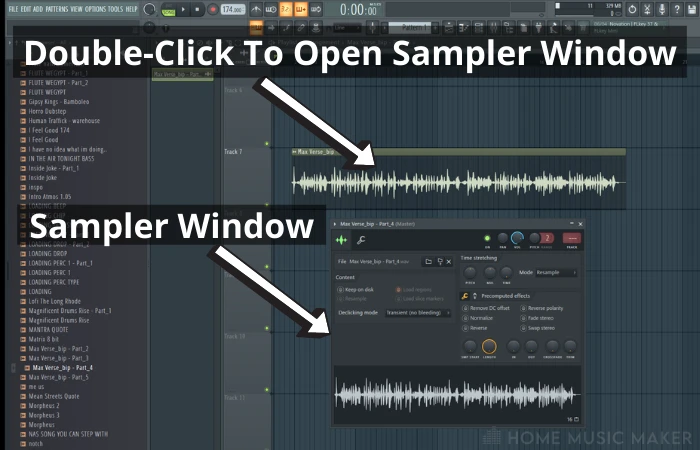
Drag your audio onto the playlist and double-click to bring up the sampler window (you will see a visual representation of your sample displayed here)
Step 2 – Time Stretching And Pitch Shifting
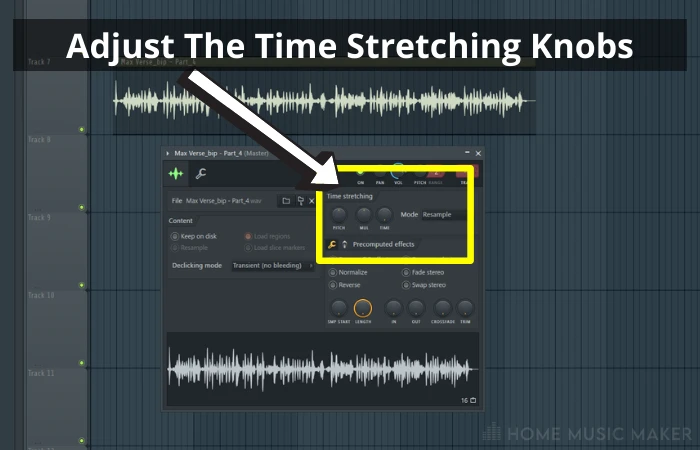
Each of these buttons affects the sample’s pitch or its length. With the pitch button, you can drop in any increment from -1200 cents (1 octave down) up to +1200 cents (1 octave up).
This can be used to match your vocal sample to different keys for your song or make minor tweaks as you wish.
pro tip
Remember 100 cents is equal to 1 semitone.
The Mul button is a multiplicator that adjusts the pitch and stretches the length of the sample out (At least commonly used as it can be temperamental).
Lastly, the time button will shorten or lengthen the audio as a whole. Bear in mind that any time adjustments will heighten the pitch by default.
This can be changed in the Mode section (try changing this to stretch to keep the pitch the same).
Step 3 – Create Unison Voices By Layering
This is a personal favorite of mine!
Paste a second instance of your vocal sample into your playlist, make it unique and then try adjusting the pitch while leaving the original as is.
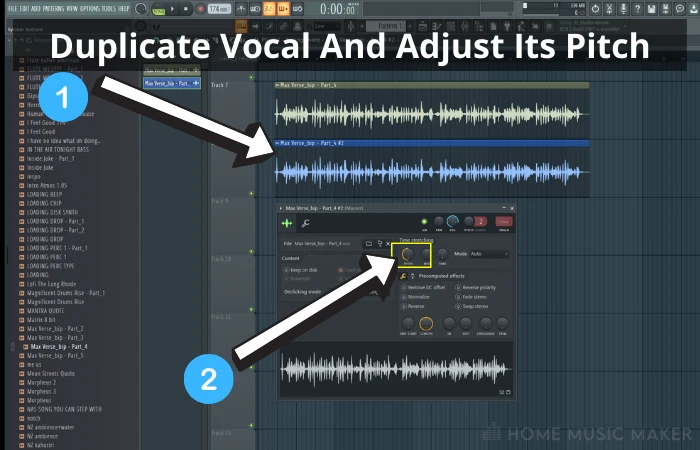
The result is multiple voices at once, which can be hugely valuable when you want to create a chorus effect.
pro tip
The sampler is basic in its appearance but don’t let that fool you! There are loads of potential outcomes in terms of a voice changer. Look at the “precomputed effects” section, where you can add distortion, reverse, reverb, and filter EQ.
How To Affect Voice Using Vocodex
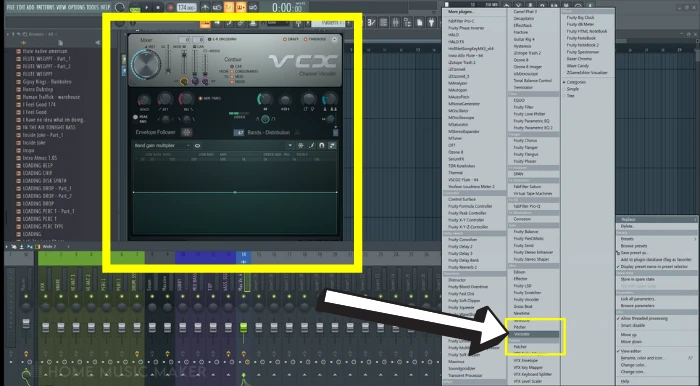
Step 1 – Open “Vocodex” In Your plugin List On The Mixer
When you select the drop-down and the menu opens, hit “V” on your keyboard to jump to and cycle all plugins starting with V. This applies to EVERY menu you open in FL Studio!
Step 2 – Have Fun Experimenting!
Firstly, ensure your song is playing the selected voice loop or sample (Right-click hold and drag along the bar-counter slider in playlist view to set the loop).
The best advice is to play around with controls when it comes to certain plugins.
Try cycling through the presets in the top-right corner. It will give great results that you can then “reverse engineer,” – meaning it will show you what dials and effects are at play within the plugin.
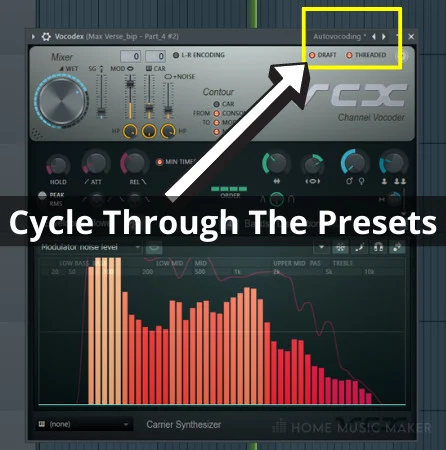
From here, you can hear the audio effect it gives and a visual indicator and tweak to your liking. You can see the EQ section light up in the below image.
pro tip
Any time your cursor is positioned over a knob/effect/slider, it will show you its name in the top left corner of FL Studio. For example, in Vocodex, it could be the unison or bandwidth effects.
Step 3 – Adjust How Wet And Dry The Effects Are
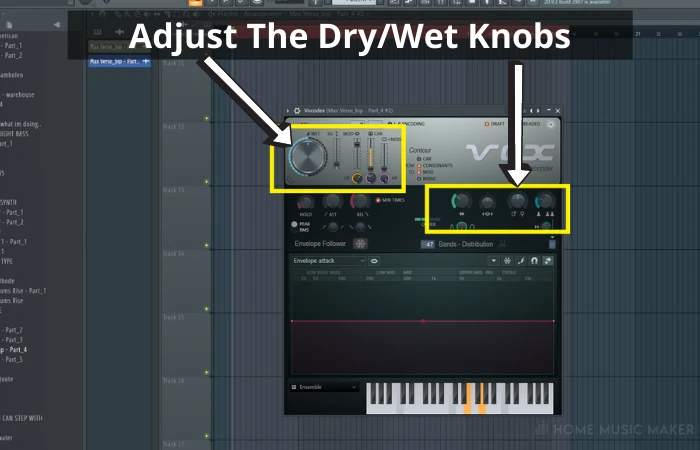
There are too many aspects of this plugin to break it down entirely, but being an overpowering option for vocals, it’s important to note the Dry/Wet knob in the top section.
This is the amount of the plugin’s effect that is affecting the actual audio sample.
The dials that show the female and male symbols and the ones on each side are the best go-to ones to give interesting effects.
But use them sparingly as they can be drastic.
How to Affect Voice Using Edison
Step 1 – Open Your Voice Sample In Edison
Right-click your sample in the sampler window and select “Edit in audio editor” to open it with Edison.
Alternative: you can select Edison from the drop-down on your mixer too.
Edison has various effects: reverb, cutting, splicing, fading in and out, time stretch, normalization and levels adjustment, and formant editing.
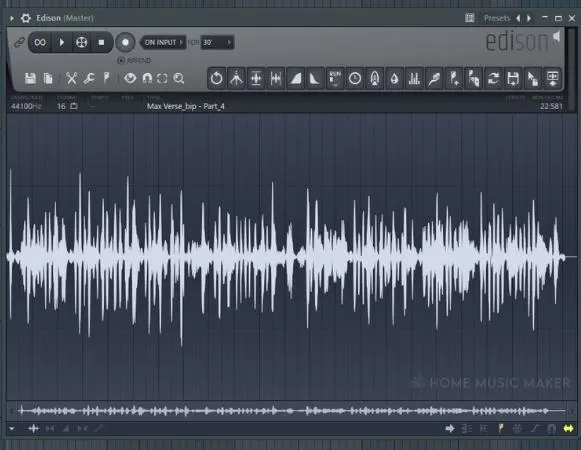
All of this, along with it being the primary tool for recording instruments or microphones.
Let’s work with the most practical voice-changing tool – Formant & Time Stretch.
Step 2 – Formant Editing
Either left-click and drag to select a specific part of your audio, or you can work with the whole sample.
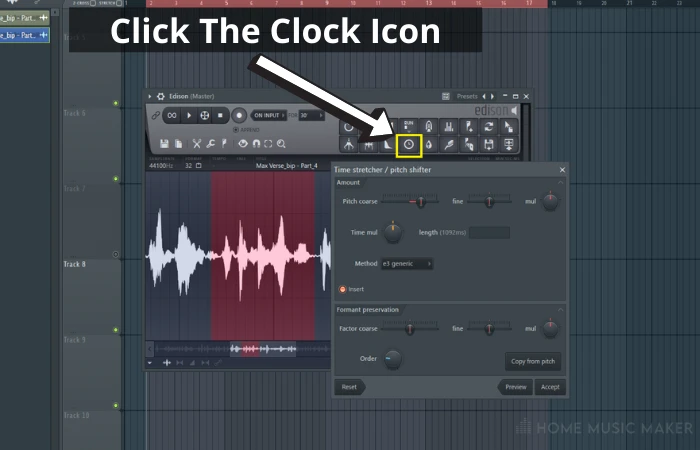
Select the clock icon to bring the Time stretch window up.
Step 3 – Fine-Tuning Pt. 1
Here we can make adjustments to either the coarse pitch or fine-tuning. This is done on a much tighter scale than in the regular sampler window.
The mode section allows you to choose if the output is mono, general (stereo), or speech mode.
Note: As you make each change, hit the preview button to see how it sounds!
Step 4 – Fine-Tuning Pt. 2
While pitch-shifting will change the key the sample is output in, formant will keep the sample within the original key and only change the timbre of the sound (color or tone).
This is especially interesting when layering different voices or hooks in a song.
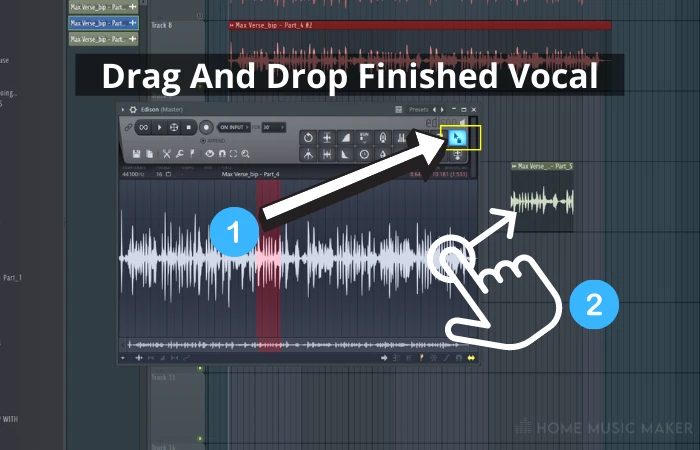
Step 5 – Happy With The Result? Paste It Back Into The Playlist
Learning this was a lifesaver for me. After hitting “accept” on the formant window, look for the cursor icon in Edison.
Then left-click hold and drag off and into your main playlist window to drop the newly edited sample in. Bear in mind that if you drop it over the original, it will be replaced, so to avoid that, drop it elsewhere.
Related Questions
Does FL Studio Have A Voice Changer?
Absolutely, there are many ways to affect a voice built-in!
How Do I Make A Female Voice In FL Studio?
The best and most accurate way is to start with a female voice or record one in. However, utilizing the Formant section through minor adjustment and pitch-shifting can characterize the voice tone to sound more female.
Voice Changer Plugin For FL Studio?
FL Studio has built-in voice changes – Vocodex, Edison, or Newtone.
Is FL Studio Good For Vocals?
Like all DAWs, it really is what you make of it. Experimenting is the best part. It is just as good as any other program.
How To Process Vocals In FL Studio?
EQ’ing different parts of the sound to reduce or increase frequencies along the spectrum can make the vocal sound cleaner. Volume control and compression will help control peaks and the overall mix.
How To Make A Voice Deeper?
Drop either the pitch or the formant. Additionally, stretching the time of the vocal sample will slow it down and therefore deepen it.
How to change the key of a vocal?
Only adjusting the pitch will change the key. It will need to be adjusted in either half octaves of 600cents or a full octave of 1200cents to change its key.
Check the following article to learn more great tips, including how to change the velocity of multiple notes in FL Studio.

 Want to connect with other music producers for help and guidance?