REAPER comes with a stock equalizer plugin called ‘ReaEQ.’ You can use ReaEQ to program your own frequency curve, but you can also choose from its various EQ presets. ReaEQ has presets for drums, bass, guitar, and vocals and more general frequency curves like different filters.
Using REAPER’s EQ Presets
Unfortunately, you will fall behind as a music producer if you don’t know how to properly EQ (equalize) during the mixing process.
EQing is the act of sculpting the frequency range of a part of your mix, and REAPER has a few dozen presets that you can use to help you do this.
Becoming capable of EQing and using an EQ plugin has allowed me to push my music production to the next level!
In this comprehensive deep dive, I will show you some REAPER EQ presets and how you can use them in your mixes.
What You Will Need To Follow This Tutorial
Here is a list of what you will need to follow in this tutorial:
- REAPER DAW (Digital Audio Workstation)
- ReaEQ (Included in REAPER)
- A mix that needs EQing
EQ Preset Foreword
Before we get into using REAPER EQ presets, I want to mention my take on using EQ presets.
Although they can be handy, especially for beginners, it is best to learn how to program your own frequency curves and do your EQing manually.
If you do decide to use EQ presets, make sure that you make some adjustments to them after you apply them so that they fit your specific mix. You can’t just apply a preset and call it a day.
Step One – Drums
Let’s begin the EQing process by sculpting the frequency spectrum of my drums.
To do this, start by inserting an instance of ReaEQ on each of your drum tracks.
Let’s get to work.
Drum BUS – Mud Free
On my BUS track (the track that controls all of my individual drum tracks), I will use the ReaEQ preset ‘Mud free‘ to cut any unneeded low frequencies on my entire drum track.
Remember, if you use presets, you should adjust them as needed to fit your mix.
Kick Drum – Basic 11 band Kick
For EQing a kick drum, I like to use the ReaEQ preset ‘Basic 11 band kick‘. This preset boosts your high and low frequencies and cuts your mids.
I like to adjust a few things with this preset, such as where the low and high boosts are.
Snare – Basic 11 Band Rock Snare
If I’m EQing a snare drum, I like to use the ‘Basic 11 band Rock Snare‘ preset.
This preset will help you add some presence in your track’s low and high range and cut the boxy mid-range.
Toms – Basic 11 band Toms
I use the ‘Basic 11 band Toms‘ preset to mix toms and make a few adjustments according to the toms I’ve recorded.
This preset scoops the mids and boosts the more pleasant frequencies in your toms.
Overheads – Basic 11 band Cymbals
My favorite ReaEQ preset to use on a pair of drum overheads is ‘Basic 11 band Cymbals‘.
This preset cuts a bunch of unneeded low frequencies and boosts the high frequencies where your cymbals will be.
Step Two – Bass – Basic 11 Band Rock Bass
The next part of your mix that we need to EQ is the bass guitar.
I recommend using the ‘Basic 11 band Rock Bass‘ preset to EQ your bass guitar and tweaking it for your mix.
With our bass EQed, let’s move on to our guitars.
Step Three – Guitar – Close Mic Acoustic / Basic 11 Band Fender Or Mesa / Basic 11 band Marshall
You will notice that REAPER has a preset for acoustic guitar and a few presets for electric guitar. You can use the ‘Close Mic Acoustic‘ preset for acoustic guitar.
I recommend either the ‘Basic 11 band Fender or Mesa‘ or the ‘Basic 11 band Marshall‘ presets for electric guitar.
My mix only uses electric guitars, so I will be using the ‘Basic 11 band Fender or Mesa‘ preset.
Now that I have the desired preset on my guitar track, I just need to make a few adjustments to the frequency curve, and I’m ready to move on.
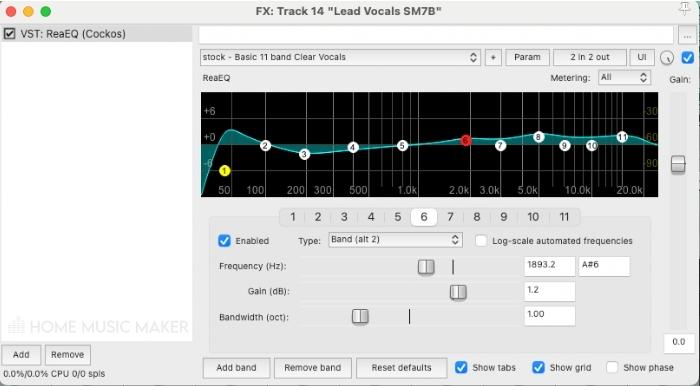
Step Four – Vocal EQ – Basic 11 band Clear Vocals
The final element of our mix that we need to EQ is the vocal track.
REAPER has a few presets for vocals, such as background vocal presets, male vocal presets, female vocal presets, etc.
However, I’m working with lead vocals today, and I like to use the ‘Basic 11 band Clear Vocals‘.
This preset will give your vocal track some serious clarity by cutting the mids and boosting the highs.
Now you have seen how you can use REAPER EQ presets to completely EQ your mix.
You can also see that REAPER has additional EQ presets for things like electronic drums, synths, and more that you can use.
Today’s mix just didn’t call for it.
Other Great EQ Presets
Basic 100/150 HPF
These are two of my favorite REAPER EQ presets because although they are simple, they are endlessly helpful when mixing and mastering.
Both of these EQ presets are High Pass Filter (HPF) that will help you cut excess low end at either 100 or 150Hz.
Sometimes the most helpful music production tools are the most simple.
Move to the Back
This EQ preset is awesome because it gives you the effect of something sounding very far away and drowned out.
Give this EQ preset a try if you are looking for a unique effect on something in your mix.
Track Default
This following EQ preset is one of my favorites because I often use this type of EQ curve.
This EQ preset cuts out lows and low-mids and boosts the high mids and highs just a bit.
I find this type of EQ preset very helpful in my mixing, and it’s something I use in every single one of my mixes at least a few times.
Pads locut [snk]
Pads locut is an awesome REAPER EQ preset that chops off low-end to clean up synth pads with too much low end.
Keep in mind that you can also use this preset to clean up other tracks that have too much low end.
Notch @50Hz [snk]
The Notch @50Hz preset is another one of my favorite REAPER EQ presets.
The Notch @50Hz preset gives you a notch filter in the sub-bass region. It helps clean up elements in your mix with too much sub-bass.
Too much sub-bass can make your mix sound boomy and unpleasant.
Electro Drums Smooth [snk]
Finally, the Electro Drums Smooth [snk] EQ preset is great if you want to clean up an electronic drum BUS track.
This preset cuts out some low-end and low mids to make your electronic drums sound cleaner and crisp.
Does REAPER Have An Equalizer?
Yes, REAPER has an equalizer plugin called ‘ReaEQ.’ ReaEQ is an excellent visual EQ plugin that you can apply as many frequency bands as you need to sculpt your sound.
ReaEQ also has some presets that you can use to get you started.
Best EQ Presets?
In my opinion, the best EQ presets in ReaEQ are drum presets such as ‘Basic 11 band Kick‘, ‘Basic 11 band Rock Snare‘, ‘Basic 11 band Toms‘, ‘Basic 11 band Cymbals‘, etc.
Although there are some great presets for guitar, bass, vocal, etc., I find the drum presets the most helpful.
What Are EQ Presets?
An EQ preset is a pre-programmed EQ frequency curve that comes included with an equalizer plugin. EQ presets are a great way to get you started on EQing a track, especially if you are a beginner.
However, it is crucial if you are serious about music production to learn how to manually EQ a track without presets, but they are convenient for rookies.
How Do You Use ReaEQ?
To use ReaEQ, start by inserting the plugin on the track you want to EQ.
Now you can apply and adjust however many frequency bands that you need to shape the sound of your mix.
You can also use the several dozen presets in ReaEQ if you need help to get started.
Does REAPER Have A Dynamic EQ?
Although REAPER has several stock equalizer plugins, it does not have a dynamic EQ plugin.
Keep in mind that you can use pretty much any third-party plugins in REAPER that you want.
This means you can use another dynamic EQ plugin from another source.
How Do You Change The EQ In REAPER?
To change your EQ frequency curve in REAPER, you can use one of REAPER’s stock EQ plugins from the ‘Cockos‘ or ‘JS‘ collection.
I recommend using ‘ReaEQ.’
ReaEQ is my favorite stock REAPER plugin because it has a visual display and a nearly unlimited number of frequency bands.
To use ReaEQ to change your frequency curve, insert it onto your track and apply and adjust bands as you need.
Related Questions
Does REAPER Stand for Something?
Yes, REAPER is an acronym for Rapid Environment for Audio Production, Engineering, and Recording. Cockos developed and released REAPER in 2006.
Does REAPER Have a Tuner?
Yes, REAPER has a plugin called ‘ReaTune‘ that has a tuner feature.
You can also use REAPER to automatically/manually pitch correct vocals.
Does REAPER Have a Synthesizer?
Yes, REAPER has a synthesizer plugin called ‘ReaSynth.’
Keep in mind, though, that ReaSynth is a very low-quality and weak synthesizer plugin.
Still hungry for more? Check out the following article looking at other REAPER plugins.