| Key Takeaways |
|---|
| The key of a song refers to the set of notes and chords that make up the music’s foundation. Understanding it is essential to manipulate music digitally. |
| Changing the key in FL Studio can be done in different scenarios: changing the key of a whole project, a sample or track, and a MIDI part. Each has different procedures. |
| Changing the key of a whole project in FL Studio can be done using the Master Pitch knob, found in the top-left corner of the main window. You can increase or decrease the project’s pitch by an octave. If using third-party plug-ins, you may need to adjust these tracks manually. |
| To change the key of a sample or a track, double-click on the desired audio clip or track in the Playlist, and adjust the Pitch knob under the Time Stretching section in the Sample Settings window. |
| Changing the key of a MIDI part is done through the Piano Roll. Double-click on the MIDI clip you want to change, select all the notes in the part, and choose the transposing options under Edit. |
FL Studio & Keys
Changing the key of music is something that’s been around way before digital audio workstations came to play.
However, thankfully now you don’t need to know nearly as much music theory to understand how to do it in a digital environment, such as FL Studio.
That doesn’t mean that you won’t need help with this, though, as it can be tricky to understand from the get-go.
In this article, we will show you exactly how to change the key of a song, sample, and MIDI part within FL Studio, plus any relevant theory that goes along with this.
What Is The Key Of A Song?
Before learning about changing the key of a song, you should have an understanding of what the key of a song actually is.
The key of a song refers to the set of notes and chords that make up the foundation of a piece of music.


It determines which scales we can use in a song, but there are always creative ways to break these rules. In most popular modern music, we will want our tracks to use the same scale and be in the same key.
It is elementary music theory but essential to always pay attention to it. You will need to at least know the possible keys in music for this tutorial, but just the major and minor ones.
It will also massively help you to understand what a relative minor is. This minor scale has the same key signature as its relative major scale but starts on a different note.
Using relative minors, we can transpose a sample in a major key to match a project in a minor key.
The relative minor of any major scale can be found by decreasing the root note of the major scale by three semitones. For example, the relative minor of G Major is E minor.
Now that you know all the theory needed for this tutorial, let’s dive in.
How To Change The Key In FL Studio
Different scenarios exist for changing the key in FL Studio, so let’s go through them.
Changing the key of a whole project is taking every single track and element of the project and pitching it up or down together. This could be to change the key in the middle of the song for effect using automation or to change the key for stylistic or performative reasons.
Changing the key of a sample or track applies to any audio. This can be a single shot sample, a loop, a recording, or even a whole song. This can be to fit a sample into a track in terms of the key, to change an entire song for remixes, and much more.
Finally, we can change the key of a MIDI part. This is for the same reasons as changing the key of a sample but requires a different process.
Changing The Key Of A Whole Project
Luckily, out of the three, changing the key of the whole project is the easiest and quickest. Of course, if you’re using third-party plug-ins, they may not integrate well with FL Studio and change with the global pitch. In this case, you’ll have to adjust these tracks manually.
Step 1: Locate the Master Pitch knob in the top-left corner of the main FL Studio window, to the right of the Hint Panel.
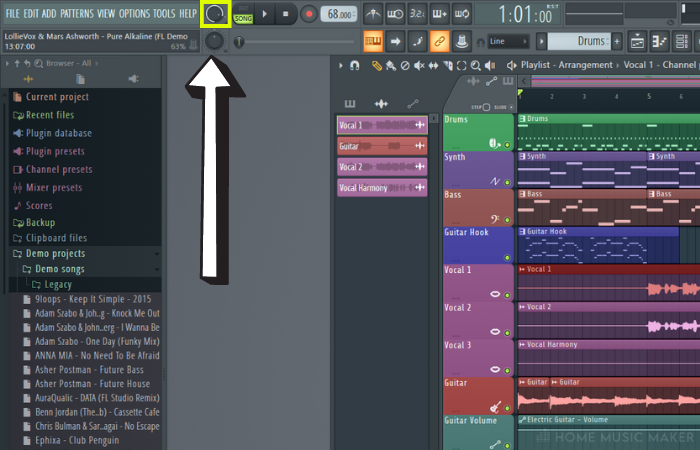
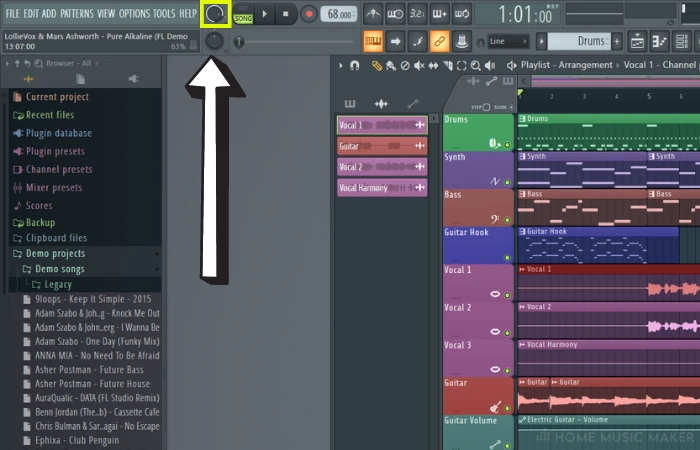
Step 2: You can increase or decrease the project’s pitch by an octave. It’s measured in cents, but the knob does stop at every semitone. One hundred cents make a semitone, so adjust this accordingly.
For example, if I have a project in the key of A Major and want it to be in B Major, I will increase the Master Pitch by 200 cents (2 semitones).
There have been many times when I’ve written a song, and I just feel that it would sound better a semitone lower. I have no idea why a semitone does the trick, but when I drop the key that small amount, the vibe just works well.
Doing this on each track would be a pain, so being able to change the key of the entire song is vital.
Changing The Key Of A Sample or Track
I work with loops a lot, and sometimes you find a loop that’s perfect for the song, but it’s in a different key. Rather than disregard the loop entirely, we can alter the key to make it fit with the song. It was honestly a game-changer for me once I figured this out.
Changing the key of a sample or track is precisely the same process except for the first step. It just depends on what you double-click.
If you want to change one audio clip, follow the sample instructions in step one. For all the clips in a track, follow the track instructions.
Step 1: With the Draw tool, double-click on an audio clip to change the key of a sample or on the track in the Playlist to change the key of the track. This will bring up the Sample Settings for either scenario.
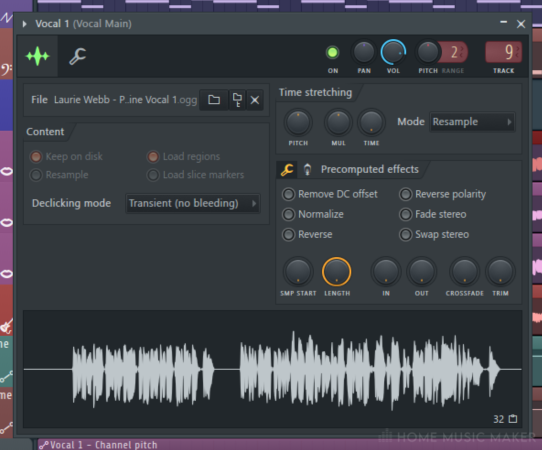
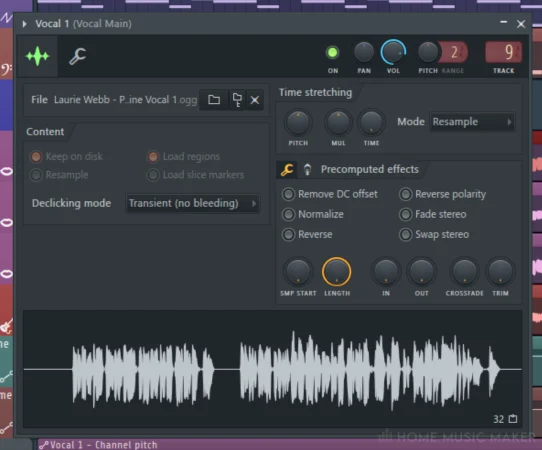
Step 2: Within the Sample Settings window, go to the Time Stretching section and locate the Pitch knob. Here you can change the key by increasing or decreasing this value. Every 100 cents is a semitone, so adjust it to the key you want the sample to be in.
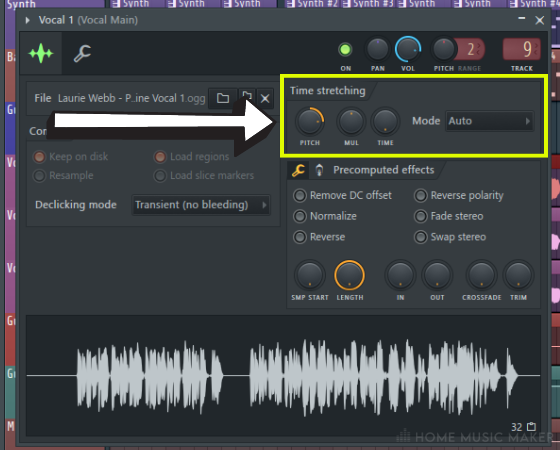
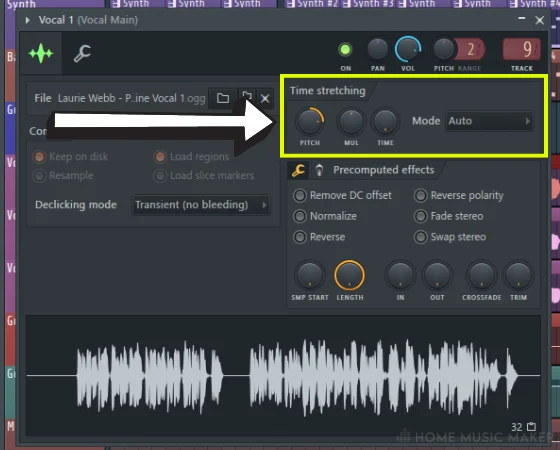
For example, if I have a project in the key of B minor and a sample in the key of G# minor, I will need to increase the sample’s pitch by 300 cents (3 semitones).
READ NEXT:
For an even more unique sound, read our article on sampling in FL Studio to create your own sounds to transform.
Changing The Key Of A MIDI Part
You may be thinking, “Why do I need to change the key of a MIDI part? Didn’t I draw or record it in?”. However, you’d be surprised at how useful this is.
Firstly, you could use MIDI packs to start a song but not like the original key. There is also the case where you’ve played something for a particular project but realized it would work better in a different song that is in a different key.
Changing the key of a MIDI part is very straightforward as well; we have to use the Piano Roll rather than the Sample Settings.
Step 1: With the Draw tool, double-click on the MIDI clip you want to change the key of. This will bring up the Piano Roll with the MIDI notes.
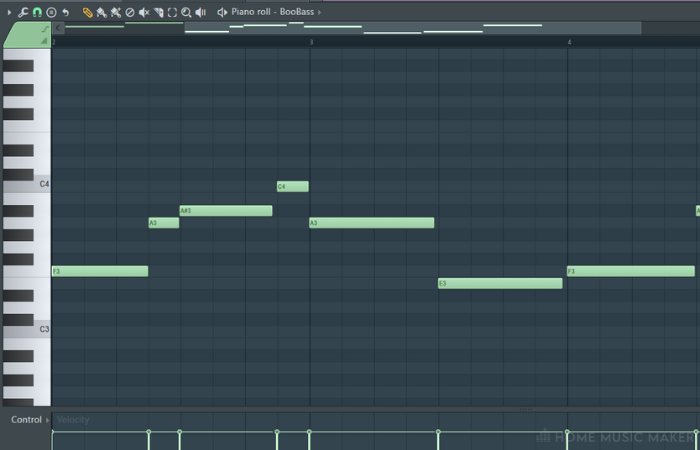

Step 2: Select all the notes in the part by pressing CTRL + A for Windows and CMD + A for Mac.
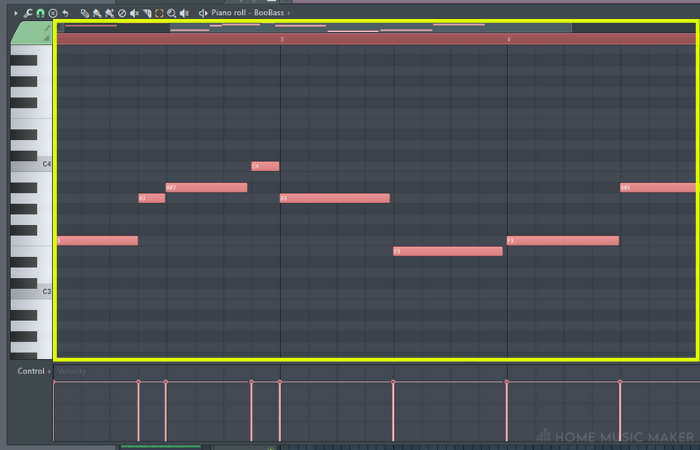

Step 3: Click on the arrowhead icon in the top-left corner of the Piano Roll window, hover your mouse over Edit, and you will see some transposing options in the second section. The Transpose Up and Transpose Down options are both in increments of a semitone.
So if you have a MIDI part in the key of C# minor, and I want it to be in F# Major, then I will need to increase the key of the MIDI part by 200 cents (2 semitones).
This is because the relative major key to C# minor in E Major (3 semitones up). I can increase E Major by two semitones to get to the target key of F# Major.
READ NEXT:
Changing the key of a MIDI part is one way to affect how it feels, but another way is described in our guide to changing the velocity in FL Studio.
Finding The Key Of A Sample In FL Studio
Sometimes, you have a sample that you need to know the key to. If you’re lucky, then the key is already in the sample title, but that’s not always the case.
I usually figure this out by jamming on the guitar or keyboard to it and finding the key that way. However, you can get some idea of the key of a sample in FL Studio.
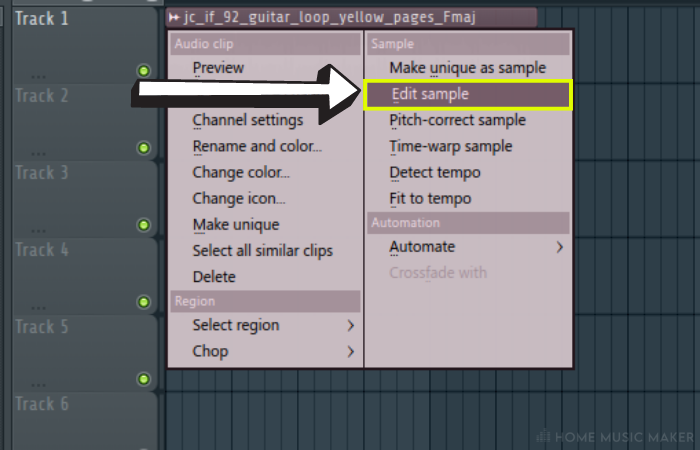
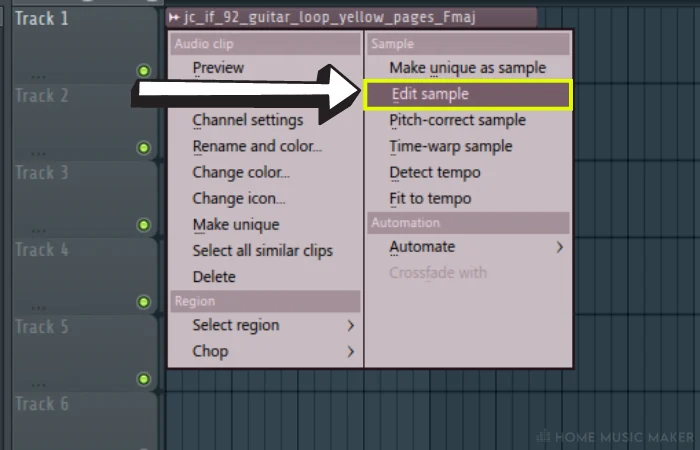
Step 1: On your sample audio clip in the Playlist, click on the audio wave icon in the top-left corner of the clip with the Draw tool. Here, select Edit Sample within the Sample section. This will bring up the Edison window.
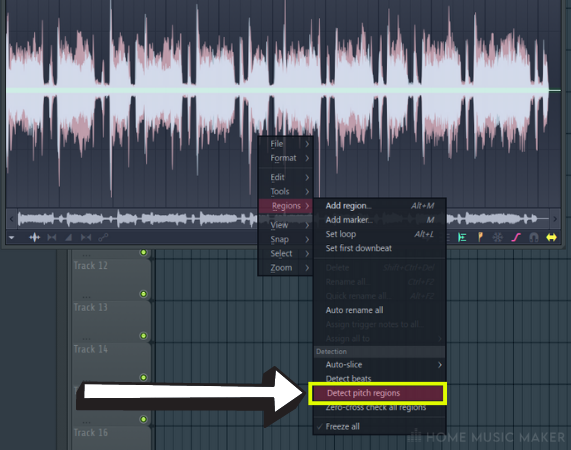
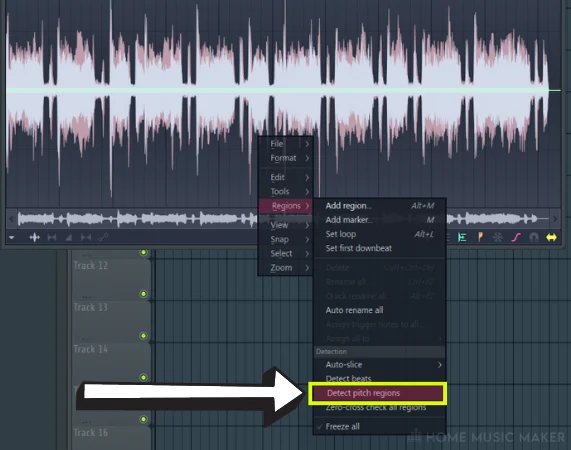
Step 2: Right-click the sample’s waveform, select Regions, then Detect Pitch Regions. This will cause yellow/orange lines to appear all over the waveform.
Step 3: Zoom into the waveform using the scroll on your mouse, and look at the notes the lines correspond to. From here, we can work out the key.

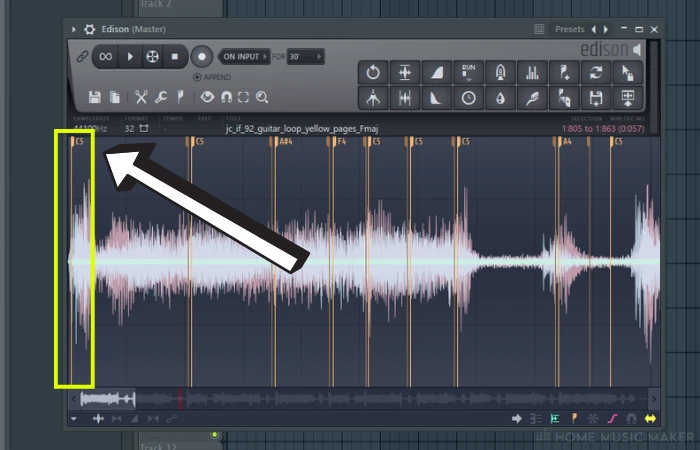
Step 4: Write down the notes you can see on these lines, and then work out what key these notes belong to. At first, you’ll need to check them against a scale cheat sheet. However, the more you do this, the better and quicker you will get without help.
For example, in the case of the sample I am using in this screenshot, I can see that the notes found are C, A#, F, and A. Well, F, A, and C make up an F Major chord. A# is also in the key of F Major, so that’s our key. I already know the key of this sample as I got it from Splice, and I can confirm that this is correct.
Related Questions
What Are Some Techniques For Changing The Key Of A Song In FL Studio To Create A Different Mood Or Feel?
Moving the key up by a few semitones can create a brighter and more uplifting mood, while shifting the key down can make a darker and somber mood.
Also, if your track has vocals, experiment with different keys to get the right tone and performance out of the singer. Even changing by one semitone can make so much difference.
How Do I Use Automation To Change The Key Of A Track Over Time In FL Studio?
Right-click the Master Pitch knob in the top-right of FL Studio, and select Create Automation Clip. In the automation track that appears, you can use this to change the key of a track over time. Remember, that 100 cents is a semitone.
What Are Some Common Uses For Changing The Key Of A Song In Music Production?
The most popular use of changing the key of a song is to fit a singer’s range or get a specific tone out of the singer’s voice. Another prominent use is to change the song’s key for the last chorus for extra impact and energy.
When a producer remixes a track, they may change the key of whatever audio they are remixing to get the right feel, timing, and texture for their creation.
What Popular Songs Have Been Transposed To A Different Key, And How Does It Affect The Feel Or Mood Of The Song?
“I Will Always Love You” by Whitney Houston was initially written and performed by Dolly Parton in the key of A major. Whitney Houston transposed it to the key of D major, which allowed her to showcase her vocal range and added a brighter, uplifting feel to the song.
“Hallelujah” by Leonard Cohen has been covered countless times. This means it’s been transposed to many different keys by various artists, and each version has a slightly different feel. Jeff Buckley’s famous cover version is in the key of C major.
“My Heart Will Go On” by Celine Dion was initially written and performed in the key of E major but has been transposed to the key of C major by many singers. This change makes the song easier for those with lower vocal ranges. What’s incredible is that Celine Dion tracked this song in one take on the first try!
What Tips Can I Use For Changing The Key Of A Sample Without Affecting The Sound Quality In FL Studio?
FL Studio has several pitch-shifting plug-ins, such as Pitcher, Newtone, and Harmor. These plug-ins can adjust the pitch of a sample without affecting the sound quality too much.
Time-stretching a sample can help you adjust the pitch without affecting the tempo or the sound quality too much. FL Studio has a built-in time-stretching algorithm called Stretch, which can be applied to samples.
One of the most important things is to start with a high-quality sample can help minimize any artifacts that may occur when pitch-shifting or time-stretching. If you start with a low-quality sample, it can only get worse.
READ NEXT:
For another critical aspect of altering your music, check out our article on changing the tempo in FL Studio.