The most straightforward method is to open your piano roll editor and navigate to the bottom of the window. MIDI notes will have a set of bars at the bottom of the screen indicating their velocity value. Left-click and hold, then drag the slider up or down to increase or decrease its velocity.
Changing The Velocity Of Multiple Notes In FL Studio
I’ve run into many moments where I felt “stuck” in my time using FL Studio. One of the earliest and most annoying moments was the adjustment of MIDI note velocity.
Velocity plays a massive part in music of every form. It conveys the overall emotion of the notes being triggered.
Understanding this technique will have a huge impact on your sounds, workflow, and general impact of the song you are creating.
There are different ways to perform the same actions in FL Studio. Still, by the end of this article, you will completely understand the various methods of changing the velocity of multiple notes.
What you will need to follow in this tutorial
- Computer with FL Studio
- An open mind
How To Change The Velocity Of Notes in FL Studio
Method One – Step 1 – Locate Your Piano Roll
Hover your mouse cursor over the Piano Roll icon and left-click to open the window.


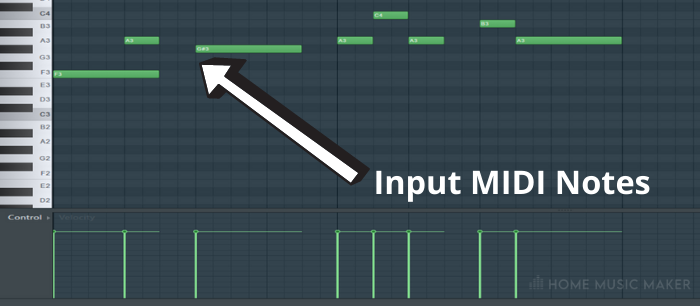
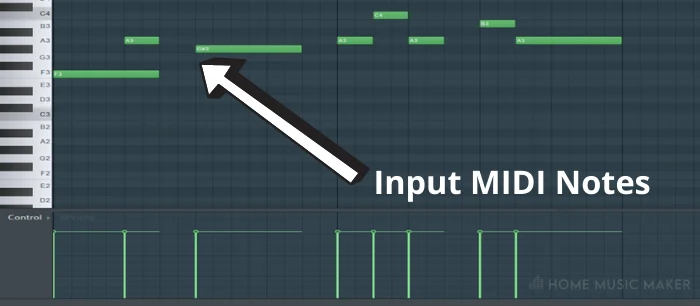
Step 2 – Input Some MIDI Notes
Left-click in your desired spots for MIDI note placement. (Anywhere will do, this is all a learning curve).
Step 3 – Click And Drag The Velocity Bars
Click and drag (up or down) the velocity bars at the bottom (FL Studio is set to velocity by default, as shown on the left of the screen)
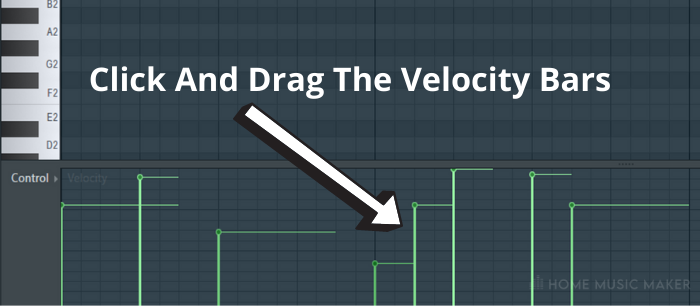
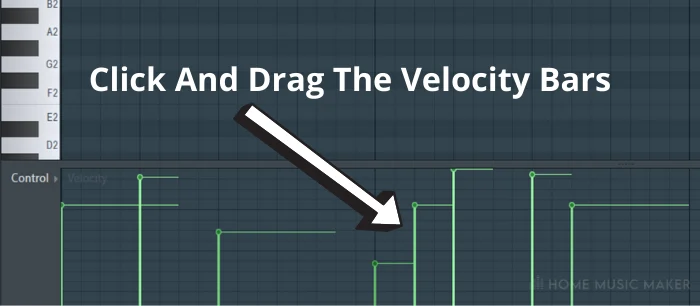
Alternative: you can click without dragging to jump the bar to a certain point.
It’s that easy!
You can test the play-through for hearing how the different velocity rates trigger each note. Low ones will sound quiet, as though lightly hitting a piano key.
In contrast, the higher register velocities will be similar to hitting a piano key with more force.
But just like a real piano, more velocity means more volume, too, so be wary!
Method Two – Step 1 – Repeat Steps 1 – 2 from Above
Follow steps 1 and 2 from the previous method.
Note: you may not need to do this if your selected notes are still pasted into the window from earlier.
Step 2 – Select Multiple Notes At The Same Time
Click the “Select” icon in the toolbar.
Step 3 – Adjust Specific Notes
Left-Click and Drag Over The Specific Note Or Notes You Wish To Adjust.


Alternative: If you wish to highlight all of your notes, you can use the keyboard shortcut Ctrl+A.
Step 4 – Adjust Velocity Levels
Hold ALT And Scroll Mouse Wheel To Adjust All Velocity Levels Together.
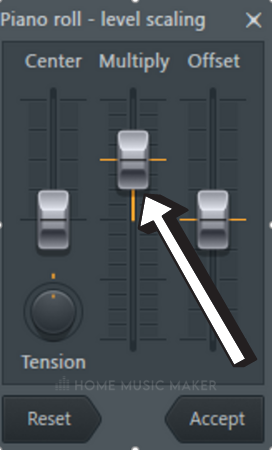
Alternative: If you don’t have a mouse scroll, you can use the shortcut ALT+X to bring up the slider and manually adjust the “Multiply” fader.
Note that this applies to all notes that are highlighted.
Bear in mind that you can still individually adjust desired note velocities at any time. Simply right-click to deselect all the notes and then left-click whichever one you want to change separately, as some may sound better suited than others.
Related Questions
How Do You Change Velocity In FL Studio?
This can be done by either means mentioned above: In the piano roll window, left-click individually to adjust each midi note manually, or hit ALT+X to increase or decrease as a group.
How Do You Select Multiple Notes In FL Studio?
Either CTRL+A to select all notes, or hit the select tool/SHIFT+E and then left-click drag.
How to Delete Multiple Notes In FL Studio?
Right-click (hold) and drag over whichever notes you want to delete.
Alternative: If you have the “Select” tool enabled, you can left-click drag over the desired notes and hit Delete on your keyboard
How to Make All Notes Same velocity FL Studio?
This one is handy for sure; hold down SHIFT+Left-click and drag the cursor from left to right across all the velocity bars – this will make each velocity match the initial point you started from.
How Do I Reset Velocity In FL Studio?
Like the step above, the only difference is that you hold ALT+Left click and drag. All notes will reset to the default setting of 78% (the most natural hitting of keys).
How Do I Enable Velocity in FL Studio?
Should the velocity edit window not be shown (it usually is by default), simply hit SHIFT+D on your keyboard to bring it up.
If the bottom section of the piano roll is not set to velocity, you can click the word “Control” on the left side and select it. (Check out the other adjustable options here too)
Are you looking for more top tips? Check out this article on how to change the tempo in FL Studio.