The Ableton normalize function lets you set the loudness levels to 0dB by highlighting the track to normalize, consolidating it, opening the track detail, adjusting the gain, and disabling warping. Like much of its functionality, Ableton normalize only takes a few steps.
So, you have been working on some tracks for a song in Ableton Live Suite or Live Lite. A fellow music producer begins talking to you about normalizing it, and you become a little uneasy.
You begin to wonder what it is, how to do it, when to use it, and ask yourself whether there are instances when it should not be used.
In this tutorial, you’ll learn what normalizing is, its best uses, when it should be omitted from your music production toolbox, and the steps to do it in Ableton.
What You Will Need to Follow This tutorial:
- A computer installed with Ableton Live Suite
- A selection of audio clips to normalize in the Arrangement view
- A stable Internet connection
How To Normalize Audio In Ableton
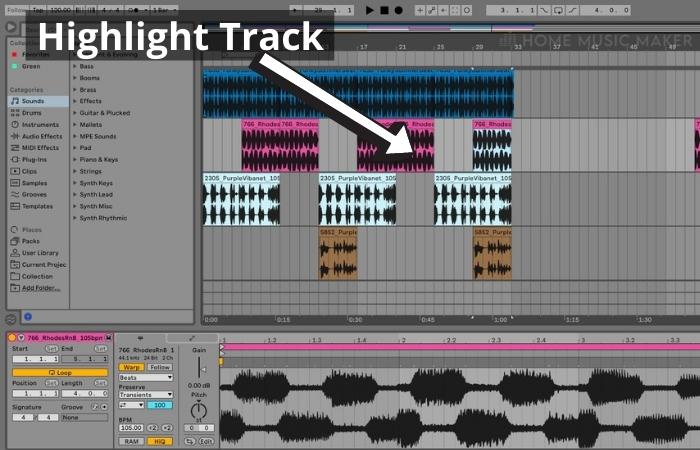
Step One: Select The Clip To Normalize
Highlight the audio track you wish to normalize.

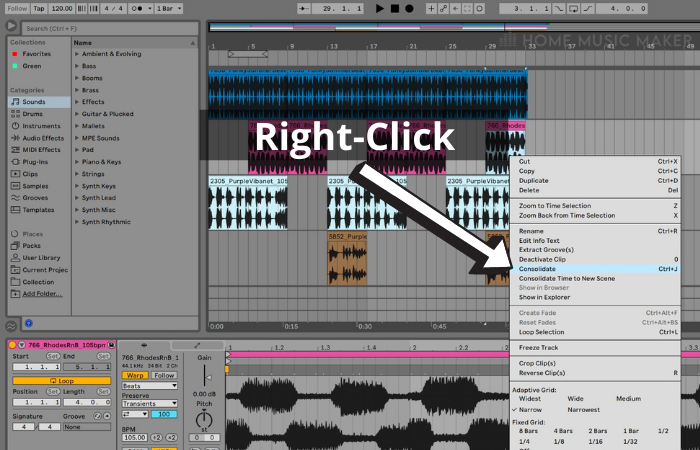
Step Two: Consolidate The Track
Right-click the track and select ‘Consolidate.’ (Ctrl+J on Win, CMD +J on Mac.)

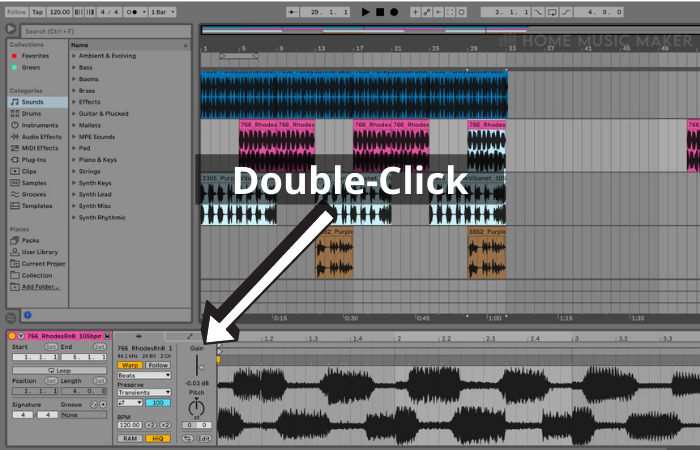
Step Three: Open The Track
Open the track by double-clicking it.
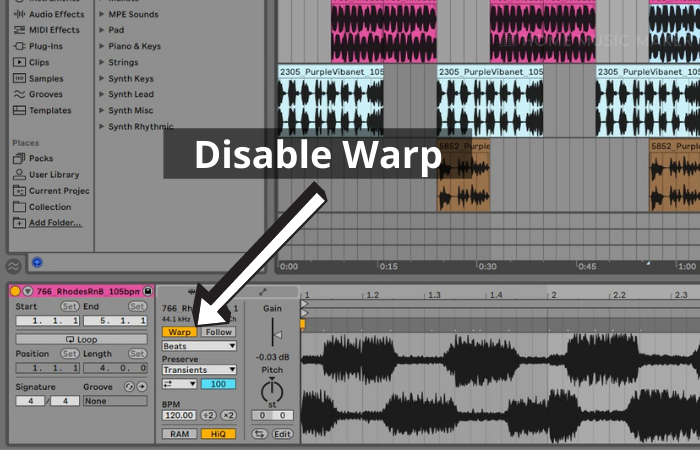
You will see a detailed view of the clip in the bottom half of the screen, where Warp is enabled, and the gain is turned down.
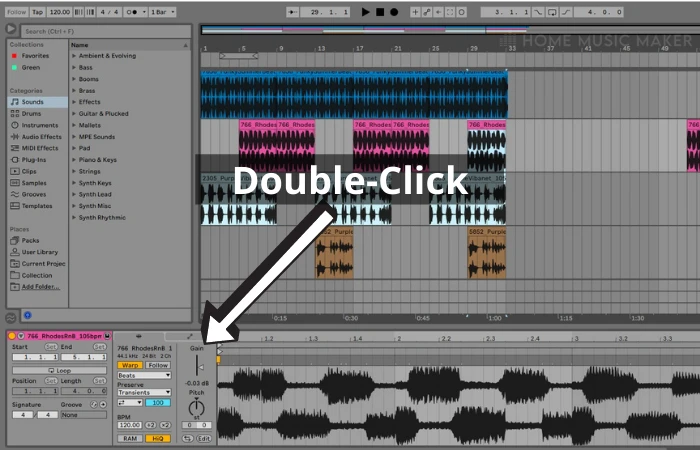
Step Four: Adjust The Gain
Double-click the gain, which changes the loudness to 0dB.
Step Five: Disable Warp
Click the Warp button to disable Warp.

What Is Normalizing?
Peak normalization means Ableton finds the loudest peak in the audio and increases or decreases its volume to a standardized threshold. The highest peak found falls at 0dB. This raises or lowers the entire audio level of the track but does not change the dynamics between peaks and valleys in the audio.
It can help when there is any sudden loudness in a track.
The benefits of normalizing include ensuring that a specific maximum volume for the bounced track can be achieved without exceeding the chosen threshold.
As previously stated, normalizing does not alter the dynamics of your track. The difference between your track’s loudest and softest parts will be changed as a whole and not in isolation.
The drawbacks of normalizing a track are that this raises the signal levels, meaning all signal levels, including the noise floor on the track.
Normalizing may cause your mix to be louder in parts where you do not want this.
Clipping is a significant concern when you normalize.
Processing a mix after normalization, using EQ, compression, or any audio effect you choose can cause clipping because the extra processing can cause the audio to overload.
It can also occur when inter-sample peaks arise when you normalize a track to near or at 0dB. (Avoiding normalizing audio on the master track prevents this type of inter-sample peaking.)
The clipping does not become apparent until you export your mix to MP3 format.
Using compression or a limiter is a better idea if you need to vary the volume of your audio track.
Compression changes the dynamic range of your track over time by different amounts. It controls maximum levels and maintains higher average loudness.
Using a limiter acts as a compressor with an infinite ratio, never allowing input signals to cross a specified level, meaning you can never exceed the peak. It catches the loudest moments and brings the level down to protect against distortion. It also maintains the balance and color of the mix. No sound beyond the threshold can get through.
Related Questions
What Is Bouncing a Track?
This is the process of transforming a completed track to audio in Ableton. It enables you to export your finished track into smaller audio groups or a finished track into a single audio file. It originates from the days when recording was completed on tape decks with a limited number of tracks. All but one track was used, and this final track was used to mix all tracks.
How Do I Bounce a Track in Ableton?
To bounce a track to audio in Ableton, freeze the track. (by highlighting it, right-clicking, and selecting Freeze.)
Right-click the track again and click Flatten. This renders the track with all features (including automation) to audio.
This means you can conserve CPU usage on your computer, and working in audio increases your creative possibilities. For instance, some of the things you can do are resampling the audio, reversing it, and time-stretching it, just to name a few.
What Is Audio Clipping?
This is a type of waveform distortion. When a piece of audio equipment, such as an amplifier, is driven beyond its limits, it goes into overdrive. This overdriven signal can cause the amplifier to proceed to produce an output voltage above its own capacity. Clipping can occur when a signal exceeds the maximum dynamic range of an audio channel.
Should I Normalize when Exporting Audio?
If you need to change the volume level on your tracks, it is better to use compression and a limiter to adjust these levels. Also, note that if you need to record vocals over the top of the mix, do not make these levels too loud.
Should I Normalize My Master?
It is generally not a good idea to normalize a master track, for the reasons discussed above.
What Is Warping?
When you warp a track, you manipulate the pitch and tempo of your audio independently of one another. So, you can change the pitch of a song to fit the pitch of another song without altering the tempos. You can either slow down or speed up the tempo without changing the pitch.
If you’d like to learn more, check out this article on Ableton Complex vs Complex Pro.