If you render a track that you have been working on in REAPER and it sounds different, chances are you rendered it to mono instead of stereo, you rendered it through something other than the ‘Master mix,’ you rendered the wrong ‘Bounds,’ or you rendered it with low audio quality.
Rendering In REAPER
One of the best feelings as a music producer is finishing producing a track and having it sound just how you want it.
The final step is rendering out your track and sharing it with the world!
If you do not know how to render a track in REAPER correctly, the rendered track you produce might sound different from it in the REAPER DAW (Digital Audio Workstation).
In this step-by-step guide, I will show you what to do if your REAPER render sounds different from what it initially did.
What You Need For This Tutorial
All of the tools and functions you will need to follow this guide comes with the REAPER DAW.
Therefore, all you need to follow this tutorial is REAPER and a track that you are ready to render.
Step One – Double-Check Your Mix/Master
The first step for correctly rendering a track in REAPER is double-checking your mix/master to make sure it sounds exactly how you want it to before finalizing it.
After listening to your finished track and being fully satisfied with how it sounds, you are ready to start rendering.
Step Two – Open Up The Render Menu
To open up the render menu, click File>Render.
From here, you can set your render preferences, render your track, and more.
Step Three – Set Your Render Settings
The next step for rendering your track in REAPER is to set your render preferences and finish the job.
Let’s look at the different parameters you can set in REAPER’s render menu.
‘Source’
The first parameter you can set in REAPER’s render menu is the ‘Source’ from which you render your track.
For example, you can render just stems, selected tracks, the master track, and more using the REAPER render menu.
If you want your track to sound the way that you have been mixing/mastering it, you should render it through the ‘Master mix.’
‘Bounds’
The following parameter that you can render based on in REAPER is the ‘Bounds’ of a REAPER project file.
The ‘Bounds’ are part of a REAPER project file that you render.
For example, you can render the entire project, a custom time range, selected regions, and more in REAPER.
I recommend making a region by clicking and dragging a time selection, right-clicking the selection, and choosing ‘Create region from selection.’ Selecting that region by right-clicking and toggling to ‘Select region,’ and then rendering through ‘Selected regions.’
You can use this option to render one track or multiple tracks.
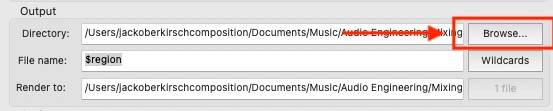
‘Directory’
Once you have your first two parameters set, it’s time to assign where you want your track saved.
Use the ‘Browse‘ button to open your computer’s file explorer and choose a save path.
Be careful when saving files, and keep your computer organized. There is nothing worse than losing a file because your computer is a black hole.
‘File name’
You can either type in the name manually or choose an option from the wildcards menu to name your file.
Pay attention to what you name your files to have an easy time finding them later.
‘Sample rate,’ ‘Channels,’ and ‘Resample mode’
The next parameters that we will want to set are the sample rate, channels, and resample mode.
The industry standard is either 44100 or 48000Hz for the sample rate.
I recommend using 48000Hz if your computer is powerful enough.
For ‘Channels,’ you should render in stereo if it’s a final mix/master unless you have a good reason to do otherwise.
For ‘Resample mode,’ I recommend using the fastest setting that your computer can handle.
We’re one step closer to rendering our track with these parameters set.
‘Metadata’
You can use this next section to embed metadata if you need to do so.
Check the ‘Embed: Metadata’ box and open up the ‘Metadata‘ menu to enter the metadata you want to include with your track.
File format(s)
The final parameter we need to set before rendering our track is what file format(s) we want our track rendered in.
REAPER gives you the option to render in WAV, MP3, AIFF, several video file types, and many other formats.
If you want to render a track in MP3 format, I recommend going with the highest bitrate that your computer can handle.
If you want to render a track in WAV format, you should use either 24-bit or 32-bit.
These are the most widely recognized in the world of music production.
Render And Double-Check Your Track
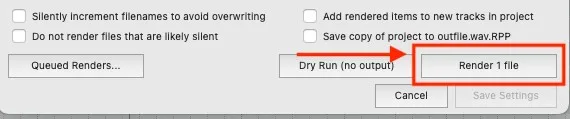
Now that you have all of your render settings how you need them, you’re ready to render our track.
To do this, just click the render button and watch it go!

Once you have rendered your track, I recommend listening to it a couple of times to ensure that you did so correctly.
Potential Rendering Issues
Let’s look at a few potential causes for if your REAPER render sounds different.
Mono Track Instead Of Stereo
The first thing to check is if you might have rendered your track in mono instead of stereo.
You can check this under the ‘Channels‘ section of the REAPER render menu.
Incorrect ‘Source’ Or ‘Bounds’
The next thing to check is your render ‘Source‘ and ‘Bounds‘ to make sure you’re rendering your track through the ‘Master mix‘ and the correct time selection that contains your track.
You can find ‘Source‘ and ‘Bounds‘ at the top of the REAPER DAW render menu.


Low’ Sample Rate’ Or ‘Bit Rate’
Another thing you can check is that your sample rate and bit rates are not at a super low resolution.
I always recommend rendering in the highest sample and bit rate that your computer can handle.
Monitoring FX Are On
The last thing you need to check if your REAPER render sounds different from in the DAW is if you have any FX monitoring enabled.
To check and see about this, click View>Monitoring FX to open up the monitoring FX window.
If you have any plugins on the monitoring FX window, I recommend disabling or deleting them before you try to render your track.
REAPER Best Render Settings
The best render settings in REAPER are the ones that give you the highest quality audio. Here are the REAPER render settings that I use:
- Source: Master mix
- Bounds: Selected regions (after selecting the correct region(s))
- Sample rate: 44100 or 48000 Hz
- Channels: Stereo
- Resample mode: As high as your computer allows
- Format: WAV (MP3 is good too, but lower in audio quality)
- WAV bit depth: 24 or 32 bit
- MP3 Mode: Maximum bitrate/quality
How Do I Render High Quality Audio In REAPER?
To render the highest quality audio in REAPER, choose:
- A high Sample rate
- ‘Stereo‘ for the ‘Channels‘ section
- A high ‘Resample mode‘
- ‘WAV‘ format for the rendered file
- A high bit depth.
When rendering your final track, it is best to use as high of audio quality as possible.
What Does Rendering In REAPER Do?
Rendering in REAPER exports your final audio track to your desired specifications, such as save location, file name, file format, and other factors.
In other DAWs such as Pro Tools, FL Studio, Logic Pro, Studio One, etc., it is often called bouncing or exporting instead of rendering.
What Does Rendering Audio Mean?
Rendering audio essentially means printing an audio file.
You can either render an individual track, multiple tracks, or the master track in REAPER.
Rendering audio also prints on any mixing, processing, and FX on the track. For example, rendering your track through the ‘Master mix’ in REAPER will render your entire mix/master onto a single audio file.
Is Bouncing The Same As Rendering?
Yes, although other DAWs refer to it as different things, rendering audio is also referred to as bouncing, exporting, etc.
It is important that you know what your digital audio workstation calls rendering, no matter which one you use.
How Do You Bounce Multiple Tracks In REAPER?
To bounce (render) multiple tracks in REAPER at once, you must make multiple regions, select them all, and then render through selected regions in the REAPER render menu.
To do this, click and drag to make a time selection, right-click this time selection and choose ‘Create region from selection‘ to make a region. Right-click the edge of the region, choose ‘Select region,’ and repeat this process for each track you want to render.
Once you have made and selected all of your regions, open up the REAPER render menu by choosing File>Render and render through ‘Selected regions.’
How To Record Audio In REAPER?
To record audio in REAPER, start by inserting a new track in the tracklist, choose the desired input on that track, arm the track to record, and then press record.
You can record audio in REAPER through multiple inputs at once also.
This is helpful if you want to use multiple microphones on one source or record multiple musicians simultaneously.
Related Questions
How Do I Get Rid of Audio Latency In REAPER?
To get rid of audio latency in REAPER, start by downloading the ASIO Audio Driver if you are a Windows user. The ASIO driver has fixed audio latency issues for me in the past on both of my Windows computers.
However, if you are a MAC user, you cannot download the ASIO driver.
To manually offset audio latency in REAPER, click Options>Preferences>Recording to open the correct menu.
From here, you can adjust the different values for ‘Output manual offset‘ and ‘Input manual offset‘ to manually correct audio latency.
Also, feel free to check out this other article for a more in-depth look at fixing audio latency in REAPER.
Why Should I Render Through the ‘Master Mix’?
You should render through the ‘Master mix‘ to render the complete mix/master of your track instead of individual tracks or an incomplete mix.
To render an audio track that contains your entire project and its full mix/master, make sure that you render through the ‘Master mix.’
What Else Can I Use the REAPER Render Menu For other than Rendering the Full mix/master?
Not only can you use the REAPER render menu to render the final version of your track, but you can also use it to render the individual tracks within your project.
This is very helpful if you work with another producer and need to send tracks back and forth.
Should I render to WAV or MP3 Format?
This depends on the purpose of the audio file that you are rendering.
For example, if you are sending a quick song sketch to a collaborator and it is not a final version, you should use MP3 because it is faster to render and send and takes up less space.
However, if you are printing the final mix/mastered version of your song, you should use WAV format because it is of higher audio quality.
Remember that it takes more time to render and send along with space on your computer.
If you want to learn more about REAPER, check out this article about REAPER Delay Compensation.