PDC (Plugin Delay Compensation) is automatically included with REAPER. Plugin delay compensation is a function that almost every modern DAW (Digital Audio Workstation) has that measures the amount of audio delay introduced by one or more plugins on your track. PDC automatically compensates for this by adjusting the output.
Plugin Delay Compensation In REAPER
Using various virtual instruments/mixing plugins on your tracks is essential for modern music production.
Unfortunately, these plugins sometimes introduce audio delay/audio latency into your signal chain.
Thankfully, most digital audio workstations have automatic plugin delay compensation built into the software that automatically compensates for this plugin delay.
In this comprehensive guide, I will show you how to manage REAPER delay compensation, what it does, and why it is important.
What You Will Need To Follow This Tutorial
The only thing you will need to follow in this tutorial is the REAPER DAW itself.
Everything that you need for this tutorial comes with REAPER.
Step One – Insert And Use Plugins
Because the plugin delay compensation in REAPER is automatic, the first step for triggering it is to use plugins on your track until it activates.
There are no extra steps you need to take to turn it on.
To insert plugins on your track, click the ‘FX’ button to open up the ‘Track FX Window‘ and choose the plugins you want to insert from the plugin menu.
There’s no set number of plugins that will cause enough audio delay to trigger PDC. It just depends on which plugins you’re using.
For example, my computer has a fast processor and plenty of RAM, and I still find PDC activated on specific REAPER sessions.
Now that you have started using plugins on your track, I’ll show you where to monitor your REAPER project’s PDC.
Step Two – Monitor PDC (Plugin Delay Compensation)
Now that we have a project full of plugins let’s look at our performance meter and monitor our PDC.
To do this, click View>Performance Meter.
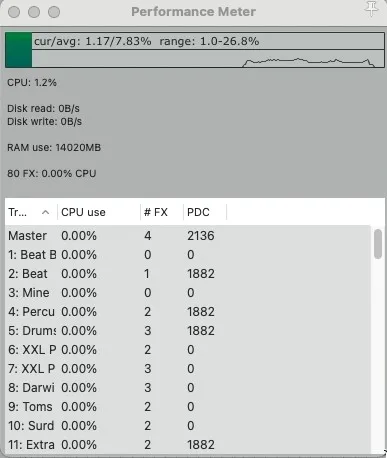
Once you have done this, you can expand the window and view any plugin delay compensation that REAPER applies on a track-by-track basis.
Knowing where and how to view PDC in REAPER is helpful to know which tracks in the project are experiencing an audio delay.
Step Three – Turning PDC Off On Certain Tracks
Let’s say you want to disable plugin delay compensation on a particular track.
In REAPER, this is quick and easy.
Simply right-click the arm to record button on any given track and then check the box for ‘Preserve PDC Delayed Monitoring In Recorded Items.’
This will disable PDC on that given track.
Although I have never had issues running REAPER with automatic plugin delay compensation turned on, I have heard of REAPER users complaining that PDC has slowed down their operating systems.
If this is the case for you, you can try turning PDC off in certain places.
What Is Delay Compensation?
Delay compensation is when your digital audio workstation automatically compensates for audio delay caused by plugins in your project file.
This function is vital because modern music producers rely on plugins, which significantly contribute to audio delay and latency.
Thankfully, most DAWs have built-in automatic delay compensation.
Why Is Plugin Delay Compensation Important?
Plugin delay compensation (PDC) is important because, without it, plugins that you are using in your track would cause a bunch of audio delay that would go unfixed.
Plugin delay compensation helps adjust your audio output to compensate for plugin delay in real-time.
Why Is There A Delay In REAPER Recording?
There could be any number of things causing an audio delay/latency, such as your computer’s audio driver, your audio interface, plugins, or even cable/microphone issues.
To manually offset audio latency in REAPER, click Options>Preferences>Recording to open up the window that you need.
Once you have the window open, you can adjust the input and output settings in the bottom right corner to manually offset audio latency in REAPER.
To do this, you will have to adjust the latency offset little by little while you test it by checking a microphone or instrument that you’re trying to record.
Here is a more in-depth article on fixing audio latency in REAPER.
REAPER Plugin Delay Compensation
In REAPER, plugin delay compensation helps us out by offsetting audio delay caused by plugins in real-time.
Without it, working on a track in a DAW would be a sonic mess.
REAPER Automatic Delay Compensation
The great thing about REAPER and most modern DAWs is that plugin delay compensation is automatic.
This means that you do not have to change around any REAPER preferences for plugin delay compensation to activate.
How Long Of A Delay Before You Get Compensation?
In REAPER, you can use the performance meter to view how many instances of plugin delay compensation are occurring and what tracks are causing it. Still, there is no way to know how long of a delay you need before you get compensation.
To open up the performance meter, click View>Performance Meter. From here you can see your track’s PDC on the right side.
Related Questions
Can You Turn Off Plugin Delay Compensation Globally In REAPER?
No, unfortunately, there is no way to disable plugin delay compensation globally.
Instead, you will have to go through each track individually and disable it. You can do this by right-clicking the arm to record button on any given track and checking the box for ‘Preserve PDC Delayed Monitoring In Recorded Items.’
You cannot turn it off globally because the plugin delay compensation in REAPER is automatic.
Do Most DAWs Have Automatic Plugin Delay Compensation?
Yes, pretty much all modern DAWs, such as Ableton, FL Studio, Pro Tools, Studio One, etc., come with automatic PDC.
Automatic plugin delay compensation is a function in which your digital audio workstation automatically adjusts audio output to compensate for any audio delay caused by plugins.
In modern music production, plugin delay compensation is so important because of how many virtual instrument/mixing plugins you use to write and produce a track.
How Do You Fix Audio Latency In REAPER?
To fix the issue of audio latency in REAPER, start by downloading the ASIO audio driver. The ASIO driver is a free and safe audio driver that has fixed my audio latency issues on numerous computers.
Remember that ASIO is only available for Windows computers and not MAC.
If you are still having issues, you can manually offset the latency in REAPER by clicking Options>Preferences>Recording to pull up the window you need.
From here, you can adjust the numbers in the bottom right corner to manually offset both the input and output latency in REAPER.
What if I Want to Use REAPER Plugins in Another DAW?
If you want to use REAPER’s plugins in another DAW, you can use this link to find a select collection of various REAPER stock plugins.
Although the ReaPlugs collection only includes a few of them, it is an excellent option for anyone wanting to use REAPER’s stock plugins in a DAW besides REAPER.
What Is Audio Latency?
Audio latency is when you are experiencing a delay when working with digital audio.
Digital audio latency can occur when trying to record something or listening back to something.
Audio latency makes it almost impossible to record and work on music.
Do you want to learn more? Check the following guide on how to use the REAPER Spectrum Analyzer.