KEY TAKEAWAYS
To crossfade in REAPER, start by ensuring that you have ‘Auto-crossfade media items when editing’ enabled, then drag the edges of two audio items together. Because you have enabled auto-crossfade, REAPER will automatically create a crossfade between the two items, resulting in smooth playback between tracks.
Crossfading In REAPER
Crossfading is an essential audio editing tool in modern music production.
Knowing how to crossfade tracks in REAPER will produce smooth audio and eliminate those nasty sonic glitches, clicks, and pops.
Crossfading is a function that I employ in every single REAPER project that I work on.
In this step-by-step guide, I will show you how to crossfade tracks in REAPER like a pro!
What You Will Need To Follow This Tutorial
Here is a list of what you will need to follow along with this tutorial:
- The REAPER DAW (Digital Audio Workstation)
- Two or more media items that you wish to crossfade together
How To Crossfade In REAPER
Alright, now that we have what we need, let’s dive into the process of crossfading in REAPER.
Step One – Enable Auto-Crossfade
The first step is to enable the auto-crossfade function within REAPER if it is not already engaged.
To do this, you can click Options>Auto-crossfade media items when editing or click the Auto-crossfade enable button on REAPER’s toolbar to the top left of its display.
Now that you have enabled Auto-crossfade, you are ready to move on.
Step Two – Crossfade Your Tracks Together
With Auto-crossfade ready to go, all you have to do now is drag your two tracks together, and REAPER will create a crossfade between the two.
As you can see, the size of the crossfade changes with how much your tracks overlap each other.
Crossfading in REAPER is really quite simple.
Step Three – Adjust Your Crossfade Shape And Points
The last step for creating a successful crossfade within REAPER is adjusting your shape and points.
To do this, hover your mouse over the crossfade until the crossfade emblem appears, and right-click it.
From here, you can change the shape of your crossfade and access the crossfade editor.
The shape of your crossfade will determine how the transition from one audio track into the other sounds.
You can use the crossfade editor to get into the nitty-gritty details of each crossfade within your project.
Personally, I don’t find myself using it very much because all of the crossfade adjustments that I usually need to make are accessible without the crossfade editor window.
Now that you have created your crossfade, adjusted its size, and chosen your desired shape/curve for your crossfade, you are all done!
Now you can sit back and listen as your two separate tracks play smoothly into one another.
How To Remove Crossfades In REAPER
To remove a crossfade in REAPER, start by selecting the two tracks that contain the crossfade.
Then, click Actions>Show action list and search for the action titled Item: remove fade in and fade out.
Once you run the action by pressing the Run button, the crossfade will be gone.
Pro Tip
You can also use this method to remove multiple crossfades at a time by selecting tracks containing them. Hypothetically, you can choose everything within your track and remove every crossfade at once if you want to.
Keep in mind, however, removing crossfades may result in sonic glitches and annoying clicks and pops.
I recommend always using crossfades in the editing process.
Hiding Edits In REAPER – Tips and Tricks For Keeping Your Track Organized
Let’s look at a few methods you can use to hide your edits and keep your track looking organized in REAPER.
Glue Tracks Together
The first thing you can do to clean up your track and keep it organized is glue tracks together as you go.
Remember, you will only want to do this if you are sure about your editing since gluing tracks together is permanent.
For example, you should only glue tracks together if you are happy with their crossfade and how they transition into each other.
To glue tracks together in REAPER, select the tracks you want to glue with the selector by right-clicking and dragging your selection (you can also shift-click to select tracks).
You can select as few or as many tracks as you desire to glue together at once.
Next, right-click any one of the selected tracks and choose Glue items.
This will glue all of the selected items together as one track.
Check out this more in-depth article on merging tracks in REAPER for a closer look at the process.
Pro Tip
Gluing tracks together within your REAPER project can be super helpful when cleaning up your track and committing to editing choices. But be careful that you are certain of these editing choices when you glue things together, or you’ll be sorry.
Hide Tracks That You Are Not Currently Using
The other thing you can do to organize your track and save some screen space while you work is to hide tracks you are not using.
To do this, click the Compact view button on any of your tracks or folder/BUSS tracks within your REAPER project on the tracklist to the left.
This does not affect the tracks negatively; it hides them temporarily to save screen space.
You can hide as few or as many tracks as you wish, which can be very helpful in keeping your REAPER project looking clean and organized.
How To Fade-In A Track In REAPER
To fade-in a track in your REAPER project, hover your mouse over the top left edge of the track until you see the Fade Tool emblem.
From here, click and drag until your fade-in looks the way you want it to.
You can also right-click when you see the Fade Tool emblem to change the shape of your fade-in.
How To Fade Out A Track In REAPER
To fade-out a track in REAPER, hover your mouse over the top right edge of the audio clip until the Fade Tool emblem appears.
From here, click and drag until you are happy with your fade-out.
Go ahead and right-click the Fade Tool emblem to adjust the fade-out curve if you want to.
How Do You Access Crossfade Settings In REAPER?
To access your settings for crossfades in REAPER, click Options>Preferences>Media Item Defaults.
From here, you can do things such as adjust your default crossfade time, shape, editing preferences, etc.
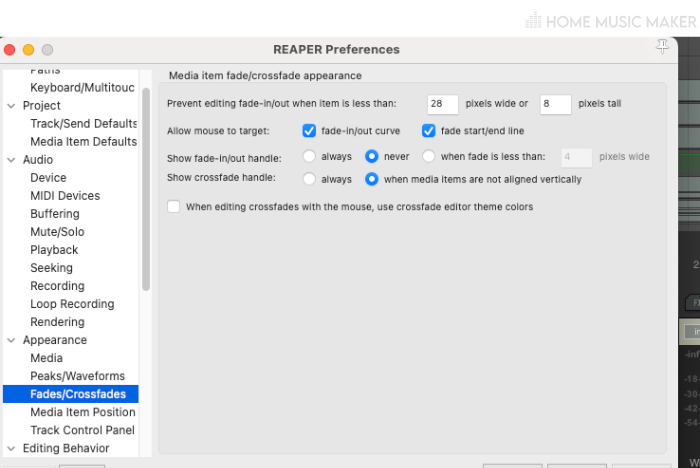
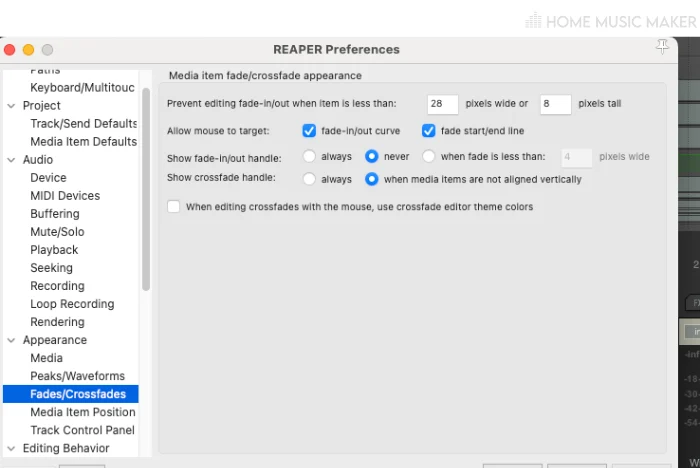
Other crossfade settings can be found under Options>Preferences>Fades/Crossfades.
Want to keep learning about editing in REAPER? Then check out this other article on cutting in REAPER.
Related Questions
How Do You Enable Crossfading For MIDI Tracks Within REAPER?
To enable crossfading for MIDI tracks in REAPER, click Options>Preferences>Media Item Defaults and check the box for Enable automatic fade-in/fade-out and auto-crossfade for MIDI note velocity.
Now your MIDI tracks will auto-crossfade the same way your audio tracks do.
What Is The Point Of Crossfading Two Tracks Together?
Crossfading two tracks together will create smooth playback between the two tracks and help prevent sound issues, sonic glitches, clicks, and pops.
Do You Recommend Leaving Auto-Crossfade Enabled In REAPER?
I do recommend having auto crossfade enabled in REAPER.
Some people may disagree, but because I am constantly using this important REAPER function for editing audio, I almost always have it enabled.
Check this next guide on moving everything in REAPER.