To merge tracks in REAPER, start by inserting a new track as a folder track and place the tracks you want to merge under this folder track. Next, right-click the folder track, select ‘Render/freeze tracks,’ and choose either the mono or stereo option.
Merging Tracks In REAPER
Merging multiple tracks can be very helpful for mixing a song and keeping your project file organized and tidy.
Merging selected items can also help you commit to your mix decisions.
If you do not merge any tracks together as you work, you may find yourself having a hard time finishing tracks.
In this step-by-step article, I will show you how to merge tracks in REAPER and some other project organization tips.
What You Will Need
Here is a shortlist of what you will need to follow this tutorial:
- REAPER DAW (Digital Audio Workstation)
- A project file of a track in progress in REAPER for you to edit
Step One – Insert a Folder Track
The first step for merging tracks in REAPER is creating a folder track.
To do this, insert a new track by double-clicking the tracklist on the left of REAPER.
Give the folder track a name to help you stay organized.
Once we have done this, we are ready to move on to the next step.
Step Two – Insert Your Other Tracks Into Your Folder Track
Now that our folder track is inserted and appropriately named, we can put the tracks that we want to merge into our folder track.
To do this, select the tracks either individually or all at once and put them in the folder track.
With our folder track set up correctly, we can keep moving along.
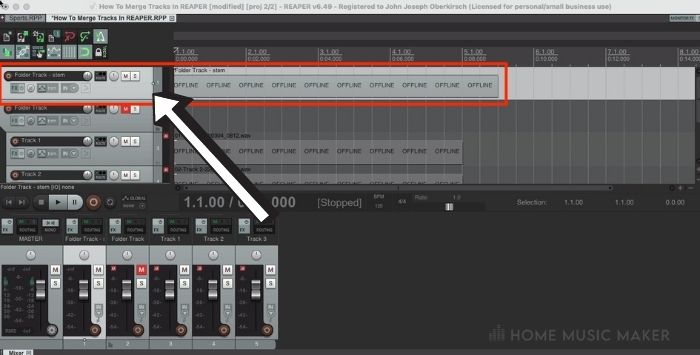
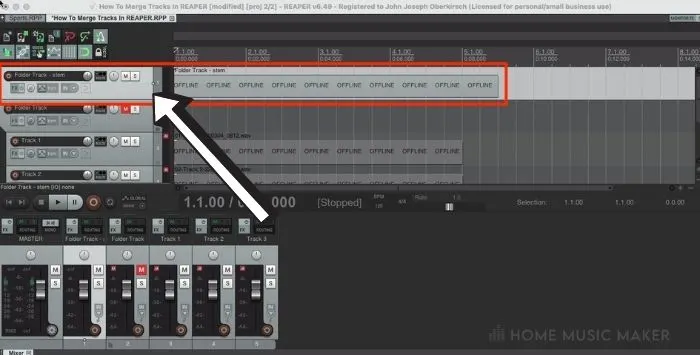
Step Three – Render Your Tracks
The next step for merging tracks in REAPER is rendering them through your folder track.
To do this, right-click your folder track that contains the tracks you want to merge, choose Render/freeze tracks, and then select the correct option between mono or stereo.
Typically, I render low-end heavy things like kick drum, 808s, and bass in mono. I render everything else in stereo. However, there are exceptions to every rule in audio production.
Now that we have done this, our audio tracks are successfully merged together! [4.Merge]
Step Four – Clean Up Your Project
The last thing that I like to do when merging audio in REAPER is clean up my project a bit.
Once you render audio items, it will create a single new track with all the audio items merged together. Meanwhile, the old audio tracks that you are not using anymore will be muted and left where they were.
If you are confident in the levels of your merged audio track, you can delete the old tracks. Still, I always recommend keeping them just in case you need them later.
To keep the old tracks out of my way while I work, I like to create a sort of graveyard at the bottom of my project and leave them there.
With our old audio tracks muted and out of the way, we now have plenty of room to work on mixing our newly merged audio track.
Gluing An Audio Or MIDI Track
Another essential editing tool for REAPER that I want to show you are gluing together audio or a MIDI item.
Gluing together audio or a MIDI file is vital for keeping your track organized and tidy.
If you have two audio or MIDI items on the same track that you want to move around and edit together, you will want to glue them together.
To do this, select the items you want to glue together simultaneously, right-click one of the items, and select Glue items.
Now your items will be glued together so that you can edit and move them as one.
You can glue together any amount of items at once, not just two.
Gluing Separate Takes
Another way that you can use gluing in REAPER is to combine separate takes of a single instrument.
For example, suppose you have recorded a vocalist doing three separate takes of the same song. In that case, you can go through and split the vocal track up to where you want the individual takes to come in and out and then glue these separate takes together afterward to ‘comp’ a take.
Selecting all the items together will see the highlighted takes as your ‘active takes.’
When you glue your vocal track together, the active takes are the takes that are glued together.
Be careful because all other non-active takes will be deleted from your project.
Related Questions
Why Do We Record Instruments on Different Tracks Instead of Just One Track?
We record different instruments on individual tracks in modern music production to have more control during the mixing process.
If you record multiple instruments with a single microphone or on a single track, you will not be able to mix those instruments individually later on.
What Are Some Tips for Making a Vocal Track Stand out In Your Mix?
A few strategies to help your vocal track stand out in your mix are saturation for warmth, compression to control dynamics, and EQ to boost your high-mid and high frequencies.
You can also double up and pan your vocal track in different ways to give it more presence in the mix.
For example, you could take your vocal track and make four copies. Next, leave two vocal tracks down the middle and pan the other two left and right. This will really help your vocals stand out in a busy mix.
What Is the Reason that You Use REAPER?
I use REAPER over other DAWs such as Pro Tools, FL Studio, Studio One, etc. is because it is so customizable. REAPER allows you to customize your visual display and your various toolbars and hotkeys.
Is There More than One Way to Pan a Track in REAPER?
Yes, there are a few ways to pan a track in REAPER. Like in Logic, the default pan setting is ‘Stereo balance‘ and not a true stereo pan. To view your options for panning in REAPER, right-click the pan knob on the track that you wish to pan.
As you can see, there are options for ‘Stereo balance,’ ‘Stereo balance/mono pan,’ ‘Stereo pan,’ ‘Dual pan,’ and ‘REAPER 3x balance‘.
What Are the Benefits of Gluing Together Audio or MIDI Items In REAPER?
You should glue audio or MIDI items together while editing a track to help you stay organized.
For example, you had to record a guitar track in separate takes and now have four audio items crossfaded into each other.
Once you have them lined up and crossfaded correctly, you can glue them together to reduce your REAPER project’s number of audio items.
Gluing items together as you work is a great way to keep your track tidy.
Want to learn more? Click here to find out How To Quantize In REAPER.