KEY TAKEAWAYS:
To add triplets to your song in FL Studio, first, change the grid size for the piano roll to a multiple of three. Then either add the notes manually or add one stretched for the duration you want the triplets to last. Finally, select it and hit CTRL+U to chop the note according to the grid size.
Triplets In FL Studio
Are you ready to add some syncopation and complexity to your beats?
Well, you’re in luck because, in this tutorial, we’re going to show you how to make triplets in FL Studio, and trust me, it’s super easy.
By the end of this tutorial, you’ll be able to create and edit triplets like a pro and take your beats to the next level. So grab your FL Studio, let’s get started, and let’s make some music!

How To Add Triplets To Your Drums In FL Studio
Triplets are a type of rhythm in which three notes are played within the duration of a single beat. They are often used to add interest and complexity to drum patterns. They can be found in various music genres, from hip-hop and trap to drum and bass.
If you want to add triplets to your drums in FL Studio, follow these simple steps:
- Launch FL Studio and open your project.
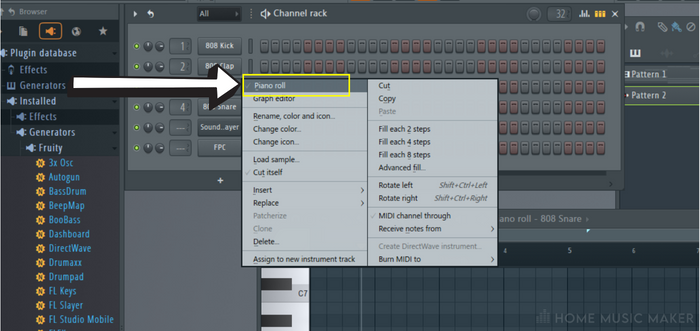
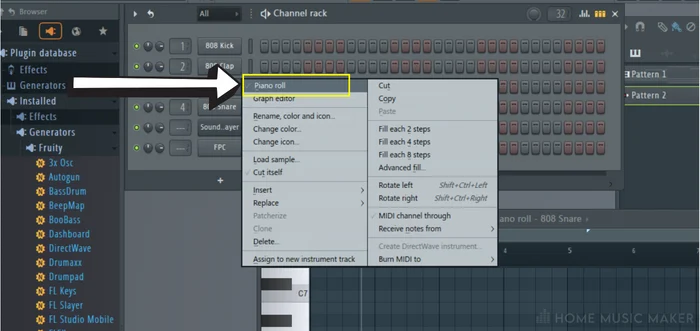
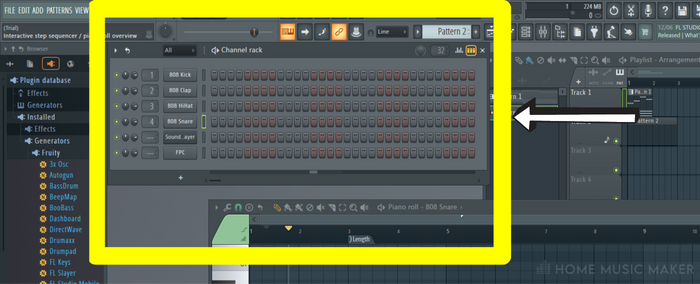
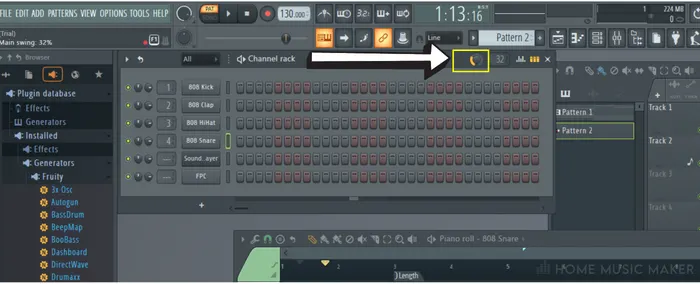
- Locate the channel you wish to add triplets to. Then right-click and select piano roll.
3. Once the piano roll opens, click the magnet icon near the top left of the window. A menu will drop down.
4. From the menu, select ⅓ step.
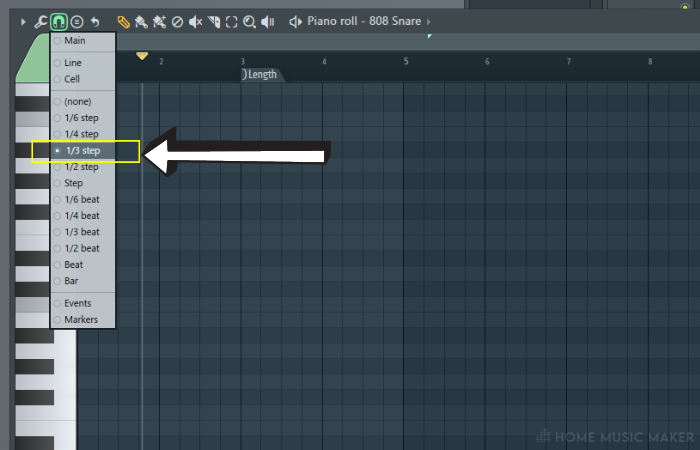

5. The grid is now divided into triplets. Proceed to edit the midi accordingly.

READ NEXT:
To make your production life easier, check out our article on the FL Studio snap-to-grid shortcut.
Using Triplets In A Hip-Hop Hi-Hat Pattern
Hip-hop beats often feature intricate hi-hat patterns. Adding triplets to your hi-hat pattern can add even more complexity and help your beats stand out.
One standard method is adding 3 or 6 triplets at the end of the hi-hat pattern before it loops.
Using Triplets In Trap Beats
Trap beats are known for their heavy use of triplets, particularly in the hi-hat and snare drum patterns.
Like hip hop, it adds a nice touch to add 3 to 6 triplets on the snare at the end of a buildup, right before it drops.
Pro Tip
When the triplets start, pitch the snare up an octave and then gradually bring it back down one note at a time until the triplets are over for that classic trap snare roll sound.
Using Triplets In A Four-On-The-Floor Drum Beat
Four-on-the-floor is a popular drum beat that features a steady kick drum on every beat. Adding triplets to this beat can add interest and complexity to the pattern.
I find almost constant triplets on some percussion (hand drum, cowbell, clave, rimshot, etc..) works excellent in tech house music. It contrasts the steady kick drum rhythm and creates a nice groove that will keep people dancing for hours.
Using Triplets In Drum And Bass
Drum and bass is an electronic music genre known for its fast-paced, complex drum patterns.
The fast-paced and sporadic nature of drum and bass music makes it a prime candidate for some well-placed triplets.
They are most useful as part of a fill (a quick rhythmic pattern played by a drummer that differs from the rest of the drum beat) to add variation throughout your drum bus.
How To Add Swing To Your Beats In FL Studio
Swing is a rhythmic effect that gives the impression that the beat is slightly off-kilter or “swinging”. It can add a lot of groove and personality to a drum pattern and is often used in genres like hip-hop and electronic dance music. To add swing to your beats in FL Studio, follow these steps:
First, open the channel rack and make sure the step sequencer is toggled on.

Then use the swing knob in the window header to add as much swing as you like.

Tips On Making Your Hi-Hats More Interesting
Hi-hats are essential in any drum pattern. Adding variety and interest to your hi-hat patterns helps elevate your beats. Here are a few tips on how to make your hi-hats more interesting in FL Studio:
- Try out different hi-hat samples. You can layer or alternate between them to make your drums more interesting.
- Experiment with different effects like reverb and delay.
- Put your open and closed hi-hats in the same choke group to make them more realistic.
READ NEXT:
With all of this MIDI programming, you could come across some issues. Check out our article on fixing when FL Studio notes keep playing.
Related Questions
How Do You Do Triplets In Music?
In music, a triplet is a group of three notes played within the same duration as two notes of equal value. To notate a triplet, you would put “3” above or below the group of three notes. The three notes in a triplet are typically played at a faster tempo than their written value indicates.
For example, if you have an eighth note triplet, you would play the three notes in the time it would usually take to play two eighth notes.
Why Are MIDI Ghost Notes So Important?
Ghost notes are notes played softly or lightly on the snare drum for added subtlety and nuance. They can be played on an acoustic snare drum, a drum machine, or a MIDI instrument.
The snare plays a vital role in your drum beat, and ghost notes can add depth and complexity. Ghost notes can also help create a sense of swing or groove.
How Do You Do Triplets In Music?
Triplets are a way to divide a beat into three equal parts, rather than the standard two parts, to create a sense of syncopation and to add more rhythmic complexity to the music.
In sheet music, triplets are notated by placing the number “3” above or below the notes that make up the triplet. This indicates that these three notes should be played in the time usually occupied by two of the same note values.
Triplet Grid In FL Studio?
To use the triplet grid, open your project in FL Studio and go to the piano roll view. Look for the grid snap options, usually at the top of the piano roll or in the toolbar. This is where the magic happens.
Once you’ve located the grid snap settings, you’ll find an option to switch between different grid snap types, including the triplet grid. Select it, and you’ll notice that the grid lines in the piano roll have changed to reflect the triplet grid.
Now, you can place your MIDI notes on the triplet grid, and they will snap to the triplet rhythm, making it easy to create those syncopated beats that will make your listeners tap their feet.
Your beats will have a new level of complexity and groove with the triplet grid. And remember, you can still edit the notes’ duration, velocity, and other parameters as you wish.
READ NEXT:
Of course, you want your beats to sound clear and professional. Check out our article on how to stop clipping in FL Studio to get the best sound possible.