KEY TAKEAWAYS:
To reverse audio in FL Studio, drag a sample into the Channel Rack and select Reverse. For MIDI, select the pattern, make it unique, and flip the notes. Add reverb or delay to a track and blend with volume for a reverse effect. To create a reverse sound, render the MIDI clip and reverse the audio.
Reversing Audio
By reversing elements of your music, you can create new textures, rhythms, and melodies that will keep your listeners engaged.
You can also create your own FX sounds, such as risers, tailored explicitly to your song.
This technique can be used on any element of your music, from drums to vocals to synths. You can apply this in a variety of ways to achieve different effects.
This article will show you how to reverse an audio and MIDI clip and create a reverse delay and reverb effect. On top of that, we shall show you how to make your own reverse sounds from a MIDI part.
How To Reverse In FL Studio – Complete Guide
How To Reverse A Sample In FL Studio
First, consider reversing a sample within FL Studio, i.e., an audio wave.
Step 1: Drag and drop your sample into the Channel Rack.
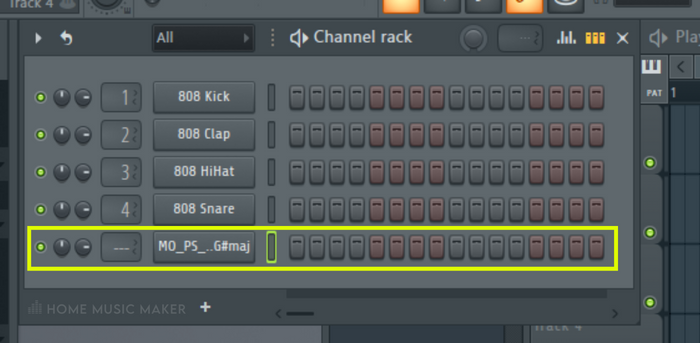

Step 2: Click on the channel name to open the Channel Settings window.
Step 3: Click the Reverse option under the Precomputed Effects section in the Sample Settings tab.
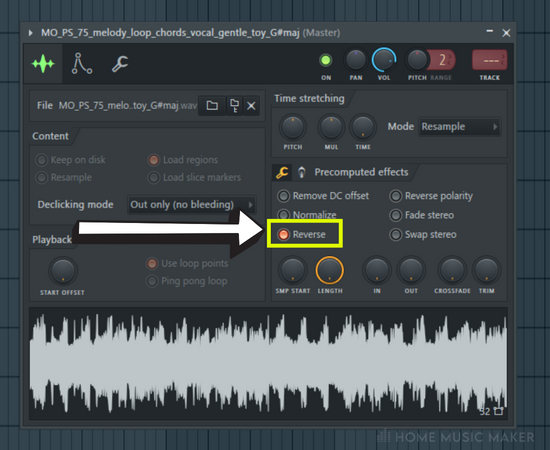
Now the sample is reversed, and you can play it using a MIDI keyboard or MIDI controller as such.
READ NEXT:
If you want to reverse multiple samples in a row, read our article on merging audio clips in FL Studio.
How To Reverse A Melody In FL Studio
Now let’s reverse a MIDI part. The part can be melody, chords, bass, drums, or anything else you can think of that is programmed in with MIDI notes or even performed on a MIDI keyboard or MIDI controller.
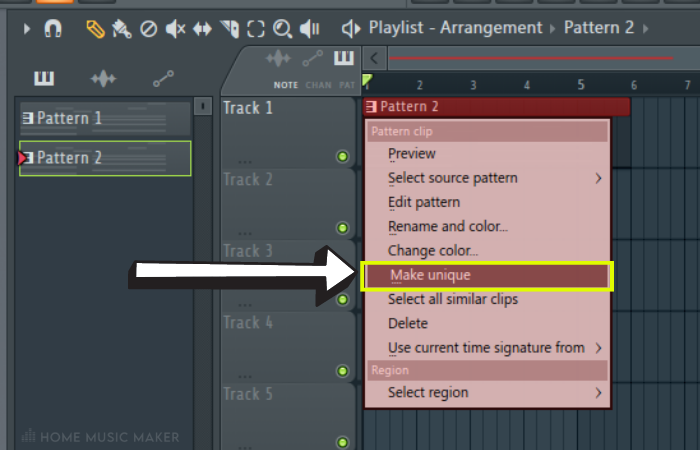
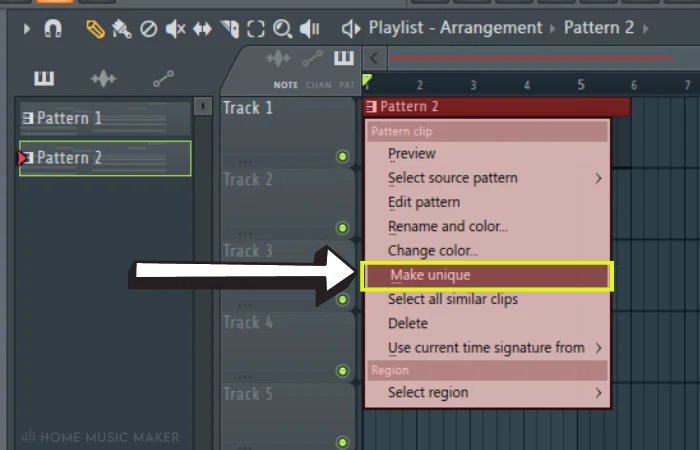
Step 1: Select the pattern you want to reverse in the Playlist by clicking on it with the Select tool.
Step 2: Click the piano icon in the top-left corner of the pattern with the Draw tool and select Make Unique from the drop-down menu. This tool will allow us to modify the MIDI clip without changing the original pattern, in case you need it later.
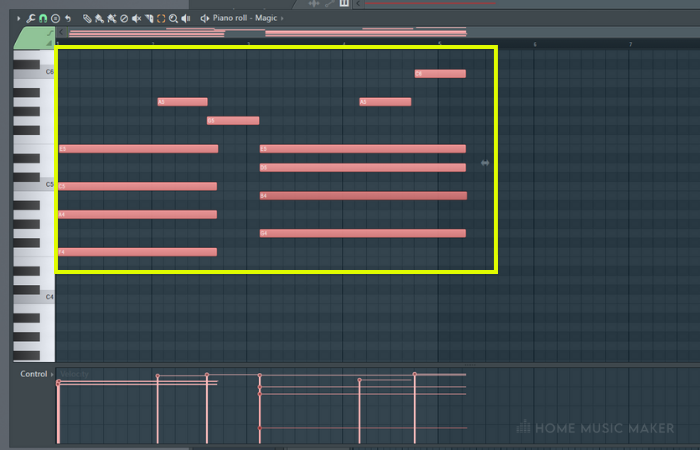
Step 3: Double-click on the new pattern with the Draw tool to open it in the Piano Roll.
Step 4: Select all of the notes in the Piano Roll by clicking and dragging over them or pressing CTRL + A on Windows and CMD + A for Mac.
Step 5: Press ALT + Y on Windows and Option + Y on Mac to bring up the Score Flipper tool.
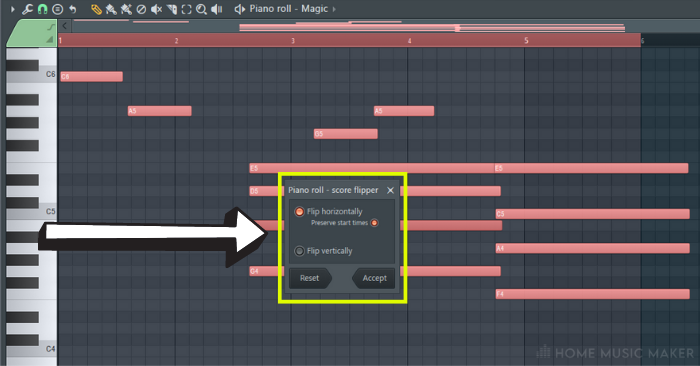

Step 6: Now, you can select whether to flip the MIDI notes horizontally or vertically. For reversing the part, we want the horizontal flip.
Step 7: Press Accept, and the MIDI notes will be in reverse order.
This tool is particularly useful in creating a b-section of a song. If I need help changing the song where I want it to retain the sounds from the previous section, reversing the chords can be an exciting way to figure this out.
READ NEXT:
Using this technique on your own samples will create a truly original sound. Learn how to do this with our article on how to sample in FL Studio.
Some Cool Reverse Effects
How To Create A Reverse Delay Or Reverb Effect In FL Studio
If you want to add a unique twist to your music, try creating a reverse delay effect in FL Studio. Here’s how:
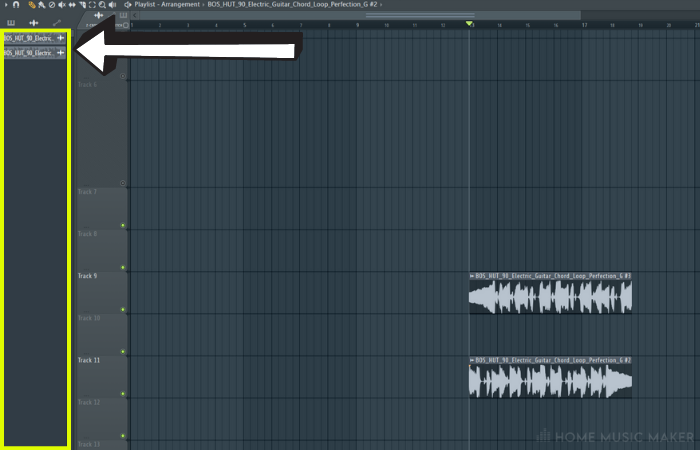
Step 1: Use the Select tool to select the pattern or patterns you want to give this effect to in the Playlist (one channel at a time).
Step 2: With the Draw tool, click on the audio wave icon in the top-left corner of the audio clip and select Make Unique. Now we can change the audio clip while retaining the original.
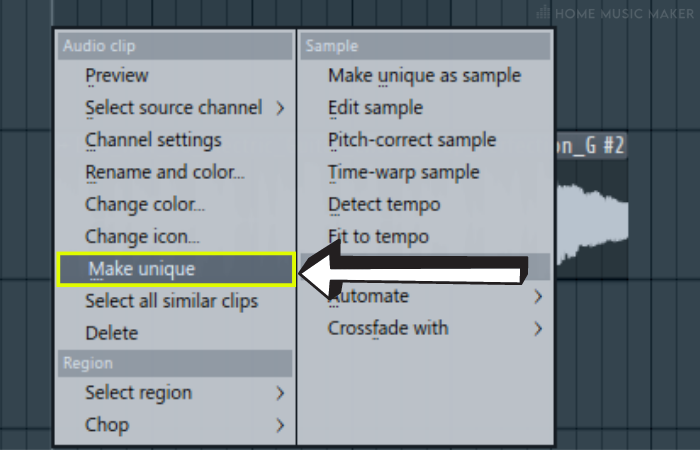
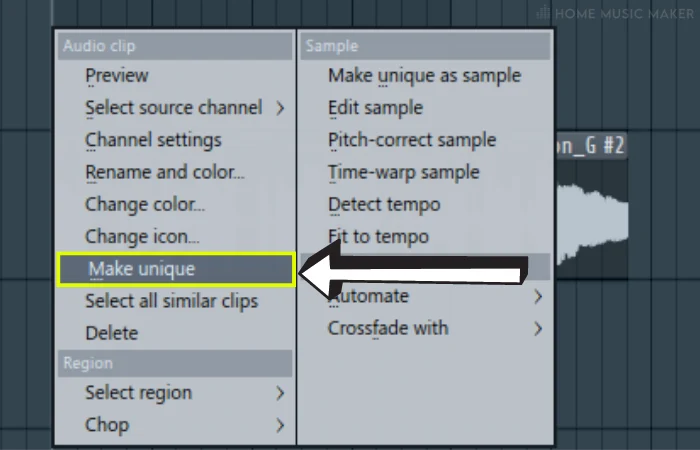
Step 3: In the Channel Settings, reverse this audio clip the same way as shown in the “Reverse A Sample” section.
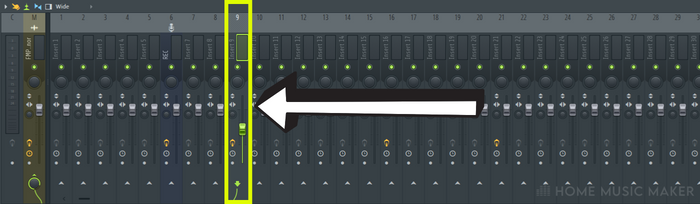
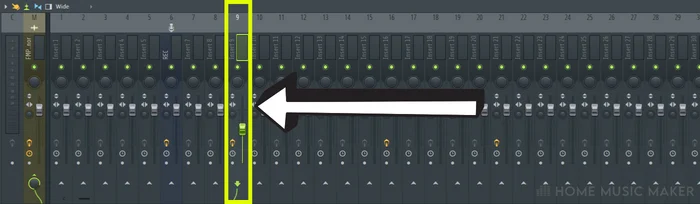
Step 4: In the Channel Rack, assign the track number of the audio clip to the corresponding channel using the box to the left of the channel name.
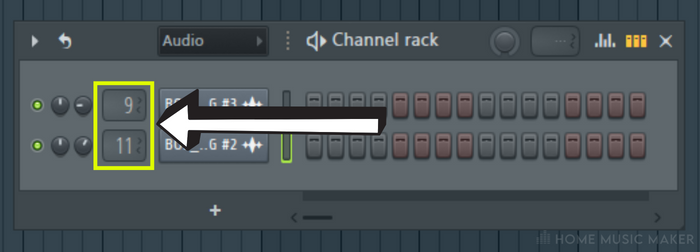
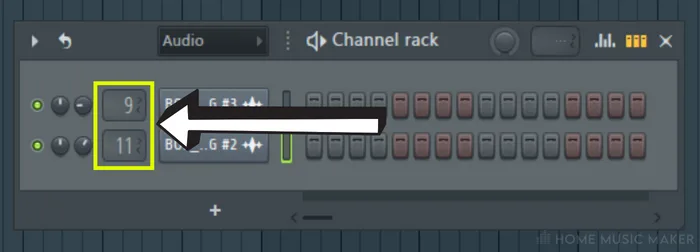
Step 5: Double-click on this number to bring up the corresponding track in the mixer.
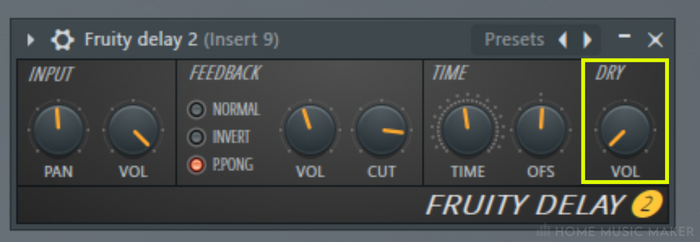
Step 6: In the Browser, click on Plugin Database, then Delay Reverb. You can choose any delay or reverb effect you want, even third-party ones if you have them.
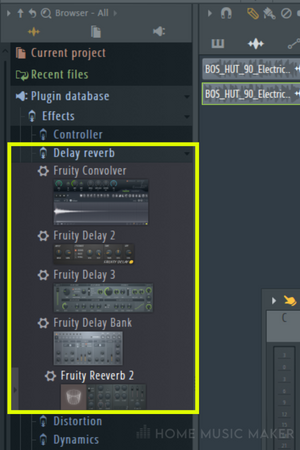
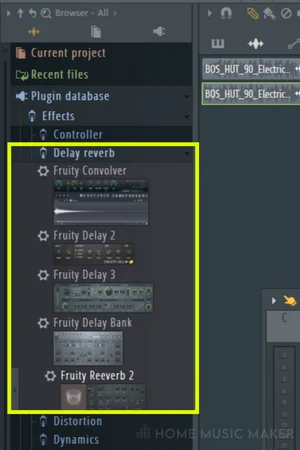
Step 7: Dial in the settings of the effect to achieve the sound you want. Keep the Dry option at 0 to hear the effect, not the original audio.

Step 8: In the Audio Clips tab of the Picker, drag back to the original audio clip.

Step 9: Blend the reverse delay audio with the original audio using the volume parameters of each track in the mixer.
You can follow this guide using a MIDI clip and reversing it using the method described in this article’s reversing a melody section.
Pro Tip
You can use EQ and other effects, such as modulation, exclusively on the delay signal to achieve an even more unique sound.
How To Make A Reverse Sound In FL Studio
Creating your own reverse sound in FL Studio is an easy and great way to add extra texture to your production. My favorite use of this is using a MIDI part from the song to create a riser FX.
Step 1: Select the MIDI clip you want to use for this sound. If it is part of a bigger clip, just split the clip.
Step 2: Use the Make Unique tool and drag the new pattern to an empty track, using the same methods in this article’s reversing in FL Studio section.
Step 3: Put another instance of your virtual instrument onto the track with the unique pattern. Ensure the settings are identical if you want that exact sound for this FX.
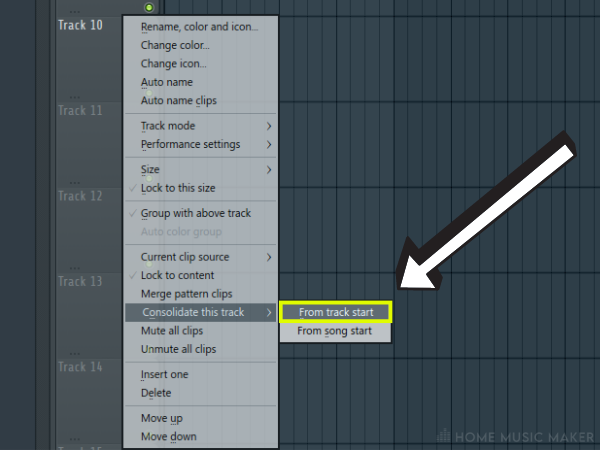
Step 4: With the Draw tool, right-click on this track and select Consolidate This Track. In the extra menu that appears, choose From Track Start to just get this sound.

Step 5: After the last step, the Render menu will appear for this track. Here you can decide what gets rendered from this track. You can opt for rendering with effects, choosing the audio file format, and more. When you’re happy, click Start.
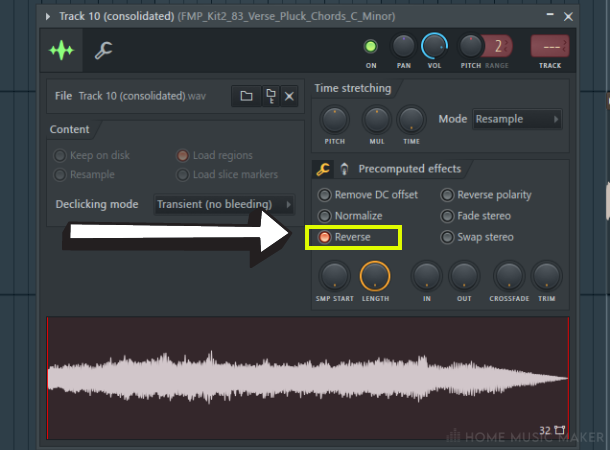
Step 6: The rendered audio clip will appear in your track. You can then double-click on the clip with the Draw tool to bring up the options for the audio clip. Click the Reverse option, as before, in the reversing a sample section.

Step 7: You can apply any desired effects to this reverse sound to get the right riser FX sound for your music that fits the song’s sonics.
Related Questions
What Is The Difference Between Reversing And Time-Stretching In FL Studio?
Reversing involves flipping a sample or audio clip backward so that the sound plays reverse.
On the other hand, time-stretching involves changing the speed or tempo of a sample or audio clip without changing its pitch.
What Are Some Common Mistakes To Avoid When Using The Reversing Technique In FL Studio?
When you reverse a clip, it can create a pop or click at the start and end of the reversed portion. To avoid this, use fade-ins and fade-outs on your clips to smooth the transitions.
Not all samples or audio clips work well when reversed. Some samples may lose their impact or sound strange when played backward. Choosing and experimenting with the right samples is essential to find what works best for your track.
When you reverse a clip, the pitch can change depending on the length of the clip. It’s essential to be aware of this and adjust the pitch to keep your track in tune.
How Do You Create A Seamless Transition Between A Reversed And Non-Reversed Section Of A Track In FL Studio?
Select audio samples that work well when reversed and blend well with your track’s non-reversed sections.
When transitioning between a reversed and non-reversed section of a track, use fades to smooth out the transition. Fading will help to eliminate any pops or clicks that may occur when the audio abruptly changes direction.
Automating the volume of the sections can help create a seamless transition.
Can Reversing Be Used Effectively In Any Genre Of Music, Or Are There Specific Genres Where It Works Best?
Reversing can be used effectively in many different genres of music. However, some genres may be more conducive to its use than others.
For example, reversing can work exceptionally well in Electronic Dance music, creating build-ups, drops, and other effects commonly used in the genre.
However, you can also use this effectively in other genres, such as Hip-Hop, Pop, Rock, and classical music.
Can Reversing Be Used To Create Interesting Effects On Drums And Percussion?
Yes, reversing can create exciting and unique effects on drums and percussion. For example, a producer can reverse a snare hit or a cymbal crash and then add some reverb or delay to create a build-up or a transition effect.
Reversing a drum loop can also create an interesting effect, especially when combined with other techniques such as filtering, chopping, and rearranging.
READ NEXT:
To learn another fantastic technique that involves manipulating samples, check out our article on how to chop samples in FL Studio.