KEY TAKEAWAYS:
To remove clicks from an audio track in REAPER, you should split the track near the click you want to remove. Select the track and press the “S” key to do this. Now, move the split around near the click you want to remove until it sounds better.
Click Removal In REAPER
In music production, you must know how to remove audio glitches like clicks and pops from an audio track.
If you don’t know how to remove clicks and pops, you will have trouble cleaning up audio tracks when a project calls for it.
I have used REAPER for many years and am versed in audio editing within it.
In this step-by-step article, I will show you how to remove clicks and pops in REAPER.
What You Will Need To Follow This Tutorial
Here is a list of everything that you will need to follow along with this tutorial:
- REAPER DAW (Digital Audio Workstation).
- An audio track with clicks and or pops to edit.
- Headphones (not necessary, but they make it easier to hear small sonic details than speakers do).
Identifying And Locating Clicks And Pops In REAPER
You can identify clicks and pops in an audio track in two ways in REAPER. You can either listen to them or spot them visually.
Here is what a click or pop might look like in an audio file in REAPER.
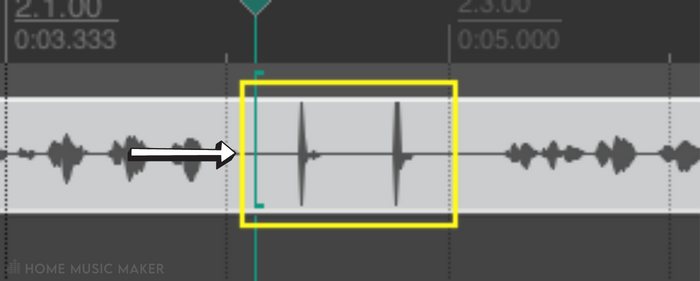
Now that you have located a click or pop in your audio track, let’s look into removing it.
Removing Clicks And Pops Manually In REAPER
Here is a step-by-step breakdown of removing clicks and pops manually from an audio track in REAPER.
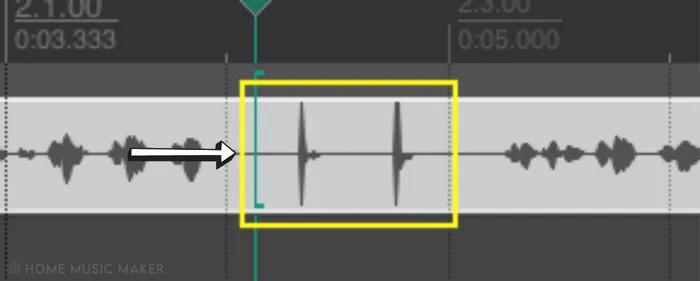
Step One – Select And Split Your Audio Track
The first step for removing a click or pop from an audio track is to select and split the track.
To do this, click on the audio track and move your cursor to where your click or pop is. Press the ‘s’ key, which will split your track.
Splitting an audio clip creates a small fade-in and fade-out. We aim to use this split and fade-in and fade-out to mask our click or pop.
Now that you have split your selected track, you are ready to move on to the next step.
Step Two – Adjust The Location Of Your Split
The next step is to adjust the location of your split.
To do this, hover your mouse over the split until the ‘double-track size adjusts’ symbol pops up. Once it does, you can move the crossfade in either direction to change how it sounds.
Once you have lined up your split in the audio track with your click or pop, you can go to step three.
Step Three – Adjust Fade-Ins And Fade-Outs If Necessary
Now, you can adjust the length of your fade-in and fade-out if necessary.
Zoom in on the split and hover your mouse over the fade-in or fade-out until the symbol appears. Once it does, you can adjust the length by clicking and dragging.
I feel that REAPER’s default fade lengths work perfectly fine, but this step is handy if you want to change them.
Now you are ready to move on to the final step!
Step Four – Listen And Adjust
The final step is to listen and make any adjustments that you might need.
What you want to hear is a nice and smooth playback without being able to notice the click or pop that we set out to remove.
If this is what you hear, then excellent work! If not, play around with the split position, and your fades until you get your desired results.
As you can see, removing a click or pop in REAPER is quite simple.
READ NEXT:
A crucial part of this is learning how to use fades. Check out our article on how to master crossfading in REAPER.
What Are Some Common Causes Of Clicks And Pops In Audio Recordings?
Here are some common causes of clicks and pops in audio recordings:
- CPU overload.
- Damaged microphone.
- Damaged audio cables.
- Loose cable connections.
- Accidentally hitting the microphone during recording.
- Sharp sibilances or mouth clicks in vocals.
- Electronic interference.
There are several different causes for clicks and pops in audio recordings.
Tips For Preventing Clicks And Pops In The Future
Here are some tips for preventing clicks and pops in audio recordings:
- Lower your computer’s buffer rate if CPU is the issue.
- Make sure your microphone is working correctly.
- Make sure your cables are not damaged.
- Make sure your cable connections are tight and secure.
- Make sure not to make contact with the microphone during the recording process.
- Keep separate electronic devices away from your audio interface.
If you follow these tips while recording in the future, you will avoid having any clicks or pops in your audio tracks.
READ NEXT:
Maybe you’re hearing crackling rather than pops. To fix this, look at our article on how to stop REAPER cracking during recording.
Related Questions
Why Is It Important To Remove Clicks And Pops From Audio Recordings?
Here are some reasons why it is essential to remove noise, clicks, and pops from audio recordings:
– They sound unpleasant to the human ear.
– They make your track sound unpolished and unprofessional.
– They distract listeners, which will take away from your track.
– If they are clipping, they can damage audio equipment over time.
– They add unwanted noise to your track.
Remember, there is nothing good about having unwanted noise in your audio recording.
Is REAPER Good For Audio Editing?
Yes, the REAPER DAW is great for audio editing. It has a lot of features that make editing audio a breeze.
Of all the DAWs that I have used, REAPER is my favorite for editing audio.
Can You Combine Two Separate Audio Tracks In REAPER?
You can combine multiple tracks in REAPER by “gluing” them together.
To do this, line up your two audio tracks where you want them to be. Next, select them both, right-click either of them, and select “Glue Selected Items”.
Gluing items together in REAPER is permanent, so you should do so with caution!
Can You Use EQ To Edit Out Background Noise?
In many cases, yes, you can use EQ to edit out specific background noise.
To do this, try using a low-pass filter and push it until you hear the background noise disappear from your recording.
However, if the noise is on the low end, try using a high-pass filter to cut the noise from your track.
READ NEXT:
The more issues you fix, the quicker you can make music. Check out our article on the REAPER can’t write to recording files error.