You’ll need to follow only three steps to change Ableton’s metronome volume. Firstly, open your selected track, enable your metronome for recording or playback, navigate to the master track in the Session View, and adjust the volume knob up or down.
Adjusting The Metronome Volume In Ableton
Using a metronome might seem like a small detail in music production.
Still, without knowing how to adjust the metronome volume in Ableton, you may be depriving yourself of the opportunity to finely hone all aspects of your creative skills to the best of your ability.
By the end of this tutorial, you’ll be able to enable the metronome in Ableton, alter its volume, change its speed and really add to your creative music production arsenal.
What You Will Need For This Tutorial
- A computer installed with Ableton Live Suite
- A selection of audio and/or MIDI tracks open in Ableton
How Do I Adjust The Metronome Volume in Ableton?
To adjust the metronome volume in your project, from the Arrangement or Session view, open your project and complete the following:
Step One: Enable The Metronome
Navigate to the control bar (top left corner of the screen), and click the metronome icon.
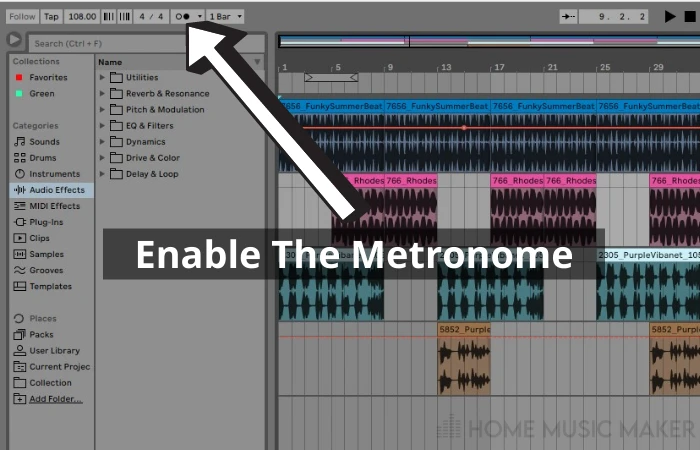
When enabled, the button turns orange. When disabled, the button is grey.

Step Two: Determine When The Metronome Is Enabled
Click the down arrow beside the metronome button, and select the ‘Enable only while recording’ option.
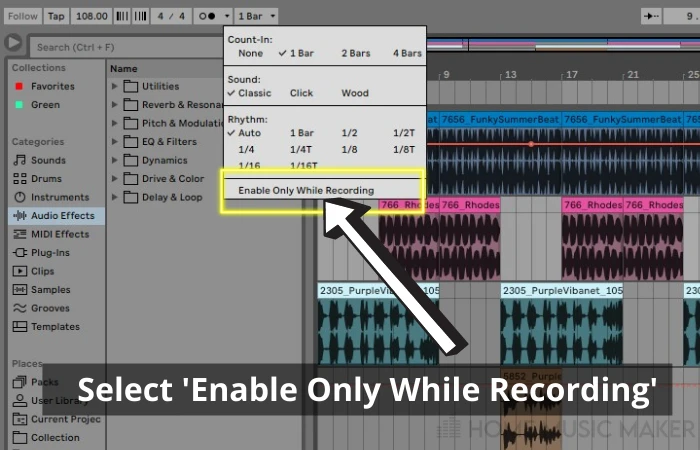
If you deselect this, the metronome will play for every track.
Step Three: Adjust The Metronome Volume
Click the Play button and navigate to your master track. You are now able to hear the metronome sound.
Adjust the metronome volume carefully by dragging the knob with the small headphones at the bottom, clockwise to the right. (Be careful not to blow your head off!!)
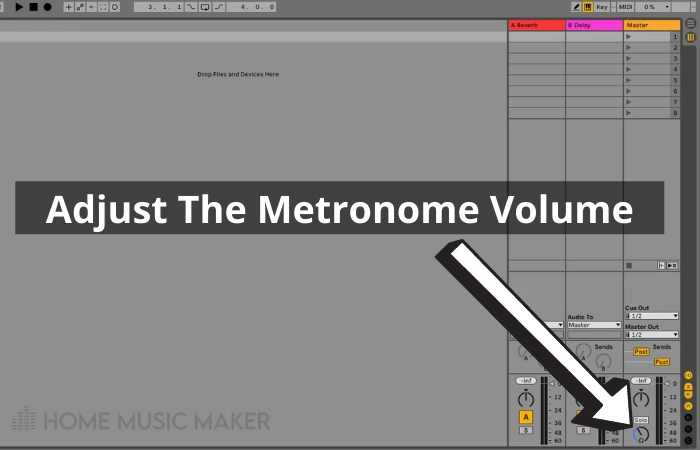
You will notice the metronome icon will be orange, and as the track is playing, the two dots on the icon flash.
How To Set Metronome In Ableton
Step One: Open Your Track
Open your track in either Session or Arrangement view.
Step Two: Set The Master Tempo For Your Audio Track, Or Your MIDI Track
Navigate to the Control Bar area of the screen (top left-hand corner in both Arrangement and Session views.)
In the BPM field, set the master tempo of your project by typing in the number of beats per minute you need.
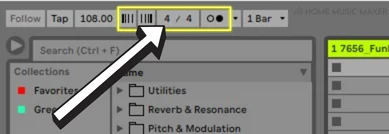
Step Three: Set The Time Signature
In the time signature field, set the number of beats per bar (top number) and the type of beats per bar (bottom number).
For example, this would be 3/4 time for a waltz, being three-quarter notes per bar.
Step Four: Enable The Metronome
Click the metronome icon to enable it. (It turns orange when enabled.)

Step Five: Configure The Metronome
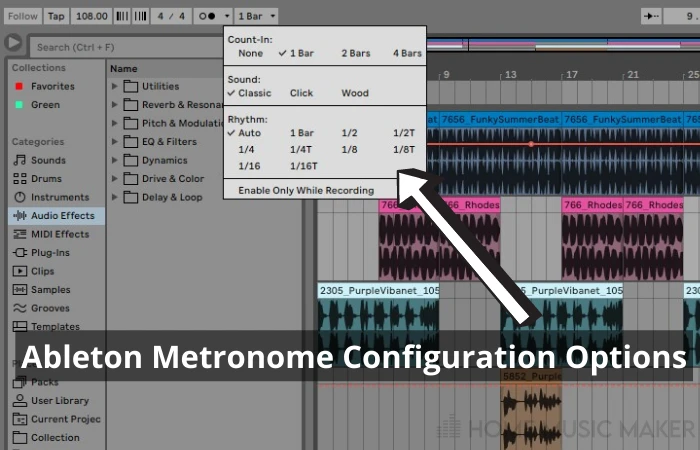
Click the metronome drop-down list to set up the following options:
- Count-in. Ableton’s metronome will count you in before recording your audio or MIDI tracks. You can choose from None, 1, 2, or 4 bars.
- Sound – Ableton gives you three options for your metronome sound. These are classic, click or wood. If you want a sound different from what Ableton provides, you can also create your own. Click here to view an article written by Ableton staff on how to do this.
- Rhythm – Ableton gives you several options for the rhythm type on the metronome. This ranges from an Auto selection (quarter notes) and quarter and half notes, quarter and half note triplets, eighth notes, eighth note triplets, sixteenth notes, and sixteenth note triplets.
Step Six: Set When You Want The Metronome To Play
You can select Enable only when recording or disable this option to play the metronome during playback.
How To Turn Down The Metronome Volume
To turn the metronome volume down in Ableton, follow steps 1 – 3 in How Do I Adjust the Metronome Volume in Ableton above.
When you reach step four, instead of turning the knob clockwise to increase the volume, turn it anti-clockwise to decrease it.
Why Can’t I Hear the Metronome In Ableton?
If you cannot hear the metronome in Ableton, you may have it set to play only when recording, and you are in playback mode.
You need to disable this option so that the metronome plays all the time.
The volume level in the master track may also be turned down to the point where you cannot hear the metronome. You can adjust this in the master track in Session View.
How Do I Enable the Metronome in Ableton?
You enable the metronome by navigating to the control bar (top left corner of the screen) in both Session and Arrangement View and clicking the metronome icon.
When enabled, the button turns orange. When disabled, the button is gray.
Why Is Ableton Recording The Metronome?
Ableton is recording the metronome because it has been enabled to do so. See step six of How to set metronome in Ableton to change this.
Related Questions
What Is a Metronome?
A metronome is an inbuilt device in Ableton (and other DAWs like FL Studio, Pro Tools, etc.) that clicks at regular intervals so that all tracks in your project (including the musicians you record) stay in time. You can specify the interval click by entering the number of beats per minute and activating and deactivating it.
What Does Tempo Mean?
Tempo is a fundamental musical element in creating a piece of music. You can use it to convey mood and all kinds of feelings, depending on what you are trying to develop in your composition.
Tempo is measured in Beats Per Minute. (BPM)
What Does BPM Stand For?
BPM stands for Beats Per Minute. This is the musical means to express the tempo of a piece. It indicates to musicians the speed at which to play the music. In Ableton, setting the BPM sets the master tempo of your track.
The higher the number of BPM, the faster the music. The slower the number of BPM, the slower the music.
Can I Automate the Metronome?
Ableton’s metronome is a great candidate for automation. Here is a handy article on how to automate tempo in Ableton.
Check out the following article for more tips on how to use the metronome in Ableton.

 Want to connect with other music producers for help and guidance?