How to automate tempo in Ableton Arrangement View is simple. All you need to do is switch on Automation Mode, navigate to and expand the Master track, set up your desired tempo range, and click and drag the red line in the track to change your tempo over time.
Ableton Live’s ability to automate tempo offers you the means to experiment with speeds in your tracks, push and pull the tempo around without twisting a knob, and draw the listener in different emotional directions, all at the push of a button.
It gives you a greater range of artistic expression, very quickly and conveniently.
By the end of this tutorial, you will be able to start your track in one tempo, increase and decrease the speeds as many times as you want, and then listen to the result of your work by clicking Play and following the automation along.
All it takes is five easy steps!
What You’ll Need to Follow This Tutorial
For this tutorial, you’ll need:
- Ableton Live
- Complete (or incomplete) midi track / s in Arrangement View
- A MIDI controller or at least one software synthesizer
- A stable Internet connection
You can automate tempo in either Arrangement or Session view.
For today’s tutorial, I’ll focus on automating the tempo from the Arrangement View.
Why is this? Because it gives you the ability to make tempo changes gradually over time rather than limiting you to the sharp peak and trough changes you make in Session View.
Arrangement View gives you a complete picture of your set, so you know exactly at what points you are creating different tempos.
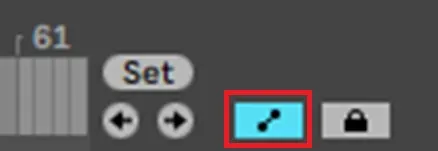
STEP ONE – Switch on Automation mode
In Arrangement View, click the Automation icon or type A on your computer’s keyboard to switch on automation mode in Ableton.

STEP TWO – Select the devices to automate
Navigate to the Master track at the bottom of the screen. Click the triangular icon with the circle around it to expand it. Two device chooser drop-down boxes display in the Track Title section.
From the first device chooser, select Mixer. From the second device chooser, select Song Tempo. A red dot displays in the two device fields, indicating you have created automation.
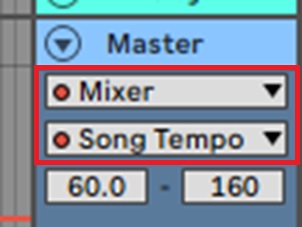

STEP THREE – Set the Automation tempo range
Under the Song Tempo field, enter the tempo range that is appropriate for your track, starting from the lowest Beats Per Minute (BPM) on the left (e.g., 60 BPM) to the highest BPM (e.g.,, 160 BPM) on the right.
You will now see a red line in the Master track (also the automation lane) and can begin to create some automation.
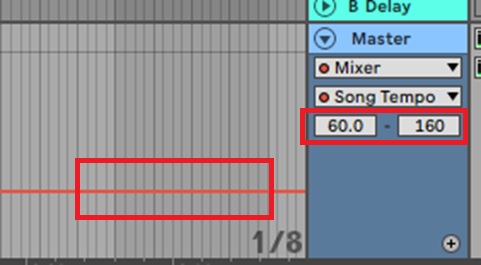

STEP FOUR – Create the Automation
Ensure you are at the beginning of the Master track in your live set at the bottom of the Arrangement View. Click and drag the red line to create gradual increases or decreases in the tempo value over time (the automation envelope).


Once you have stopped dragging the line, Ableton Live displays the tempo at the point where you released the cursor. You can repeat this and create as many tempo change points as your track requires.
STEP FIVE – Review the Automation
Click Play to listen to your track with the automated tempo change.
Note that as the track is playing, you can view the tempo field in the interface at the top left side of the screen increasing and decreasing in real-time, as per your changes. The BPM box displays a small red dot in the top left-hand corner, denoting the tempo is automated.


And that’s all there is to it!
Related Questions
What Is Tempo?
Tempo is the Italian word for time – it’s also a fundamental musical element in creating the feel of a piece of music.
In music theory, the tempo is about the music’s speed and mood. It can convey a spectrum of feelings, including excitement, anticipation or relaxation, love, gravity, and sadness.
Tempo is measured in Beats Per Minute. (BPM)
What Is BPM?
BPM stands for Beats Per Minute, and this is the musical expression of the tempo of a piece of music. It tells the musician how quickly (or slowly) to play the music. In a DAW, it articulates the master tempo.
The higher the number of BPM, generally the more joyful, playful, and exciting the mood of the music. The slower the number of BPM, the sadder or more romantic the mood of the music.
How Do I Set BPM In Ableton?
Setting the BPM in Ableton is easy. Click the BPM field in the top left corner of Ableton Live in either Session or Arrangement View, and enter the BPM you require. Your song tempo will be the number of BPM you have entered.
What Is Automation?
Almost every feature of Ableton can be automated, e.g., volume, panning, tempo. In the case of automating the tempo, it means having Ableton change the tempo over time by moving a knob automatically for you after you have specified the points in the track where the tempo needs to change.
It can also mean automating other parameters simultaneously, but that is for another article!
Why Automate?
Quite simply, because it:
* Allows different tempo changes at the time you specify, with great precision
* It means you create truly idiosyncratic effects in your live sets
* It frees up your time to focus on other parts of your live performance.
How Do I Turn Off TempoAutomation?
Should you decide you, don’t like the automated effect you’ve created. Click the BPM field in the top left-hand side of the screen in Arrangement View, right-click and select Delete Automation or use the Ctrl+Del keys.
What Is the Difference Between Session and Arrangement View?
Session View is predominantly used for live performance and DJ Sets. It’s also great to use when playing around to record song ideas.
Arrangement View is used primarily for arranging and producing tracks with fixed timelines and start and endpoints. It is straightforward to precisely adjust track points and draw in various automations.
Want to learn more? Click here to find out how to fade a MIDI track in Ableton.