If you want to fade an audio track in Ableton, it is pretty straightforward.
Unfortunately, trying to do the same with a MIDI clip is not so easy and can be seriously frustrating if you don’t know-how.
Luckily we’re here to help!
In this article, I explain how to fade a MIDI track in Ableton Live.
How To Fade an Audio Track in Ableton
First, let’s take a quick look at how you fade an audio track.
Hover the mouse icon over the audio clip that you want to fade so that the fade-in and fade-out handles appear (if they don’t appear, press ‘A‘ on your keyboard, and they will appear). You then left-click on the handle that you want to fade and hold down on the mouse as you lower the fader.
It should look like this:


However, if you try and do the same thing with a MIDI file, you will notice no fader handles.
See.


So how do you fade a MIDI track?
Step 1: Apply the Utility Effect to Your MIDI Track
On the left-hand side of the DAW, you will find the Effects tab; left-click (1) on it. The Effects panel will appear to the left. Scroll through the effects until you see ‘Utility.’ Left-click on Utility (2) and drag it across to the MIDI instrument track.
You can drag it anywhere on the MIDI track, and it will load the Utility effect to that selected track.
To see the Utility effect on your track, left-click on the little box at the bottom right of the DAW (3). There, you will see your Utility track loaded.
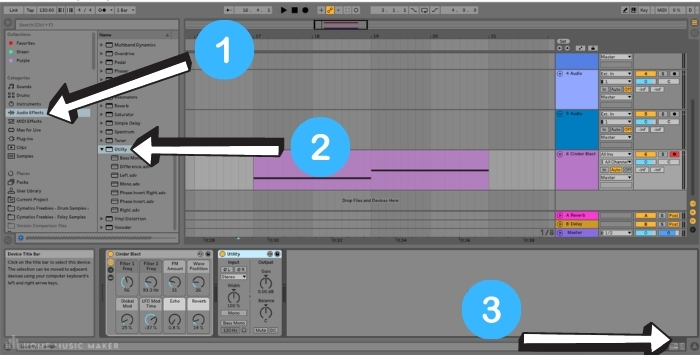

The Utility effect is a gain plugin, which we will now use to automate the fade in and out of your MIDI clip.
Step 2: Prepare the MIDI Track for Automation
Go ahead and press ‘A‘ on your keyboard to see the automation options appear on your MIDI track (1).
To automate the Utility effect device, left-click on the ‘Gain’ knob (2) of the utility device since that is what we want to automate.
You will notice that the automation options on the MIDI track itself instantly switch from ‘None‘ to ‘Utility‘ (3) as the device and Gain as the automation control.
You will also notice a red automation line appear (4).

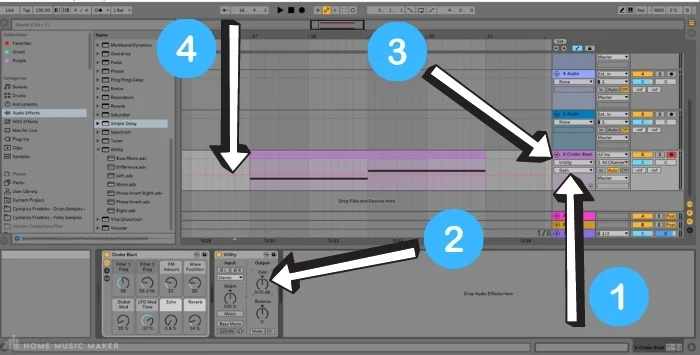
If you want, you can also use the drop-down menus to select the effect device and automation control, but that involves more steps.
Step 3: Automate the MIDI Track
The next bit can be a little bit fiddly.
You want the majority of the MIDI clip to maintain a constant volume. Therefore, you want to click on the red automation line (technically called a ‘breakpoint envelope‘) somewhere near the clip‘s start and near the end of the clip where you want the MIDI clip’s volume to be unchanged.
You will also want an insert marker just before the clip itself and after the clip so as not to interfere with the volume for the rest of the track.
Lastly, create breakpoints at precisely the start and end of the clip.
Once you have your breakpoints, go ahead and select the breakpoint at the very start or end of the clip (depending on whether you want to fade in or out).
Left-click on it and drag it down.


Hey presto, you have created a fade!
How steep you want your fade is up to you.
If you want it to fade in from or out to complete silence, drag it all the way down. Otherwise, find a point that you are happy with.
FAQ – How to Fade a MIDI Track in Ableton
How to fade to silence in Ableton Live?
Do exactly as I have done above, but drag the breakpoint at the very start or end of the clip down to the bottom line. It should show -inf dB. If you are fading out at the end of the song, this is what you will most likely need to do.
Why don’t you just put a breakpoint in the start and end and drag the beginning down, so you get a straight ascending line until the end?
You can do that if that is the effect that you are after. If you want the entire MIDI track to fade in or out so that the track volume fades in or out, simply put a breakpoint at the start and end of the MIDI track or clip and drag one of the breakpoints down. If you want the midi clip to fade in, lower the first breakpoint. If you want the midi clip to fade out, reduce the second breakpoint.
Is there a way to fade in MIDI clips without automating in arrangement view?
You can automate the MIDI clip itself using the clip viewer. Double-click on the midi clip. Next, select the Show/Hide Envelope Box button at the bottom left of the clip viewer (remember the names and functions of each button will appear in the help box to the left of the DAW when you hover the mouse icon over them). From there, select ‘volume‘ from the ‘Control Chooser‘ drop-down menu. Go ahead and automate using breakpoints, as shown in this tutorial.
Note: You cannot use this technique to fade in the track itself, only MIDI clips within that track. Also, note that your MIDIi clip’s volume will be affected twice if you automate the clip using the clip viewer and any gain automation you do on the track itself using the Utility plugin.
What is the recommended way to fade to silence in Ableton Live?
Personally, I tend to prefer automation using the Utility plugin. It allows for more control. Plus, sometimes I forget when I have created a clip fade in the clip viewer – which can cause all sorts of problems later. Although there may be some instances where automating the clip’s volume inside the clip viewer is recommended, such as when you want to gate the clip’s volume while maintaining the volume of the track’s effects (such as reverb).
How do you make stutter edits in Ableton Live?
There are many ways to do this, but I do it by double-clicking on the MIDI clip to open the clip viewer. Click on the Show/Hide Envelope Box button, select Volume from the Control Chooser drop-down box. Then, instead of creating breakpoints – select the Draw Mode Switch pencil at the top right of the DAW and left-click between the grid lines on the clip view editor to create blocks of silence. You can get the stutter effect if you do this in 16ths (right-click to see the grid editor).
Can you maybe automate the chain volume of an audio rack?
You can do that too. You can create fades on an audio file or automate the volume of the instrument rack or effect rack. You can even fade the master track in or out using a Utility plugin. The same applies if you want to fade in a drum rack etc. Whereas if you’re going to fade an audio effect, you will automate that effect’s gain and not the Utility plugin. If you want to apply the Utility automation to multiple tracks, simply copy the automated Utility plugin and paste it into the other tracks.