You can simply hold and drag the loop marker across the ruler to set the length of your marker locators. Once you’ve positioned them properly, press “/” or click on the Loop Active to enable the loop function in Presonus Studio One.
Knowing the ins and outs of looping parts in any DAW might not seem like a skill worth your time, but I’m here to try and change your mind.
Although it doesn’t seem like there’s much to it, loop selection in Studio One is quite a big topic to cover, and it will immensely speed up your workflow.
Let’s start with the basics.
How Do I Select A Loop In Studio One?
When you first create a new song project in Studio One, the first you need are the loop markers.
New users may have a hard time finding them as they are neatly tucked away in the upper left corner of the ruler. Simply hover your mouse over that corner. You’ll immediately see double arrows that you can hold and drag your loop marker to the desired location. (1)
Once you’re happy with where your loop markers are positioned, press num pad “/” on your keyboard or click on the Loop Active icon in the transport section at the bottom. (2)
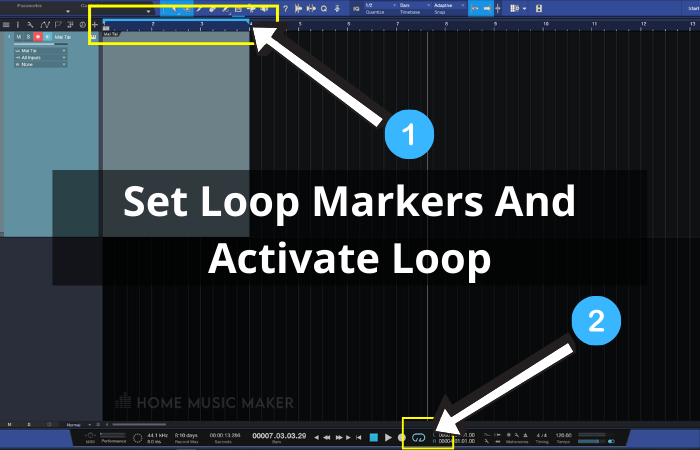

And voila- you’ve got yourself a section that you can loop.
Although doing loop selection this way is acceptable, there are additional layers to it that will make your work in Studio One even more enjoyable. Here are some pro tips to make your life easier.
Use Snap Function To Your Advantage
To use the snap function, simply press “N” on your keyboard or click on a snap icon at the top of the project window next to the quantize menu.
Now, if you hold and drag your loop markers, you’ll notice how they will align with whatever quantized value you have set.
Depending on how fine you want your loop marker to respond, you can set the quantize value from 1/1 to 1/64.
If you need to roughly set the marker length, going with values of 1/1 or 1/2 is a good choice, whereas 1/32 and 1/64 are excellent for fine-tuning the loop selection.
Alternatively, simply disable the snap function if you don’t want your loop marker to be constrained by the grid.
Now, you’ll be able to move it around freely.
Use Ctrl And Alt Keys To Control The Loop Marker
Hovering over the ruler and dragging the loop marker is convenient in most cases. Still, it can feel a bit clunky sometimes.
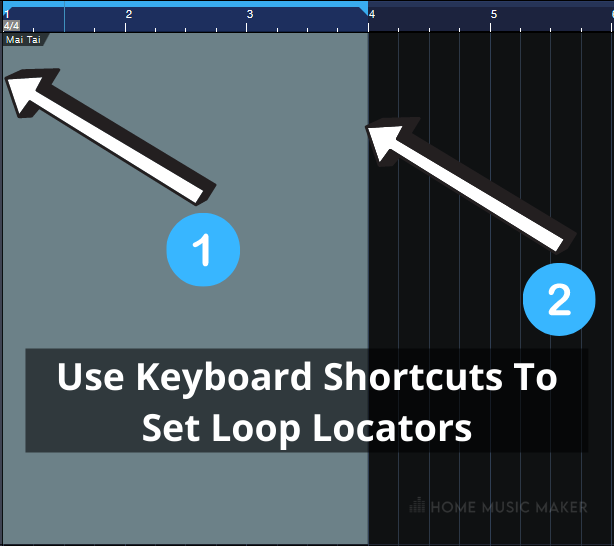
Luckily, you can easily set up your loop locators with Ctrl (Cmd on Mac) and Alt keys.
While holding the Control key (Cmd on Mac) and hovering over the ruler, you’ll notice the blue vertical line appear.
Once you left-click on any position on the ruler, this will determine your left locator. (1)
To set your right locator, repeat the process while holding the Alt key. (2)

Use Events To Set Your Loop Marker
This is probably my favorite way of selecting my looping range because it’s easy and convenient.
All you need to do is select any audio event in the project, press “P,” and the loop marker will be the length of the event.
This is ideal when auditioning loops or when mixing a particular instrument.
It’s important to note that the snap function will determine how events will be marked.
If your audio track or MIDI events fall precisely on the grid, having the snap function enabled won’t cause you any trouble.
However, if your event is slightly pulled out by a random value, it will snap your locators to the nearest grid subdivision.
If you want to select a whole event that doesn’t sit perfectly on the grid, hold the Shift button and then press “P.”
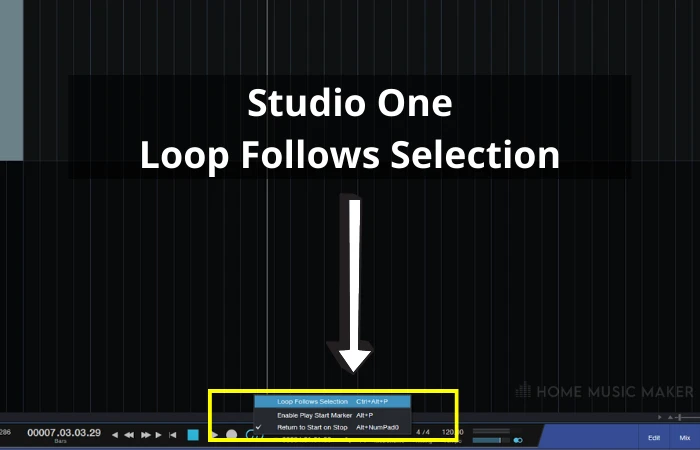
Alternatively, suppose you want to have this function enabled without needing to press “P” every time you select an event. In that case, you can right-click the Loop Active icon in the transport section and mark “Loop Follows Selection” or (Ctrl (Cmd on Mac) +Alt+P for a keyboard shortcut).

Set Your Loop Selection Through Transport Menu
Although it’s not the most efficient way of setting loop markers, you may want to use the transport menu if you’re tired of using the ruler.
You’ll notice L and R fields beside the Loop active icon that tell you exactly on which bar and beat your loop is placed.
Simply hover over the numbers and use your mouse wheel to change the position of your left and right locator, respectively.
Note that the marker’s resolution will change accordingly the marker’s resolution will change accordingly depending on the area your mouse is placed on.
If you hover over the first set of values, it will change the locator position by a whole bar.
The second set will change the position by beats (quarter note), the third one by an eight-note, and the last one will position the locator in samples.
Use Shift Loop Function
Studio One has the option to shift your entire loop region by the same amount, starting from the end of the current loop.
This is super useful when working with song structures with the same amount of bars.
For example, your verse may contain 16 bars as well as your pre-chorus and chorus. Shifting your loop by those same 16 bars means that you don’t need to go back and constantly adjust the loop marker whenever you want to listen to a different part of the song.
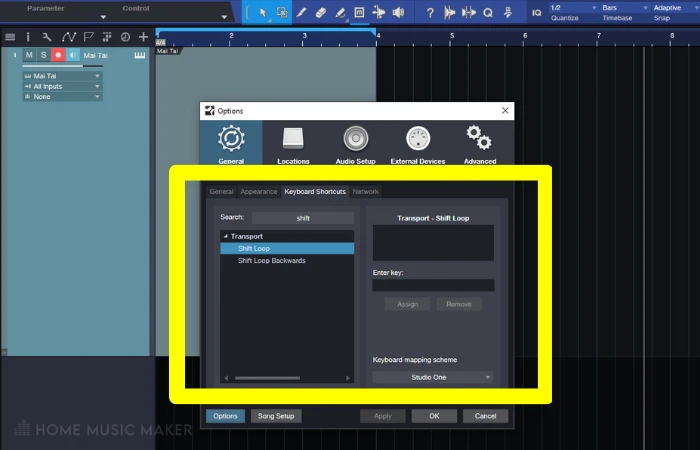
However, this function is not assigned to any hotkey by default, so you must do it manually.
To do this, head over to Studio One and click on Keyboard Shortcuts.
Search for the “Shift Loop” function in the menu and assign whichever hotkey feels the most natural to you.
Once you do, click Apply, and you’re good to shift your loop around Studio One.

Related Questions
How Do You Extend a Loop Duration in Studio One?
You can either hold and drag the marker to the desired position or use the transport menu to set the length of your loop marker.
What Is the Key Command to Loop a Selection in Studio One Professional?
The key command is “/” (forward slash).
What’s the Quick Key to Delete a Track in Studio One?
It’s Shift+T.
How Can You Stop a Loop From Continuously Repeating in Studio One?
You can simply toggle the loop button on or off to control a loop playback.
Does Studio One Support Loop Recording?
Yes, if you click on the wrench icon in the transport menu, you’ll see all the recording options, including loop recording.
Why Is Looping Useful?
Looping a specific part of a song section is helpful in many ways. First of all, it’s great when mixing a song. You can always focus on a particular part of the song and make it sound as best as possible. Also, it’s excellent for auditioning drum loops or trying out a virtual instrument.
Does Studio One Artist Come With a Loop Library?
No, only the Pro version of Studio One comes with a hefty selection of audio loops and samples. You can always buy additional packs from the Presonus webshop.
Final Words
While there are many ways to set the length of your loop markers in Studio One, enabling the “Loop follows selection” function and using the “P” shortcut seems to be the preferred method, although not conclusively the best one.
After all, the beauty of Studio One lies precisely in the endless possibilities to tweak it to your liking and workflow!
For more great tips, check out this article on how to nudge in Studio One.