To use the REAPER web interface, go to Options>Preferences>Control/OSC/Web>Add>Web Browser Interface. From here, check the box for ‘Use rc.reaper.fm’, enter an ID word, go to ‘rc.reaper.fm’ on the device you want to use as a controller, and enter your keyword.
Using The REAPER Web Interface As A Controller
There is nothing more frustrating than recording an instrument in your studio and running back and forth to press record after every take.
Thankfully, REAPER has a feature that you can use to turn any device into a controller for the DAW (Digital Audio Workstation).
This will save you some time and make your audio production workflow a breeze.
I use this feature all the time when recording music/audio in REAPER!
In this how-to guide, I will show you how to use the REAPER web interface and what it can do.
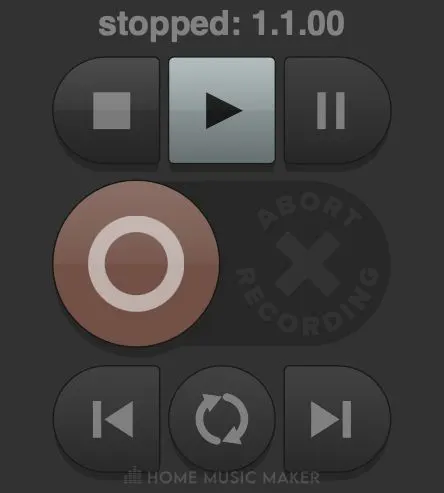
REAPER Web Remote Interface
The REAPER web remote interface is a feature that lets you control REAPER using a third-party device as a controller.
Step One – Set Up A Web Browser Interface In REAPER’s Settings Menu
The first step for using the REAPER web interface to turn your device into a recording controller for REAPER is to change some settings in the settings menu.
To do this, select Options>Preferences>Control/OSC/Web.
Once this menu is open, click ‘Add‘ and select ‘Web browser interface.’
From here, you have the option to set a username and password. This is optional, but if you want to, enter a username and password in this format, username:password, and press the enter key.
Now you have added a new web browser interface!
Step Two – Link Your Device
Your next step for turning your third-party device into a recording controller is to use your device to open up the appropriate website’s HTML.
To do this, you can check the box for, ‘Use rc.reaper.fm‘, type in a keyword, and press the enter key.
You can type in the whole website’s HTML into a browser such as Mozilla Firefox, Google Chrome, Apple Safari, Microsoft Edge, etc.
I recommend using the rc.reaper.fm option, as it always seems to work much more smoothly.
If you decide to use this method, go to rc.reaper.fm on your desired browser and enter your chosen keyword.
Once you enter the keyword, you will get a link to take you to your REAPER recording controller.
Now you are ready to start using the controller!
Step Three – Use Your Device As a Controller
Now that you have successfully set up your device as a REAPER controller let’s look at how you can use it.
Here are some of the REAPER web interface features:
- Stop button
- Play button
- Pause button
- Record button
- Abort recording button
- Go to the beginning of the track
- Go to the end of the track
- Loop track
- Arm to record button for each track
- Mute button for each track
You can use these features to easily control REAPER with a third-party device.

REAPER Web Interface Not Working
If the REAPER web interface is not working, here are a few things you can try:
- Use the ‘rc.reaper.fm‘ website with a keyword that you enter instead of simply using the entire website’s HTML. This seems to work much better.
- If you get an error message after you click ok, open the menu for your Web Browser Interface back up, re-type the keyword, and press ok again. I know it seems weird, but it sometimes works for me.
- Make sure you update REAPER.
- Make sure you update your computer.
- Try a different device; some devices have more issues than others.
- Try a different browser.
The web interface for REAPER is pretty simple, follow the steps correctly, and it should work for you.
The REAPER web interface is a massive help with producing audio/music using REAPER.
REAPER Web Interface Template
To make a template for a REAPER web interface controller, click Options>Preferences>Control/OSC/Web to open up the right menu.
From here, press add and choose ‘Web browser interface.’
You can choose to enter a username and password or not; it’s up to you.
Once you have checked the box for ‘rc.reaper.fm‘ and type in a keyword, press the enter key, and boom, you have made a REAPER web interface template.
REAPER Web Interface Mixer
Unfortunately, the REAPER web interface recording controller is very basic and does not have a mixer.
The only thing that the REAPER web interface lets you do is record audio.
Related Questions
Do You Like the User Interface of Reaper?
Yes, I love the user interface of REAPER. I find it easy to use and navigate.
In my opinion, REAPER’s user interface is one of its best features. It is a big reason why REAPER has so much accessibility for beginner music producers.
Is REAPER Good for Editing?
Yes, REAPER is excellent for editing.
You can efficiently perform your standard cut, copy, and paste in a flash. Still, you can also use REAPER to split audio, perform fade-outs, duplicate entire tracks, etc., without even opening another menu.
What Browsers Are Compatible with The REAPER Web Interface?
Don’t worry. Whether you use Microsoft Edge, Mozilla Firefox, Apple Safari, Google Chrome, etc., you will be able to use the REAPER web interface feature. The REAPER web interface is available for all browsers.
Can You Use the REAPER Web Interface Controller for Editing?
No, the REAPER web interface controller is only helpful for recording audio; it will not help you edit in REAPER.
Fancy learning more? Check out this in-depth guide on virtual instruments on REAPER.