Normalization in REAPER is achieved by selecting the audio item and pressing Ctrl+Shift+N. To normalize multiple audio items, select the audio items you want and press Ctrl+Shift+N. To normalize multiple audio items in the same track using a common gain, select the items and press Ctrl+N.
Normalization
Normalization is an audio process you hear thrown around, but do you actually know what it does?
Do you know how to do it? And, more importantly, when to use it?
It’s not a feature necessary to music production, so even some experienced music producers and mixers don’t know how to use it, as they have never needed it.
In this article, we shall explore what normalization is, specifically within REAPER, how to use it and when to use it.
What Is Normalize In REAPER?
Normalization is the process in which the overall volume is changed by a fixed amount to reach a certain level. It doesn’t change the dynamics or any other qualities in the audio; it just increases the loudness.
If you want to change the dynamics and make the track have a smaller dynamic range, then you want to use compression.
Normalization is not a REAPER-specific audio process. Many other digital audio workstations, such as Pro Tools and Adobe Audition, have this feature.
How To Normalize Audio In REAPER – Step-By-Step Guide
Step 1: Click on the audio file you want to normalize. This will select it.


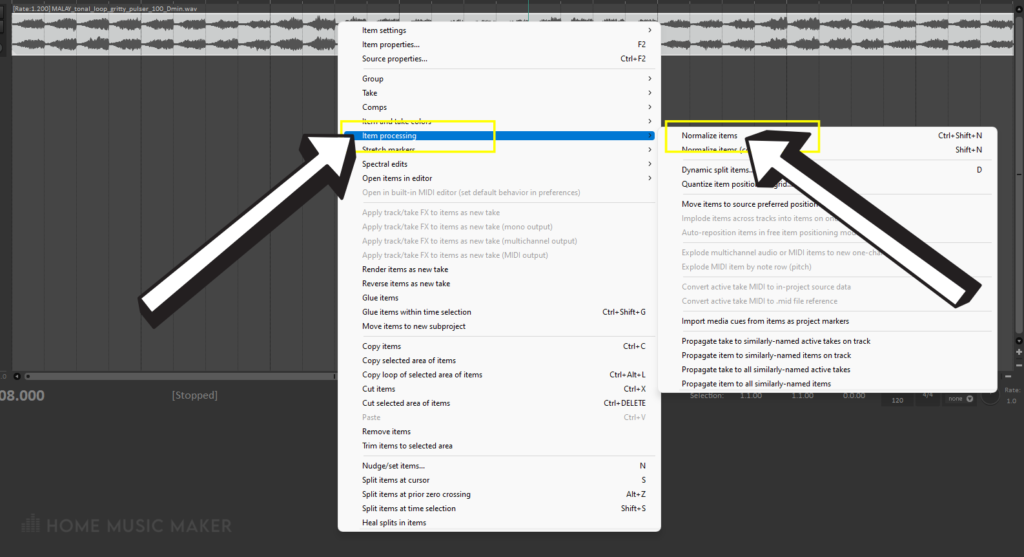
Step 2: You can press Ctrl+Shift+N to normalize the audio. You can also right-click the audio, hover over item processing and then select normalize items.

Now the audio file is louder, without the peaks clipping. This is why it’s also called peak normalization.
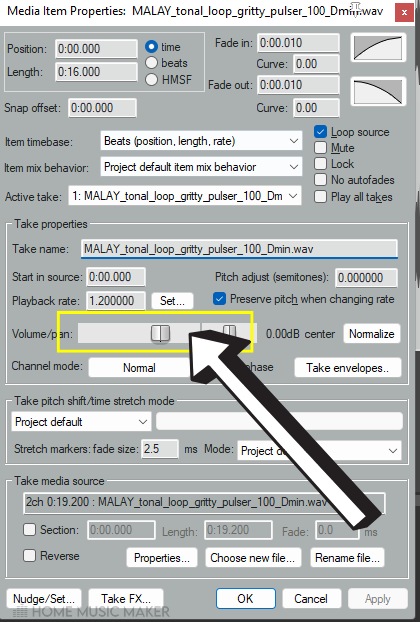
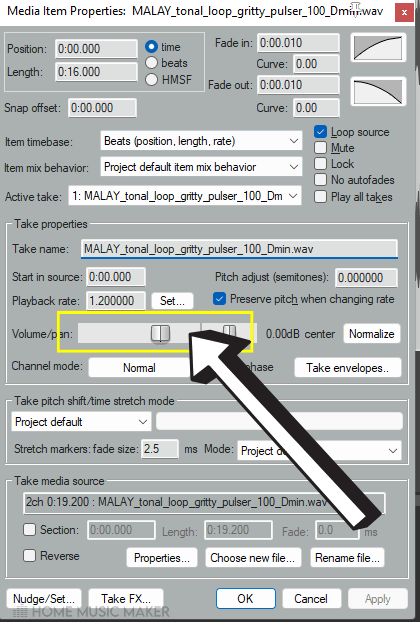
Step 3 (Optional): If you want some headroom on your audio file, i.e., a more significant gap between the peak and the top level, then you just have to adjust the volume of the audio item.
You can do this in the media item properties.
Right-click the audio item and then select item properties.
From here, within the take properties, you can adjust the volume of the audio file.
How To Batch Normalize Audio In REAPER
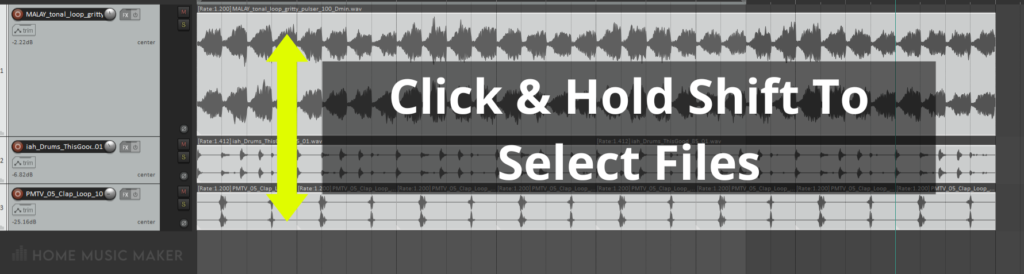
Step 1: Select all of the audio items. Do this by clicking on the first audio file you want to normalize and then clicking on the rest while holding down the shift button.
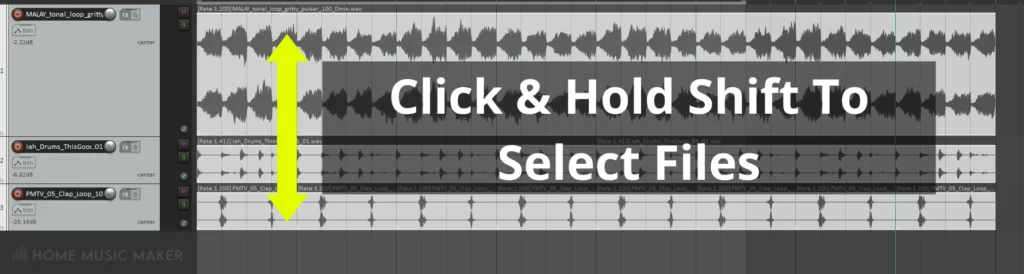
Step 2: Press Ctrl+Shift+N while all the audio files are selected. You can also right-click, like normalizing one audio file, but you have to hold shift as you do it.
Step 3 (Optional): You can also adjust the volumes of each audio clip independently to give more headroom in the waveform.
How To Normalize Multiple Items To A Common Gain
Step 1: Select the audio items you want to use peak normalization on to a common gain.
Step 2: Press Ctrl+N or right-click as you would for the single audio item and select Normalize items (common gain) from the item processing section.
Step 3 (Optional): You can also adjust the volumes of each audio clip independently to give more headroom in the waveform.
Why Normalize Audio?
It’s never really necessary to normalize audio. However, it can be a great trick to have in your arsenal.
Normalizing the audio will make the waveforms larger and easier to work with when editing audio, such as a recording on a vocal track.
If you want to remove certain sounds but can’t see where it is, having larger waveforms can help with this.
You can achieve this by using the custom action Peaks: Increase peaks view gain.

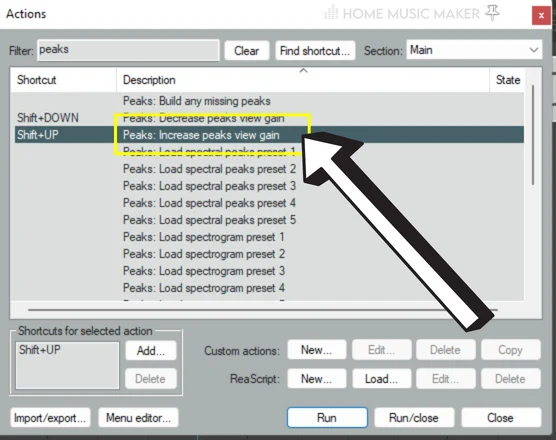
However, you can’t use this on separate tracks.
Not being able to use this separately on different tracks isn’t ideal, as some audio file waveforms will be larger than others already.
What Is the Best Method To Normalize Audio?
Normalizing is a pretty basic audio processing tool. There isn’t necessarily the best way to go about doing it.
And honestly, it’s not something you need, so any way you do it will be acceptable. It won’t affect the outcome.
However, the REAPER DAW is limiting compared to Pro Tools. You can’t set the level you want the loudest peak to be at in the peak normalization.
When Should You Normalize Audio?
Typically, normalizing audio would be helpful if you’re trying to see closer into a specific waveform but don’t want the other waveforms to increase in size.
Suppose you are in the process of audio editing a guitar recording and get rid of all of the background hum when there is no playing. In that case, you can see what needs removing when you normalize the audio.
However, if you zoom in on every waveform in the project, the snare waveform will most likely lose a tone of detail in the waveform so that you can’t even see the peak. On top of that, other tracks will have similar issues if they are louder at the source.
When Should You Avoid Normalizing Audio?
If you have a track with multiple audio items from one that’s been split up. For example, performing loudness normalization the traditional way won’t work either.
It will bring all the individual audio items up in volume based on the loudest peak in each audio file. This means that a breath or a quieter moment will be too loud.
The Pros And Cons Of Normalizing Audio
Audio Normalization Pros
- It doesn’t make the signal-to-noise ratio worse.
- Doesn’t change the dynamic range of the audio file or any other qualities.
- It is straightforward to use.
- Allows you to see larger waveforms on specific audio items.
Audio Normalization Cons
- Doesn’t improve the signal-to-noise ratio.
- Using it in the middle of a session rather than at the start could mean adjusting all of the faders again.
- In REAPER, you can’t set the loudness level at which the peaks will stop.
Related Questions
Where Is Normalize In REAPER?
It can be accessed in three places.
– Firstly, pressing Ctrl+Shift+N or Ctrl+N to normalize multiple items to a common gain.
– Secondly, right-click the audio item or items and select normalize audio in the item processing section.
– Thirdly by going to actions and clicking on the show action list. You can search for “normalize,” and the different options for normalization will appear.
Is Normalizing The Same As Compression?
No. Normalization increases the volume level of an audio recording or file based on a peak level. It does not change the sound or dynamic range of the recording, just the overall loudness.
Compression changes the dynamic range of a track. You set a threshold for where the volume level must reach before the compression kicks in. You set the ratio for how much the volume will drop. The final important basic one is makeup gain, where you can bring the overall volume back up after it’s been compressed. There are other settings you can change too.
You can think of compression as a person adjusting the track’s volume when it reaches a certain level.
There was a long period in the history of music production called the loudness war. The goal was to create the loudest music possible, and compression played a massive role in this. It was used on the individual and master tracks during the mixing and mastering processes.
Towards the end of this so-called loudness war, the compression effect felt overused and left some music sounding very flat dynamically.
Should I Care What Audio Normalization Is?
It’s a good technique to be aware of to expand your pallet of tools. If you enjoy using it and find it helps your creative process, great. If not, don’t worry and don’t use it. I personally don’t use it.
Does Normalization Degrade The Sound?
Not at all. Normalization only affects the volume of the sound. Nothing else will be changed so that it won’t have a degraded sound.
Check this next article from an in-depth guide on REAPER multiband compression.