Making a subliminal track with Audacity can be challenging, depending on how you want to approach it. You’ll have no problem putting it together if you only import pre-recorded audio. On the other hand, recording it all by yourself will take some more effort considering workarounds.
Interested in making your own affirmations and subliminal audio but unsure how to do it?
This article will have you covered.
We’ll go step by step and guide you through the process using the free software Audacity.
So, without further ado, let’s dive straight in.
Making Subliminal Audio In Audacity – Step-By-Step Guide
Step 1: Import Or Record Your Subliminal Affirmation
The first thing you need to do is either find positive affirmations online or record your own.
Depending on what you’re after, this process can take a while if you’re a beginner at recording audio.
If you don’t want to be bothered by recording jargon, you can always download an audio track with positive affirmations from the web.
Alternatively, you can even record yourself with a smartphone. You’d be surprised how good the sound quality can be when played on proper speakers.
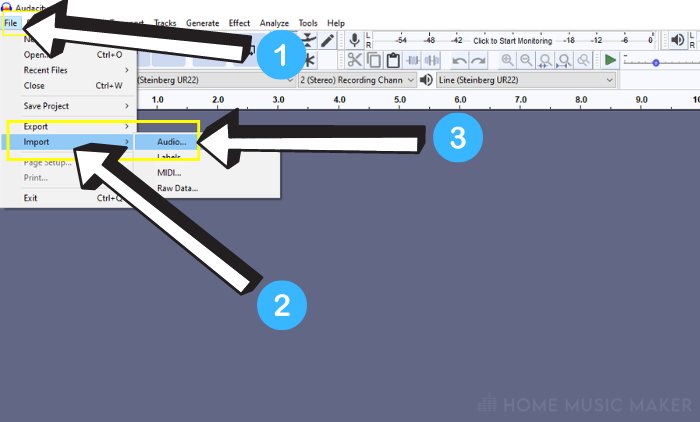
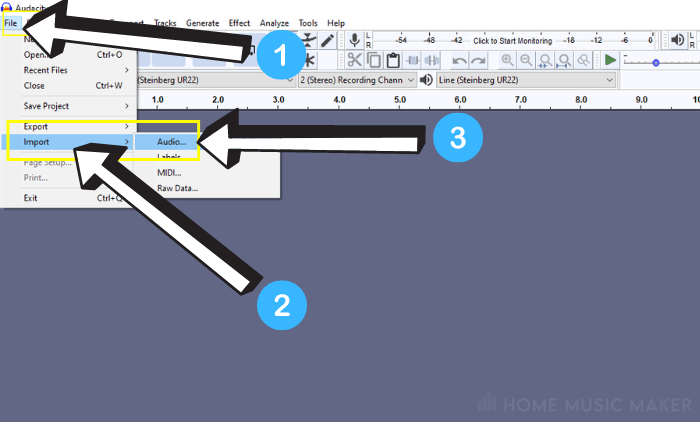
Then you can import it into Audacity by heading to File>Import>Audio.
If you’ve recorded multiple audio files, you may have to move them, so they don’t overlap.
To move your audio files in time, hover over the white bar at the top of your audio file until you see a hand appear instead of a cursor.
After that, simply drag your audio file to the desired position.
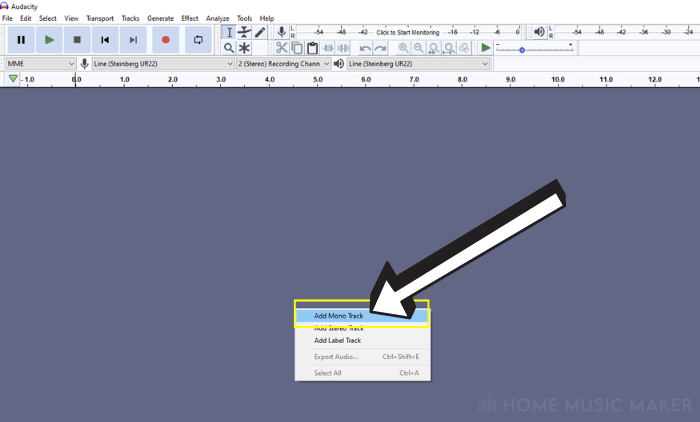
If you decide to record your voice with a pro microphone inside the Audacity, here’s the drill.
Right-click on the empty project window and choose “Add Mono Track.”
Most of the time, you’ll be recording yourself with a single microphone, so to avoid annoying problems, make sure to record in mono.

After that (assuming you’ve correctly connected and routed your microphone), press the red record button at the top left corner of the window.
Step 2: Import Or Record A Fitting Piece Of Music
Music is probably the most crucial part of it all.
Without getting too technical and tangled up in theory jargon, you want to have a relaxing and empowering feel to the music.
The best way to achieve this is to use diatonic chords and stretch them out in time. This means no quick chord changes- set your tempo but make sure the music doesn’t feel too busy.
If you’re not a skilled composer, you can always search for relaxing, royalty-free music and import it into your Audacity session.
If you’re set on recording your own music, unfortunately, there are some limitations to using Audacity. Namely, Audacity cannot record MIDI.
This may be sad news if the only thing you got is a MIDI keyboard and you rely on using virtual instruments.
On the other hand, recording audio works like a charm.
You can perhaps mic up a guitar amp and use lots of delay and reverb to get that ethereal feel. Or even connect your keyboard to an amp and try recording audio that way.
Layering vocals and producing them in Audacity is also a viable option.
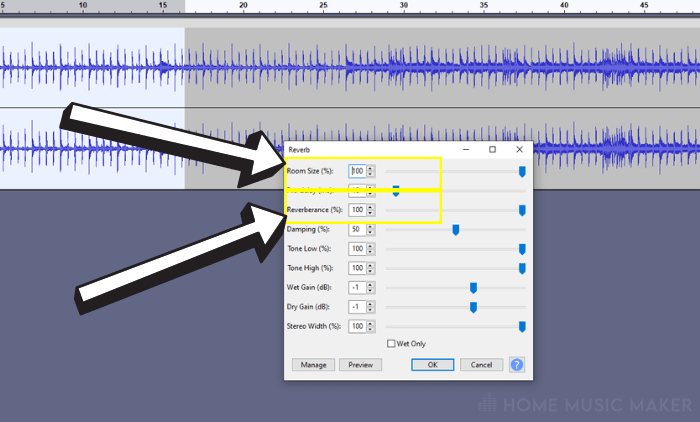
You can always spice things up with lots of reverb to make your otherwise dull recordings sound magical and spacey.
You can apply reverb by clicking on the Effect tab and choosing Reverb.
To get that massive echo, set Room Size and Reverberance relatively high.

Step 3: Set Your Speech Level
You may want to approach this step differently depending on what you’re looking for.
If positive affirmations should be at the forefront, make sure to set them just above the level of the background music.
To change the volume of your tracks, move the slider with + and – symbols on the left of each track.

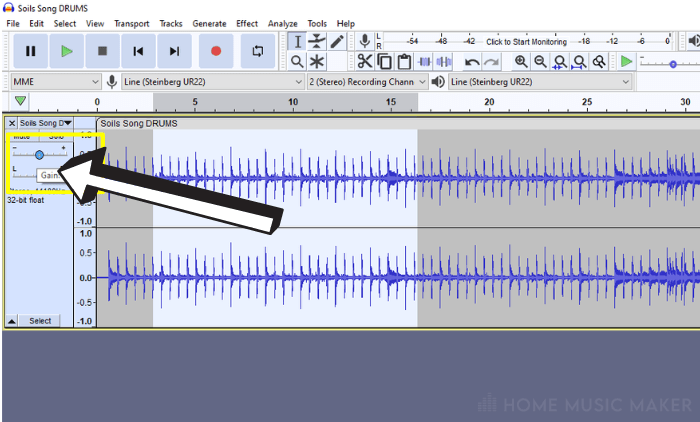
You want to have a nice balance where the voice is still quite clear but not too much as it may become disconnected from the rest of the music and spoil the experience.
Alternatively, you may want to create a proper subliminal message, where all of your voice recordings are buried beneath the music.
There is a fine art in making this happen.
You generally want to aim at a target level where you can’t perceive the words being spoken with your conscious mind.
However, you can still hear something happening underneath the music and in your subconscious mind.
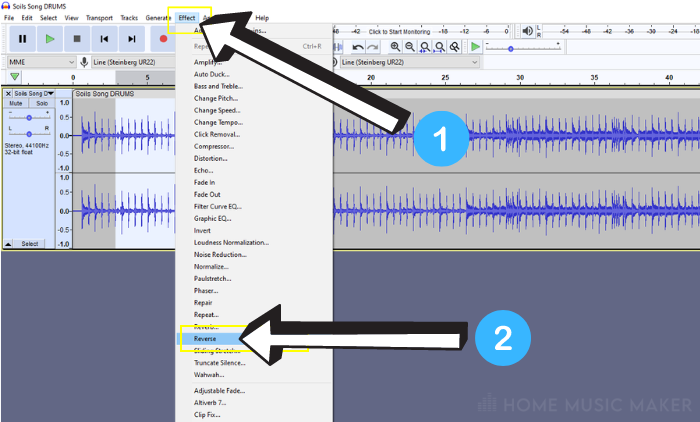
To add to the mystery of the experience, you can use a neat function in Audacity called Reverse.
To reverse any selected audio, go to Effect>Reverse.
It’s as simple as that.

This way, you can perhaps have the voice be a bit higher in the mix without you actually telling which words are being spoken.
It also sounds pretty cool and can enhance the overall spaciness and mystery.
Step 4: Make Your Final Adjustments
Once you finish most of the work, it’s time for some minor but effective audio editing.
The most critical “final touch” is to add Fade In and Fade Out to your audio.
This will add a gentle and graceful touch to your overall audio as the music won’t start banging immediately and ruin the experience.
Again, go to Effect>Fade In or Fade Out to do this.
Audacity will automatically make a fade curve.

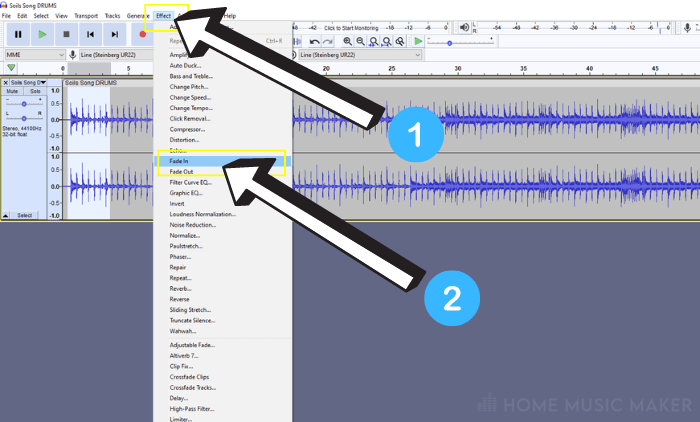
If you want to control how quickly your audio fades in and out, you can select a specific portion of the sound file and then apply the fade.
Another thing you can do at this point is to change the overall speed, tempo, and pitch of your clip. All of these functions can be found in the Effect tab.
There’s no right or wrong way to approach this step. It essentially all boils down to how you want your subliminal recording to feel.
It’s a good idea to try out all of these functions and see whether you like the effect or not.
Slowing down the whole audio file can be a nice effect, making everything sound bigger and more vibey.
Changing the pitch is also quite interesting. Remember that it’s quite a drastic effect, so it’s perhaps better to adjust it little by little.
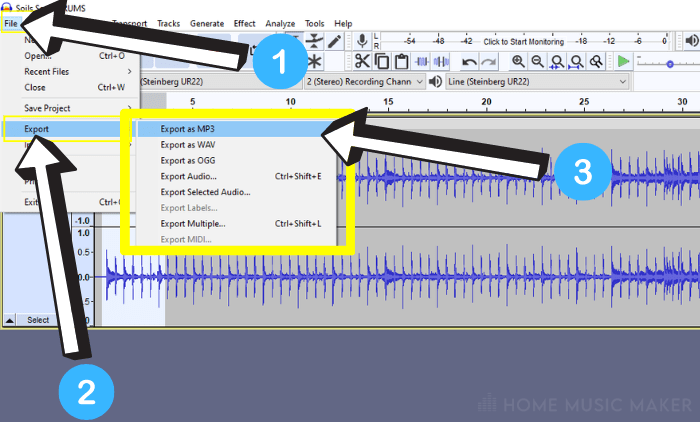
And finally, once you’re done with the whole thing, go to File>Export> and choose whichever audio format you prefer to use. And you’ve got yourself your own personal subliminal audio clip.

Related Questions
How Can You Extract and Hear the Affirmations From a Subliminal Audio File?
You can use plugins like Izotope RX8 to extract vocals from audio or use online tools such as LALAL.AI.
Which Software Should I Use To Create Subliminal Audio?
Although Audacity will get the job done, you may want to consider some well-known DAWs if you’re doing it regularly. You can try FL Studio, Cubase, Studio One, and Ableton, to name a few. They all work great and will drastically improve your workflow over Audacity.
How Many Affirmations Are Needed to Create One Subliminal Audio?
Depending on how long you want your audio to be, you can expect as little as ten or as many as 400 or more.
What Version of Audacity Should I Use For This Method?
You’ll be good to go if you just download whatever’s latest on the official website.
Should You Change the Frequency of Affirmation?
Changing the frequency can have a soothing effect, but it’s entirely optional. It’s best to check your particular case and decide what’s best for it.
Final Words
Although Audacity lacks some of the functions typically found in professional audio software like Adobe Audition, it’s still very much usable.
If you’re trying to record your subliminal messaging from scratch, you may experience some hiccups along the way.
Besides, you’ll be impressed by how well you can make things sound in this free software.
Want more tips? Check out this guide on how to add silence in Audacity.