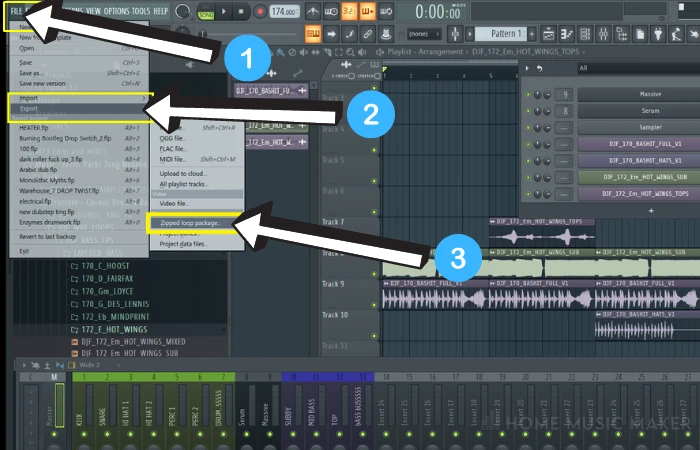
There are a few ways to send FL Studio projects. The most commonly used is a Zipped Loop Package, which will contain all of the associated files, data, and VST info. Simply go to File > Export > Zipped Loop Package.
Collaboration!
One of my favorite things about being a music producer (and using FL Studio) is the ability to share files and data with other producers seamlessly.
I find this especially helpful when a project I’m working on feels a little bland and my creative flow gets interrupted.
Whether it’s exporting a vocal sample, a specific section of a sound as a file, or even the entire project, being able to send FL Studio files is a game changer.
Stay with me if you’re interested in the different methods of sending FL Studio projects.
I’ll show you the best ways to go about this!
How To Send FL Projects To Someone
The Only Way Worth Noting – Zipped Loop Package
The most user-friendly and complete way to send an FL Project is via a Zipped Loop Package.
The package will export your FL Studio:
- Project files
- Sample audio
- MIDI information
- Automations
- VST Plugin settings
Plus, everything running on your mixer/master chain with the file as a Zip.
This will allow the receiver to seamlessly extract the package into a new folder and open the project file.
Other methods out there can do the same thing, such as “project bones” or “project data,” but I can tell you first hand they are much more time-consuming and tricky to get working on the other side.
So in terms of all your project information, this should be your ONLY go-to method.
Note: The only potential drawback with this method is that the person receiving the file often needs to have either the same version of FL Studio or newer, along with the plugins you have used if they are 3rd party.
Sadly this is unavoidable.
Step-By-Step Guide To Sending FL Studio Projects
Step 1 – Export
Go to File > Export > Zipped Loop Package to bundle everything in your project file into a Zip file.

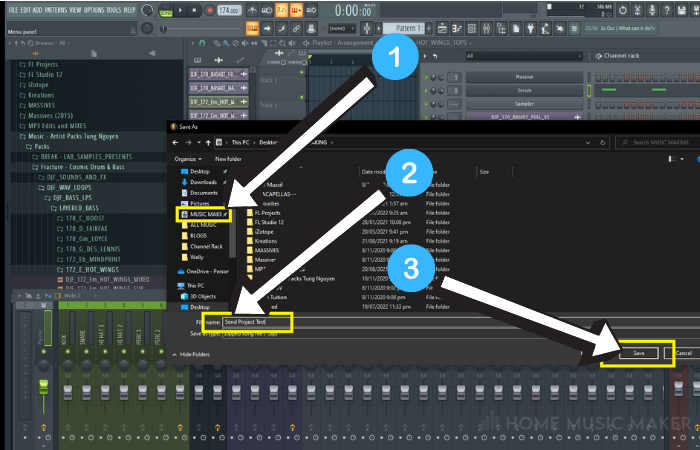
Step 2 – Save
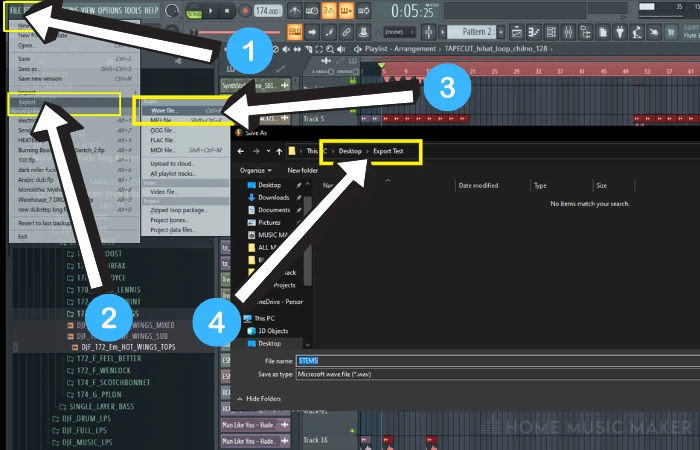
Choose the location you want to export the package to, name and save it.
Step 3 – Send it!

Your package can now be sent either via email attachment or file server via the internet to whomever it’s going to.
How To Send Stems In FL Studio
This is the most commonly used method of collaborating with other producers or musicians.
Stems are the exported audio tracks from within FL Studio itself, meaning there is no project data with it.
Each track on your mixer and playlist is internally recorded and bounced out as a WAV file so that it can be easily drag-and-dropped into the receiver’s DAW (Digital Audio Workstation) effectively as a sample.
Step 1 – Routing
First, you must ensure all the sounds, audio clips, and plugins are routed to your mixer.
If some aren’t, then they won’t be exported as stems.
You can designate a channel destination by left-clicking and dragging up or down on the number section shown above.
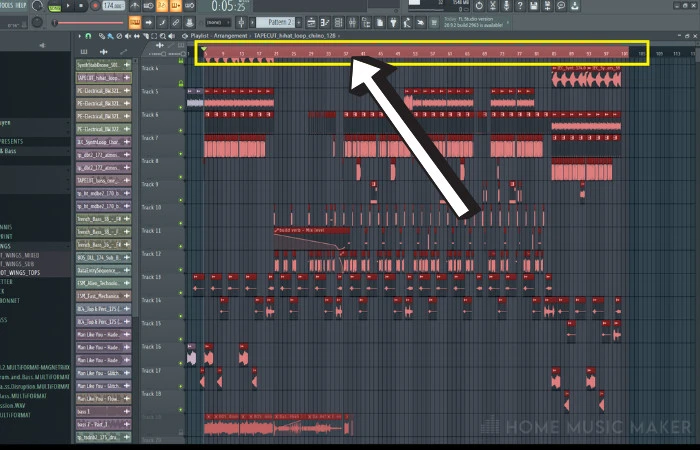
Step 2 – Highlight Duration
Along your timeline bar, right-click hold + drag from the desired starting point to the end of the song.
This will highlight all the information between those points.

Step 3 – Export To Location
Go to File > Export > Wav File (Best Quality), and be sure to create a new folder specifically to save your stem files into.

Step 4 – Split Mixer Tracks
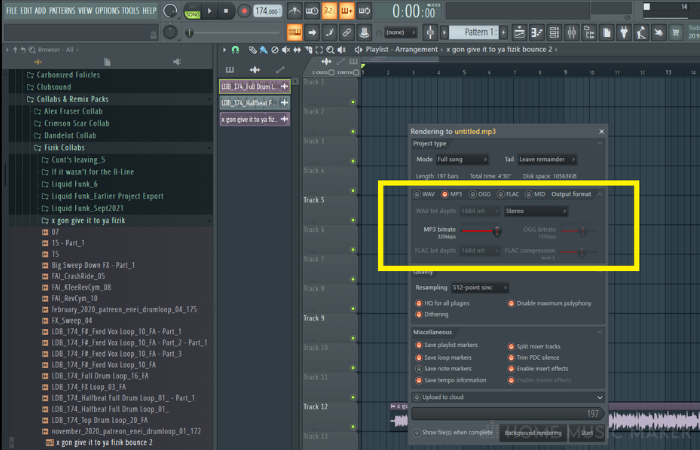
This window shows various settings for exporting files.
The most crucial part of this method is the split of mixer tracks. This will render each routed channel as a separate audio file, with all its assigned effects applied too.
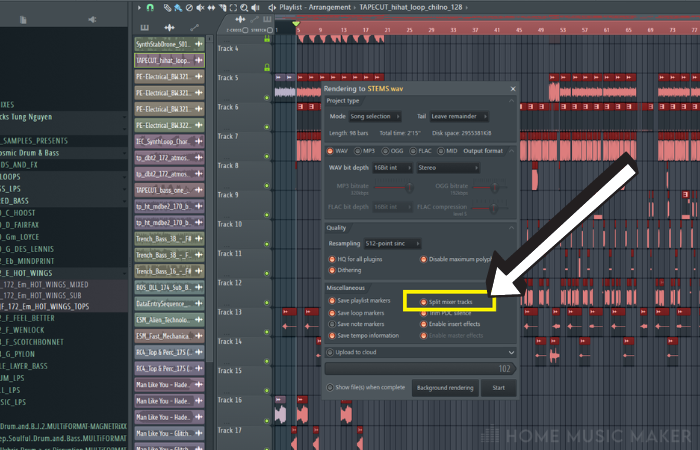
Note: The larger the project, the larger this export will be, as well as time-consuming, so be aware of how much space you will need to work with on your computer.
Step 5 – Files
Your final result will look something like this.
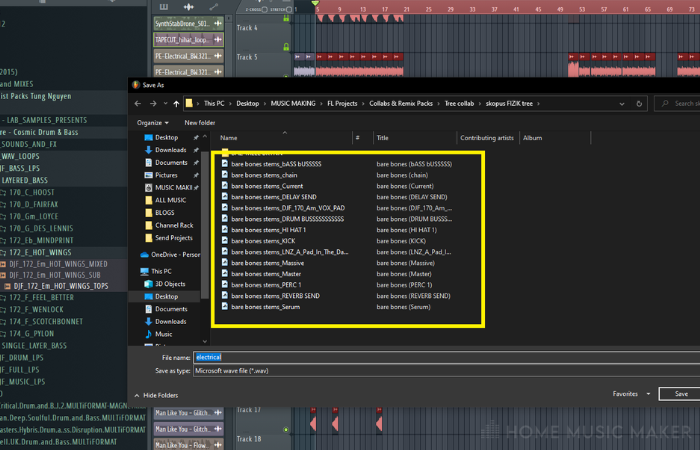
Each file is noted with its complete details.
From here, you can opt to zipping them and send them, or you may like to send them in parts.
How To Send FL Studio Projects From A Phone
For the on-the-go people out there making beats on your phone or tablet, you can bring your projects home!
Step 1 – Network
Ensure that your device and desktop are connected to the same network (WIFI or ethernet), and that enable sharing under the sharing/files tab of FL Studio mobile is turned on.
Once both your PC and device have recognized each other, select the FLM plugin on your device, followed by send all on the pop-up that asks “update plugin with all sample library content or just files.”
It’s important to send it all the first time to ensure the plugin is updated with the entire content.
Your files should all load into the FL Studio Mobile plugin on your PC now.
Step 3 – Detailed File Sharing – Locate Data Folder
Locate your Data folder on your PC for the FL Studio Mobile app.
The usual address for this is – C:\Program Files\Image-Line\FL Studio 20\Plugins\Fruity\Generators\FL Studio Mobile\LocalData (WINDOWS)

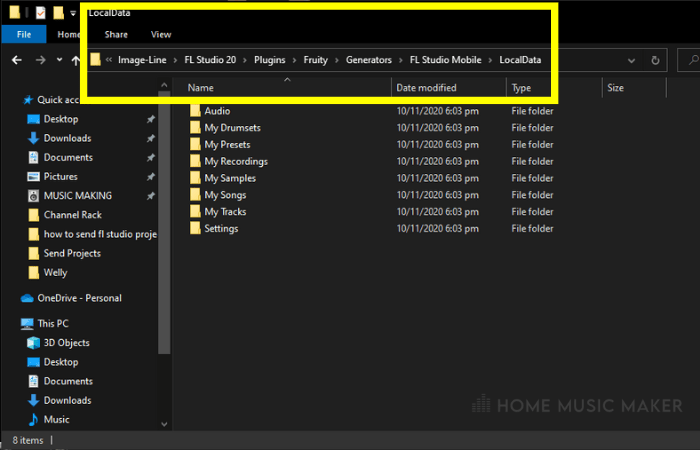
For MAC users: [user]\Documents\Image-Line\FL Studio Mobile\
Step 4 – Copy Tracks
Copy your device audio files from their saved location into the My Tracks folder in the above destination.
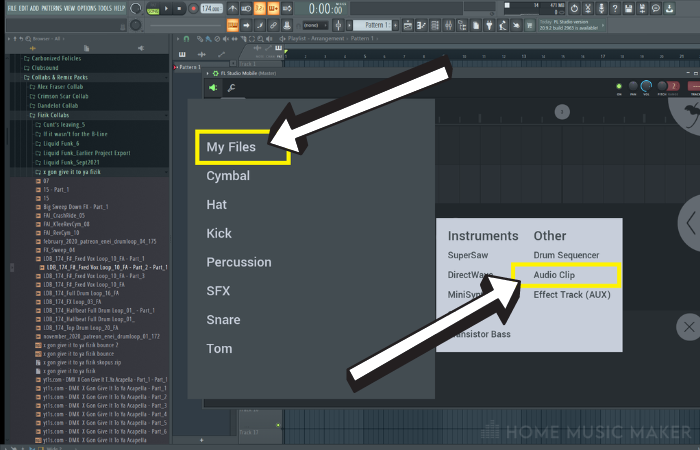
Step 5 – Open Your Project
Reopen FL Studio, so the data files are scanned, then open the FL Studio Mobile plugin and hit the + sign.
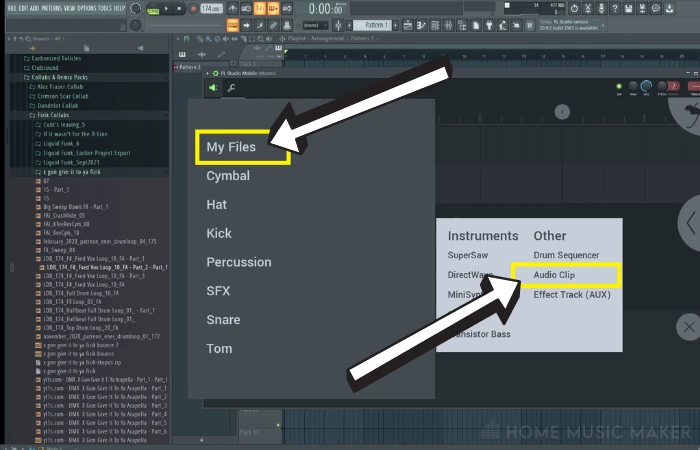
Select Audio Clip > My Files to view and import your new files to your project.
If you left-click each one, it will automatically import it into its own track in the plugin.
This process works exactly the same in reverse, so if you have some tracks made at home that you want to further progress on the go, simply repeat the same process but from the plugin to the device!
How Do I Export An FLP File?
To export your project file, go to File > Export > “chosen type of file export.”
You can choose various files here, as shown, depending on the quality you desire (the higher quality, the higher the file size).
Note that the actual FLP file can be manually copied and pasted anywhere by simply saving your project.
Still, without a Zipped Loop Package, it won’t contain any of the sample audio data required to open correctly (only beneficial if you move the file to a different location on the same host computer).
Related Questions
Can You Send FL Studio To Someone?
As FL Studio requires a license to run, the actual program cannot be sent to another person. Of course, some people have cracked (illegal versions) of the program, but this is not something I endorse.
How Do You Transfer FL Studio Projects To Another Computer?
The fastest way to send files and projects is via a Zipped folder, through either email or, if the file is too large for email, through a file share website such as WeTransfer. But note they will need the same version of FL Studio or higher.
How Much Does FL Studio Cost?
Prices can range from as little as $99 (Basic loops and melody creation) to $299 (Full song creation with plugins) to $737 (Complete access all unlocked)
Do You Have To Pay For Each New Release Of FL Studio?
If you opt for the fully unlocked version of FL Studio, this is a one-time fee, meaning you will receive free downloadable updates.
After Exporting The Project To Zipped File, Where Will Its Location Be?
You determine this, but it’s usually in the same file that the original FLP file was saved.
My advice is to take it slow and follow the prompts asking where you would like to save it. If sending to someone else, it’s often easiest to save it to your desktop for quick access.
Check out the following article to find out of you can transfer FL Studio to another computer.