Ultimately this is a process of elimination. While there are a few reasons you may have no sound when you export from FL Studio, the best method is to check that nothing anywhere is muted, that the “export entire project” button in export settings is checked, and that your plugins are not the culprit.
The Sound Of Silence…
Firstly, I feel your pain. You’re hard at work on your latest banger, and you export the audio to MP3/WAV file so you can test it out in the car or on a system.
You’re amped up, impressed with how much work has gone into your music production, and then… NOTHING, NOPE, SILENCE.
What’s worse is that the whole song was processed and looked normal.
So what’s gone wrong?
Read on, and I’ll explain the possible reasons for this problem, along with some handy workarounds I’ve discovered.
How To Export A Song In FL Studio – Various File Types
Step 1 – Exporting
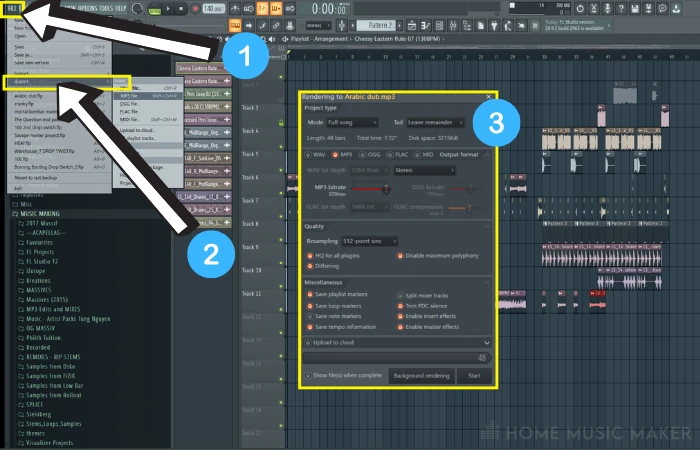
Once you’re ready to export or “bounce” your audio file out, go to File > Export > your choice of file format.
Step 2 – File Format
You will see in the above image various options for the type of file you want your track to be exported as. Each has its own unique settings, sound quality, and file size according to choice.
MP3 File – The most common and smallest file type. It is widely accepted on all systems and will be the fastest export with still high quality—definitely the best choice for convenience.
WAV File – Typically, a larger file size due to being an uncompressed file. Basically, this is CD song quality. This also makes it ideal for audio editing as more parts of the file are intact and, therefore, more detailed.
FLAC File – Similar to WAV in terms of its quality, but generally, these are compressed files, so they are not quite as good in editable quality.
OGG File – Superior to MP3 in quality, the only real drawback with this choice is compatibility. Not many system types support the file, so you will be limited in where and how you can play your track.

Step 3 – Bounce!
Once you’re happy with your choice of export, select start at the bottom right.
Bear in mind that depending on your choice, this can take some time.

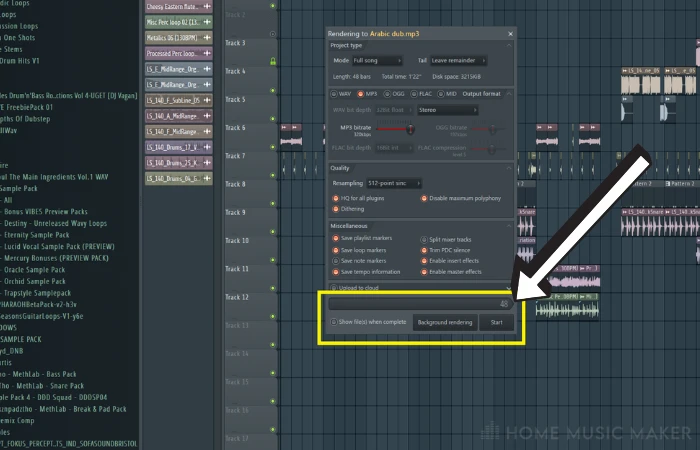
Personally, I let my computer do its thing at this stage. Still, you do have the option to select background rendering if you want to keep using your computer while it creates the export.
You will see the progress bar move across until completion.
Lower settings can cause your export to run into issues if there is any clipping in the project.
Stick to these two choices, as you can choose between convenience and quality while not sacrificing compatibility!
Also two keyboard shortcuts for you:
- Render/export to MP3 – CTRL + SHIFT + R (CMD + SHIFT + R for MAC)
- Render/export to WAV – CTRL + R (CMD + R for MAC)
The Important Question – Why Is There Silence On My Exported File?
There are two main reasons when encountering silence after bouncing your tune (assuming you can hear audio when played back inside FL Studio).
Method 1 – Master Output
The first and most common issue is that something has become unlinked between your mixer channels and the master output of FL Studio.
Step 1 – Channel Routing
Check that each channel used within your project is linked to the master channel mixer track. These are the green cables going out of each channel and into the master, as in the image below.
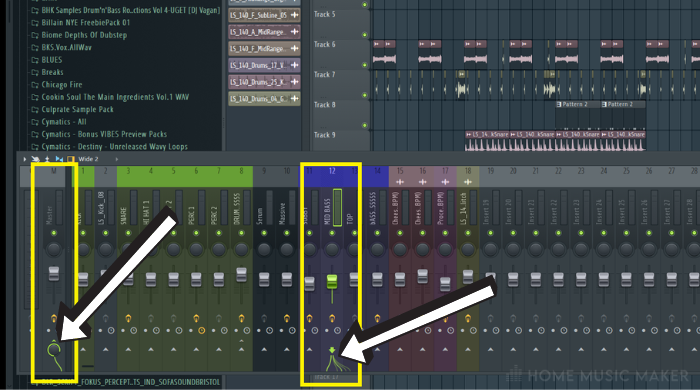

Any not joined here will effectively be silenced as there is no output connection.
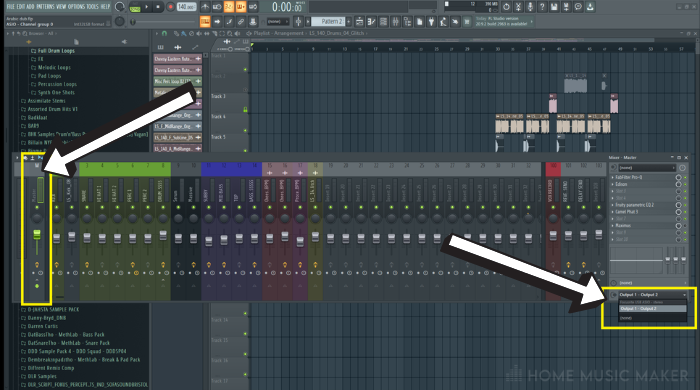
Step 2 – Master Audio Output
Another option to investigate is your output settings.
You see in the highlighted section below that the master channel itself is selected and that the output drop-down is selecting output 1 – output 2 (your default audio driver).
If you see none in this section, this will export with no sound.

Method 2 – Audio Driver
The second (and less common, but this has caught me out more than once) is an overload or “blip” in your audio driver settings for FL Studio.
It sounds like an audio click or pop during playback. In my experience, when this happens while exporting, it can kind of short-circuit the render, resulting in silence on the end result.
This may vary from system to system, but I have found that using the built-in FL Studio ASIO driver can, from time to time, be problematic.
While it will always play the audio, sometimes its buffer can get confused.
An alternative option for export issues is to try switching to another driver, such as ASIO4ALL or, better yet, the driver that comes with your audio interface.
Why Does My Song Sound Different After I Export From FL Studio?
I’ve often heard stories of people who, after exporting their tune, listen to it back on their computer, and their overall mix sounds horrible.
Don’t think it’s your fault!
If the mix sounded good within the project, there’s a high chance this is an audio driver issue.
Similar to method two above, keeping track of how your audio is outputting from your computer will play a massive part in the overall sound of the track.
A good move here is to double-check the following:
- Your computer’s sound settings show you are enabling the same driver as FL Studio.
- No external equalizer controls are running on the computer’s sound (Realtek Audio Driver and Windows Media Player can have these running which can adversely affect the sound of your mix.
- That all of your drivers are up to date.
Related Questions
How Do You Mass Mute On FL Studio?
This is simple but super handy, especially when you want to solo a track or sound in your project quickly. Right-click on any green circular light at the top of a channel or side of a sound to enable only that one sound. To reverse it, simply right-click again.
What Is Dithering?
This is a process of adding noise to a file, usually 24bit or 16bit, instead of 32bit. It is meant to disguise other less desirable digital noise created by certain processes. Generally, this is only used at the final stages of your mix and can get quite technical.
Can FL Studio Export MIDI Notes?
Sure can! Once you have your MIDI notes open in the piano roll, hit the drop-down arrow of the piano roll and go File > Export as MIDI file.
Hotkey – SHIFT + CTRL + M (SHIFT + CMD + M for MAC)
What Is WAV Bit Depth?
This is a tricky one to answer quickly. The higher the bit-depth, the more information is stored within the file. More info means more quality and larger size, so bear this in mind.
How Do I Fix FL Studio ASIO Error?
Try checking that your drivers are up-to-date. Unplug and plug in your interface, close and reopen FL Studio, or switch audio drivers, so the computer’s default driver and your FL Studio selected driver is the same.
Want to learn more? Check out this guide on how to export stems in FL Studio.