KEY TAKEAWAYS:
Ensure your audio interface is correctly set up in Ableton. Then create or join a Discord server to stream on and create or locate a voice channel for the stream. Download and install OBS Studio, ReaStream, OBSVirtualCam, and VB-Audio. Configure this software to connect the video and audio from Ableton to OBS Studio and Discord.
Ableton And Discord
Do you already have a Discord server where you want to start streaming your Ableton sessions? Or have you heard a lot about it and want to get in on the action?
Either way, routing the audio and video from Ableton to Discord is more complicated.
Luckily, I have successfully navigated through this maze and have a complete guide on how to do this.
This article will show you how to individually set up Ableton and Discord for streaming, what extra software you will need, and finally, how to connect the video and audio from Ableton to your Discord stream.
Setting Up Your Ableton And Discord For Streaming
First, before connecting Ableton and Discord, ensure they work fine separately.
Setting Up Your Audio Output And Input
Regardless of your audio interface, it will almost always have at least one input and output. This allows you to record audio into Ableton and hear the output of Ableton in some capacity.

To get these inputs and outputs to work in Ableton, we need to configure the audio settings in Ableton’s preferences (CTRL +,/CMD +).
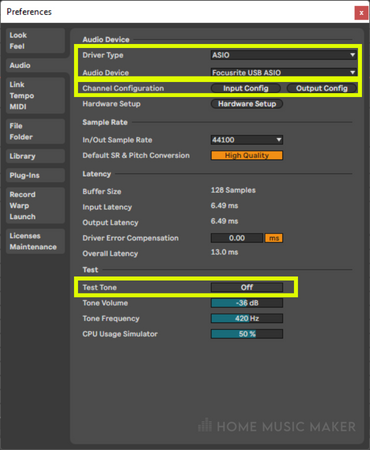
In the “Audio” section of preferences, ensure your “Audio Device” is set to your audio interface. The “Driver Type” should be the driver associated with your audio interface. In my case, it’s ASIO.
Then, to configure the inputs, click the “Input Config” button. You can set up Ableton’s mono and stereo inputs to match your audio interface.
Configuring the outputs is the same process as configuring the inputs.
Click on the “Output Config“ button and set up the outputs in Ableton to match the outputs on your audio interface.
To double-check that your output is configured correctly, use the “Test” section of the “Audio” tab in preferences. Press the “Off” button adjacent to the “Test Tone” option. If you can hear a tone, your output is configured correctly.
Configuring Your Audio Tracks In Ableton
Setting up Your Audio Track
Now let’s ensure that Ableton can receive audio from the inputs of your audio interface.
Plug your microphone or instrument into your audio interface.
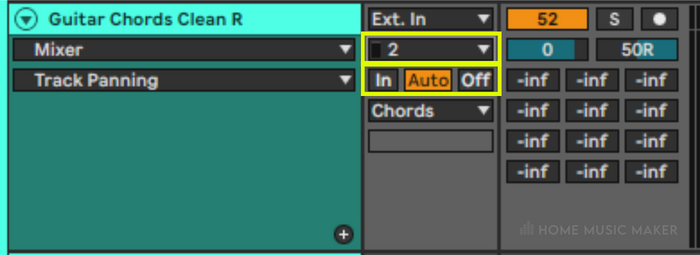
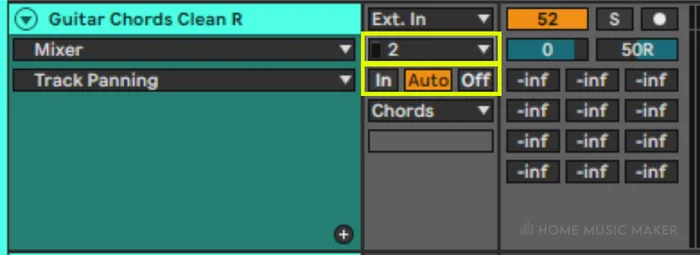
Select that input on the audio track you want to record. You can do this by using the second drop-down menu in the middle section of the track head.
Just choose the number that corresponds to your audio interface.
Press the arm button on the track, which has a circle at the top right corner of the track head in the arrangement view.
It will be red when it is activated.
Change the monitoring option to either “Auto” or “In” (underneath the input drop-down menu) to hear yourself through Ableton.
Now test record something and listen back.
If you can hear it, you have correctly set up the inputs and outputs.
If you can’t, you may be listening to yourself through a direct monitoring feature on your audio interface.
The output on Ableton needs to be correctly configured. In this case, go back to the previous section to re-configure.
Creating A New Server Or Joining An Existing One On Discord
To stream on Discord, you need to be on a server.
Think of the server in Discord as a large group chat, filled with sometimes thousands of people. You can either start your own server or join an existing one.

If this needs to be clarified, first, you must sign in or up for Discord to have an account.
Then in the left-hand sidebar, press the green “+” button three buttons up from the bottom.
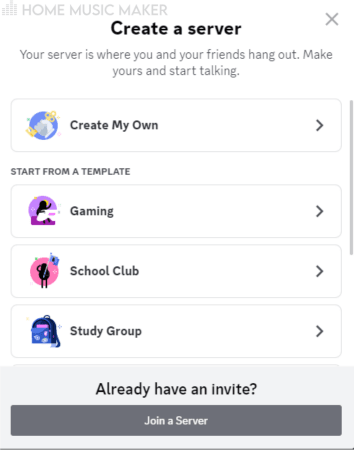
Here you can either choose to join a server or create your own. To join a server, click on the button that says so at the bottom of the pop-up.
Then you have to paste in the invite link of the Discord server you wish to join and click “Join Server.”
To start your own server, click the “Create My Own” option for a blank server, or choose from the templates.
Then select whether the server is for a club/community or just for you and your friends.
After this, you can choose a photo and a name for your server.
Click “Create,” and you will have created your server.
Now you can invite your friends/fans to your server and customize it further.
Installing Necessary Plug-Ins Or Apps For Streaming On Discord
It goes without saying you will need Ableton and Discord installed on your computer.
Unlike streaming to other platforms, such as Twitch, streaming to Discord is more tricky.
We will need to download four pieces of software (luckily, they are all free!)

First, you need to download OBS Studio.
This is software that allows you to video record and live stream.
Go through the straightforward and self-explanatory setup of OBS Studio, and load up the software.
The next download is ReaPlugs.
This is a collection of plug-ins by the digital audio workstation REAPER, and they are free to download.
However, the only plug-in we care about for this tutorial is ReaStream.
So when you download the executable file to install ReaPlugs, you only need to check the ReaStream box when choosing the plug-ins to install.
Although, if you want some more free plug-ins, install them away.
ReaStream will allow us to stream the audio of Ableton to OBS Studio.
This is otherwise known as a virtual audio cable.
We then need to get the Virtual Cam Filter and install it.
It’s a straightforward process to follow with the installer window. This connects the video from OBS Studio to Discord.
Finally, we need to download another virtual audio cable to connect the audio from OBS Studio to Discord.
We shall be using VB-Cable. Installation is very straightforward, and there is even a “read me” text file explaining it.
Streaming Ableton On Discord
Now that Ableton and Discord are correctly set up, we can connect the two.
Setting Up A Virtual Audio Cable
A virtual audio cable is an audio connection between two pieces of software, which could be considered a digital cable or virtual cable.
Our first virtual audio cable to connect Ableton To OBS Studio is the ReaStream plug-in we installed. Let’s configure this plug-in.
Open up Ableton, and drag the “restream-standalone” from your plug-ins section of the left-hand sidebar onto the master track (assuming that you want to stream the audio of everything in Ableton and not one specific track).
The user interface will then appear.
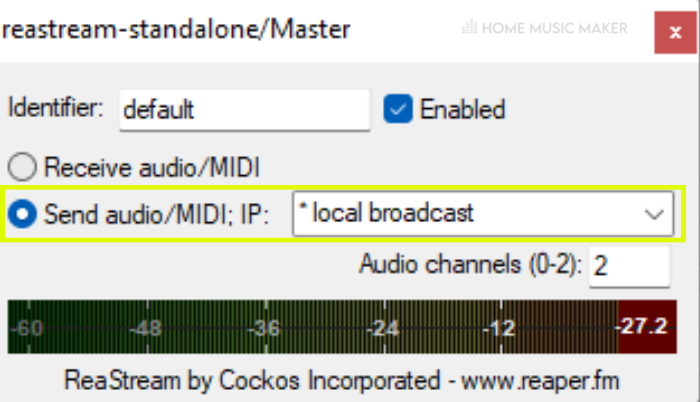
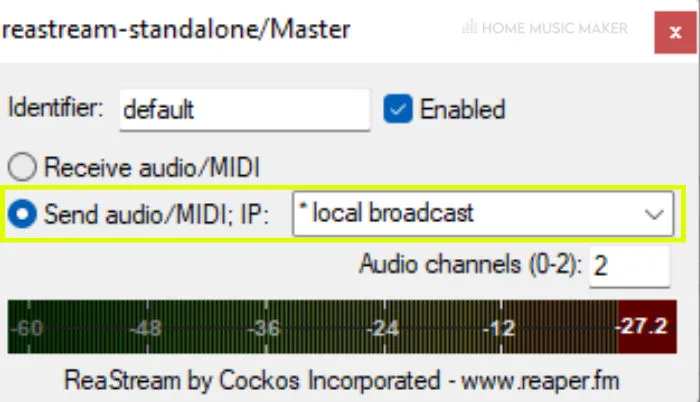
For the radio buttons option, select “Send audio/MIDI; IP:” as we want to send audio from Ableton to OBS Studio.
Then in the drop-down menu next to this, choose “* local broadcast,” as it is a connection from one software to another on the same computer.
Now your virtual cable is set up.
READ NEXT:
To make this process quicker, create an Ableton template specifically for streaming on Discord. For an in-depth look, check out our article on Ableton templates.
Connecting Ableton And Discord
Connecting The Audio From Ableton To OBS Studio
Now we can set up OBS Studio to receive the audio from Ableton via the virtual audio cable.
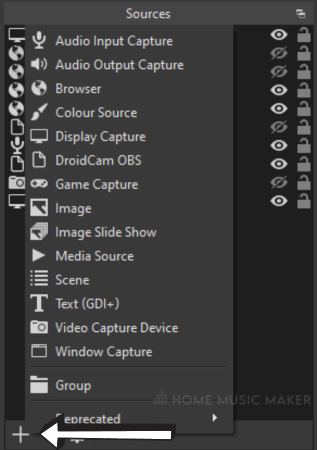
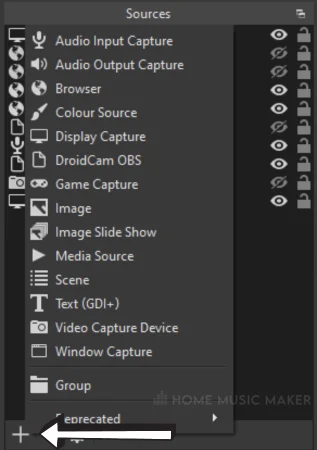
Open OBS Studio and press the “+” button at the bottom left-hand corner of the “Sources” section.
From here, choose “Audio Input Capture,” type in the name you want for the source (e.g., Ableton), and press OK.
Keep the device set to default in the next section. Then press OK.
Now, right-click on the new audio input capture you created in sources and select “Filters.” Here, we can add ReaStream to connect this audio input capture to receive audio from Ableton.
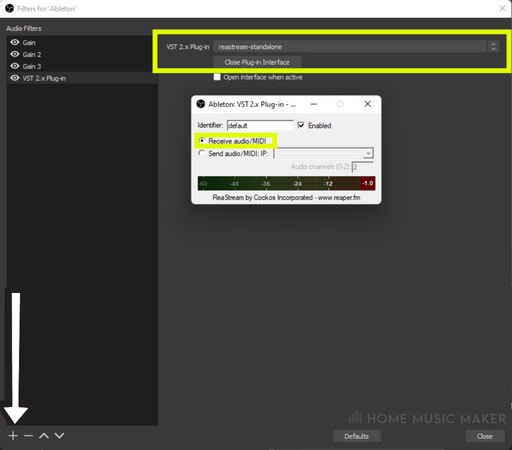
Press the “+“ button in the bottom left corner of the filters window and select “VST 2.x Plug-In“.
This option allows you to add almost every plug-in installed on your system to your audio input capture.
The plug-in we want, of course, is “restream-standalone.”
Click the button “Open Plug-in Interface” and ensure that the radio button “Receive audio/MIDI” is selected.

To save you some time, before testing if this works, I recommend adding three “Gain“ filters the same way you added the ReaStream effect.
Set each “Gain” filter to -30dB, as in my experience, the output from Ableton is just way too high.
Now play sound through Ableton and check that it is being received through the “Audio Mixer” in OBS Studio.
If not, go through this tutorial again and see what you missed.
Connecting The Video From Ableton To OBS Studio
All that’s left is to set up the display capture to stream Ableton visually.
Press the “+” button once more in the sources section of OBS Studio. Choose “Display Capture” this time, rename it if necessary, and press OK.
Leave the “Capture Method” as “Automatic.” If you have multiple displays, choose the one which Ableton is on.
Connecting The Video From OBS Studio To Discord
Now you have set up the video and audio connection from Ableton to OBS, you can connect OBS to Discord.
Of course, you must first have Discord loaded up, so open up the app.
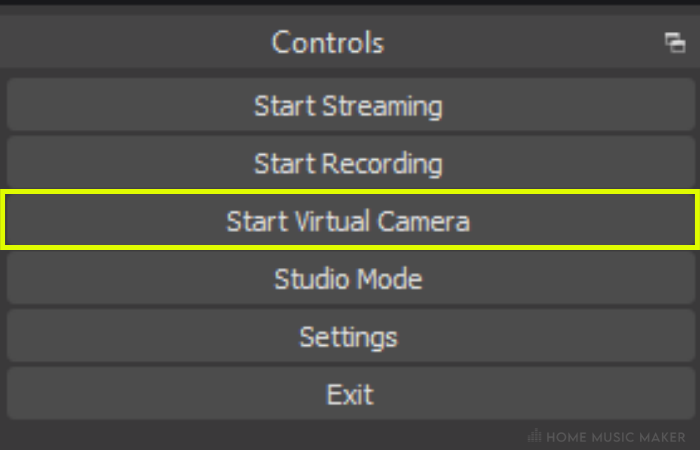
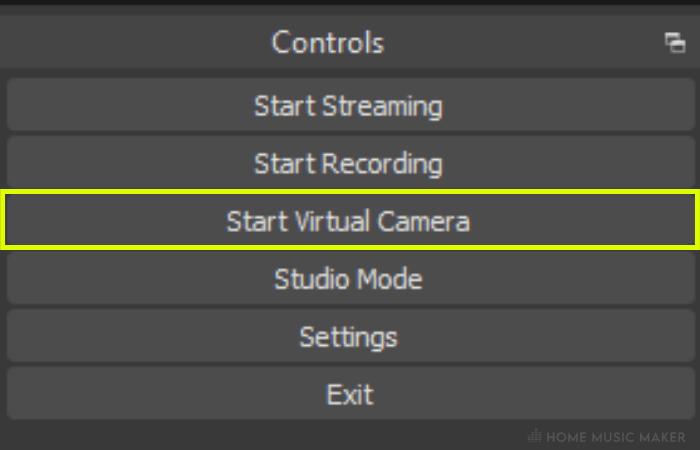
Press “Start Virtual Camera” in OBS Studio under the controls section.
Then go to Discord, and enter the server you want to stream on.
If this is a brand-new server, you must create a voice channel. Press the “+” button next to “Voice Channels” and create a new channel.
Now, click on the channel to start streaming.
A row of 6 buttons will appear at the bottom of this stream, the first of which is a camera logo with an arrow pointing down.
Click on the arrow and select “OBS Virtual Camera.”


Press the camera button to turn it on, and you will see the same as what you see on OBS Studio.
Connecting The Audio From OBS Studio To Discord
The final step is using the VB-Cable virtual audio cable we installed earlier to connect the audio from OBS Studio to Discord.

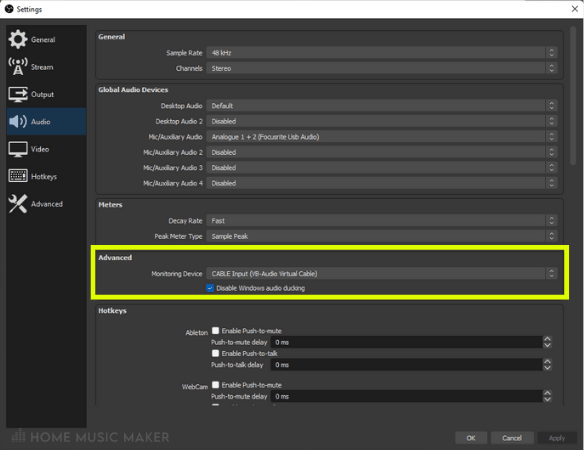
Within OBS Studio, go into settings by pressing the “Settings“ button two down from the “Start Virtual Camera” button. Click on the “Audio” tab within the settings, and change the “Monitoring Device” to “CABLE Input.”
Then, in the “Audio Mixer” section, press the settings cog button and select “Advanced Audio Properties.” Now, change the “Audio Monitoring” parameter to “Monitor and Output” for any audio sources you want to be heard on your Discord stream.
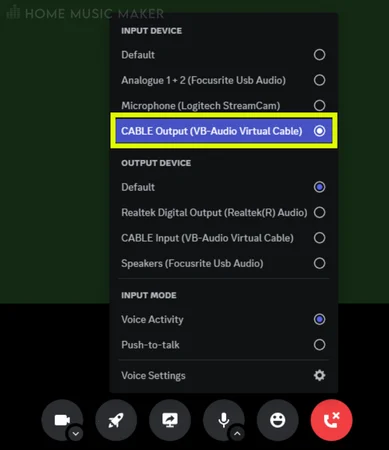
Switch over to Discord, locate the six buttons at the bottom of the stream, and then find the microphone button.
Click on the arrow button within the microphone one and choose “CABLE Output” as your input device.

In the same menu that pops up from the arrow button you just clicked, select “Voice Settings.”
From here, you can test that your audio signal is indeed being picked up in Discord by clicking the “Let’s Check” button.
Play something on Ableton while this testing is enabled.
Now you know the OBS Studio audio will be heard in your Discord stream.
Tips And Tricks For Streaming Ableton On Discord
Setup A Microphone Input For Your Stream
Of course, you will want to talk on the stream and use Ableton.
In OBS, go to the audio mixer and find the “Mic/Aux” channel.
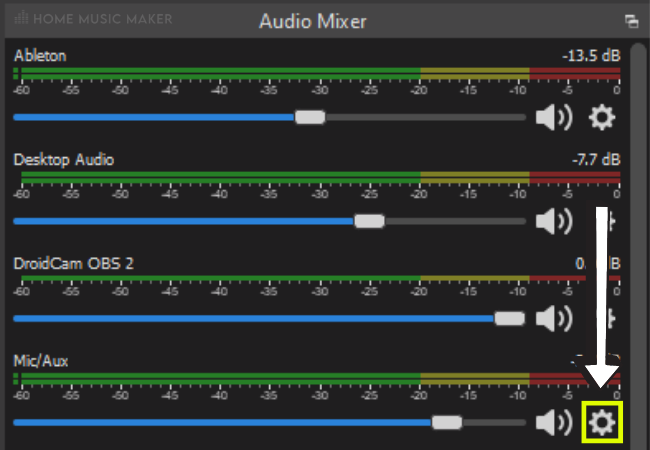

Click on the settings cog and select “Advanced Audio Properties.”
Assuming you’re only using one microphone, check the “Mono” box. Also, change the “Audio Monitoring” option to “Monitor and Output,” just as we did for Ableton.
You can play around with the microphone’s volume in the audio mixer to get the correct levels.
READ NEXT:
While streaming, you don’t want to use studio monitors as your output device, as the microphone could pick up their sound. Instead, take a look at our article on using headphones with Ableton Live.
Interacting With Your Audience
A message icon is in the top right corner of the stream.
This will open up the chat for the stream.
Here you can read your audience’s words and reply on the stream or chat.
You can also do some things to encourage audience participation on your stream.
Here are a few ideas:
- Give member perks, such as customized emojis or exclusive content.
- Reward participation by assigning them roles and permissions only actively participating people can get.
- Set up different channels for different purposes within your server.
- Be consistent with your streaming and activity on other channels within your server.
- Use social media to promote the stream.
One thing that shouldn’t be overlooked is not tolerating abuse on your server.
If you see any harmful comments about race, sexuality, gender, or religion, block these people from your server.
You want to have a safe place.
Recording Your Stream
To record your stream, you only need to press “Start Recording” above the “Start Virtual Camera” button in OBS Studio.
To change where the video file is saved, go to settings, and in the “Output” tab, you can change the “Recording Path.”
You can then upload the whole stream to YouTube or cut up the video into clips for social media to promote and attract more people to your stream.
Related Questions
Can I Use An Alternative To Virtual Audio Cables To Stream Ableton On Discord?
Not really. It would help if you had the virtual audio cable to connect the output of Ableton to Discord.
How Do I Troubleshoot Audio Quality Issues When Streaming Ableton On Discord?
Let’s look at the most common causes of audio quality issues on Discord.
– Discord requires to be run as administrator.
– Other software is using the audio device being used in Discord.
– Discord needs updating.
– System audio drivers need updating.
To stream to multiple platforms simultaneously, use ReStream to send your OBS Studio to stream to multiple streaming platforms.
How Can I Improve The Visual Aspect Of My Ableton Stream On Discord?
You can use OBS Studio overlays to enhance your stream’s visual aspect. You can create your own or use a service like Streamlabs to find one.
Can I Stream Multiple Tracks From Ableton On Discord At The Same Time?
Absolutely. If you have your ReaStream plug-in on the master track, it will stream all the tracks. If you only want a select few tracks streaming, put these tracks into a group and add the ReaStream plug-in.
READ NEXT:
Want to streamline your workflow? Save time and improve productivity with Ableton shortcuts.
Robert Armstrong (The Disgruntled)
Monday 24th of July 2023
I have followed the steps outlined here several times to be sure I didn't miss anything, but for whatever reason the reastream-standalone in OBS is not receiving audio. I even tried disabling the three gain filters thinking they were smothering the signal, but still the meter shows nothing.
I have spent all night trying different methods to stream Ableton directly to Discord. This solution seemed very promising so I'm saddened by this issue.
Please email a response when you're able to, I will do anything short of coding a better Discord myself.
Matt
Sunday 30th of July 2023
Hi Robert,
There could be several reasons why the audio is not being received in OBS:
Incorrect configuration: There might be a misconfiguration in the settings of Ableton, OBS Studio, ReaStream, or VB-Audio. Double-checking all the settings and ensuring that they are correctly configured is essential.
Driver issues: Sometimes, audio interfaces may have driver-related problems that could affect the audio input. Updating or reinstalling the audio interface drivers could potentially resolve the issue.
Virtual audio cable settings: The ReaStream plug-in acts as a virtual audio cable between Ableton and OBS Studio. Ensure the correct audio outputs and inputs are selected in the ReaStream settings.
OBS Studio filters: The gain filters may not be the cause of the problem, but other filters in OBS Studio may be affecting the audio input. Checking all the filters applied to the audio source in OBS Studio might help identify any issues.
Discord audio settings: Make sure that the audio settings in Discord are correctly configured to receive audio from OBS Studio.
To troubleshoot the issue further, the user may want to try the following steps: Verify the audio settings in Ableton to ensure the correct audio interface is selected and inputs and outputs are correctly configured.
Double-check the ReaStream settings in Ableton to ensure it is set up to send audio to OBS Studio.
Confirm the audio input settings in OBS Studio, including the audio source and any filters applied.
Check the virtual audio cable settings and ensure they are set up correctly.
Verify that the correct audio devices are selected in Discord.
Restart all the applications involved (Ableton, OBS Studio, Discord) to ensure a fresh start.
Test the setup with a simple audio source (e.g., microphone input) to see if the issue persists.
I hope these help. if not, it might be worth reaching out on an OBS forum to see if anyone can help.
Cheers
Matt