KEY TAKEAWAYS:
The standard methods across all software, such as save, copy, paste, and more, are the same within Ableton. Toggle between views by pressing the tab. Alter keyboard shortcuts by accessing key mapping by CTRL + K/CMD + K. To change parameters using a MIDI controller, open MIDI mapping with CTRL + M/CMD + M.
Shortcuts In Ableton
Do you find yourself constantly being pulled away from the creative parts of producing in Ableton, trying to find specific features in the never-ending menus?
Luckily, so many keyboard shortcuts are already set up in Ableton for you to implement into your workflow.
Because there are a lot, it can seem very daunting to know which ones will improve your workflow.
Don’t worry. In this article, I will review the shortcuts that will improve your Ableton workflow. I have broken them down into their categories to make it easy for you to find the one you need now.
Create, Save, And Edit Your Own Shortcuts
Creating And Saving Shortcuts
You first need to turn on the “Key Map Mode.” You can do this by pressing the “Key” button in the top-right corner of Ableton.


Once activated, you will notice that certain parts of Ableton are highlighted in orange. These are the aspects of Ableton that you can assign a shortcut to and other parameters that aren’t visible currently.

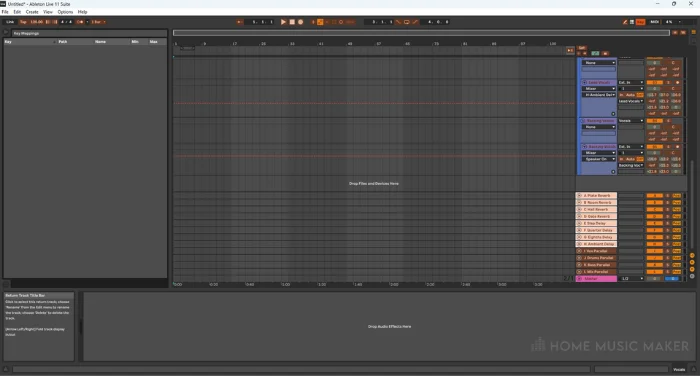
Next, click on the parameter you want to adjust and press the key/keys you wish to assign. For this example, I will set up a shortcut for the changing monitoring option of a track by pressing “u.”

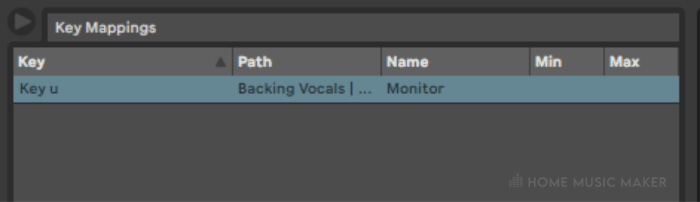
The shortcut is then automatically saved, so you can exit the “Key Map Mode” by pressing the same “Key” button. Now you can use your new custom shortcut.
Editing Shortcuts
Editing the shortcut you have created is the same as creating a new one.
Click on the parameter you want to edit the shortcut, then press the key/keys to make the new shortcut. This will automatically change the keymap to have the new shortcut.
General Shortcuts
This section is all about the shortcuts that are more utilitarian. They aren’t glamorous or exciting, but you absolutely need them.
First, I cannot stress how important consistently saving your live set as you’re working on it. The number of times I have lost progress due to forgetting to save throughout working. Along with that, some shortcuts go along well with saving.
Refrain from brushing over the preferences shortcut, as I use this shortcut the most out of all of these.
| Windows | Macintosh | |
| Save | CTRL + S | CMD + S |
| Save As | CTRL + Shift + S | CMD + Shift + S |
| Open | CTRL + O | CMD + O |
| New Live Set | CTRL + N | CMD + N |
| Open Live Set | CTRL + O | CMD + O |
| Preferences | CTRL + , | CMD + , |
The following shortcuts will be helpful when you want to bring up a particular view or change from arrangement to session view. Also, having the info view available at your fingertips is a great way to learn and understand Ableton further.
| Windows | Macintosh | |
| Toggle View | Tab | Tab |
| Show Browser | CTRL + ALT + B | CMD + ALT + B |
| Show Info View | Shift + ? | Shift + ? |
One of the best feelings is producing a track and exporting the audio file. So why not learn the shortcut to get your music bounced even quicker? Also, for exporting the MIDI file, select the MIDI clip you want to export.
| Windows | Macintosh | |
| Export Audio | CTRL + Shift + R | CMD + Shift + R |
| Export MIDI file | CTRL + Shift + E | CMD + Shift + E |
If you find these shortcuts unintuitive, you would change a few around or even add your own; you can use the key and MIDI maps. The key map will allow you to assign keyboard shortcuts, and the MIDI map will allow you to set parameters to your MIDI controller.
| Windows | Macintosh | |
| MIDI Map Mode On/Off | CTRL + M | CMD + M |
| Key Map Mode On/Off | CTRL + K | CMD + K |
Playback And Recording Shortcuts
Recording and playback are one of the most critical aspects of Ableton for apparent reasons. These shortcuts will help you to quickly record a part, play from various places in the project, let Ableton scroll across the project as it’s playing or recording, and promptly loop a selection.
| Windows | Macintosh | |
| Play From Marker | Space | Space |
| Play From Place Last Stopped | Shift + Space | Shift + Space |
| Stop Playback Once The Selection Is Over | CTRL + Space | ALT + Space |
| Record | F9 | F9 |
| Loop Selection | CTRL + Shift + L | CMD + Shift + L |
| Turn on/off loop selection | CTRL + L | CMD + L |
| Auto-scroll | CTRL + Shift + F | CMD + Shift + K |
READ NEXT:
Not everything always runs smoothly, but there are always solutions. Check out our fix on the Ableton record button not working.
Editing, Quantizing, And Comping Shortcuts
Editing, quantizing, and comping are detail-oriented processes requiring an intuitive workflow. Shortcuts will quicken these more tedious parts.
Editing
The shortcuts for copying, pasting, cutting, deleting, and other standard methods throughout computing are the same in Ableton. I’ll list them here in case you’re unaware of them, but the ones specific to Ableton to focus on are the duplicate and rename shortcuts (that I use all the time).
| Windows | Macintosh | |
| Copy | CTRL + C | CMD + C |
| Paste | CTRL + V | CMD + V |
| Cut | CTRL + X | CMD + X |
| Delete | Delete | Delete |
| Undo | CTRL + Z | CMD + Z |
| Redo | CTRL + Y | CMD + Shift + Z |
| Duplicate | CTRL + D | CMD + D |
| Rename | CTRL + R | CMD + R |
| Select All | CTRL + A | CMD + A |
| Copy drag | CTRL drag | ALT drag |
While using these editing shortcuts, you can use these shortcuts to control the grid settings to make the process even more accessible and quicker.
| Windows | Macintosh | |
| Narrow grid | CTRL + 1 | CMD + 1 |
| Widen grid | CTRL + 2 | CMD + 2 |
| Triplet grid | CTRL + 3 | CMD + 3 |
| Snap to grid | CTRL + 4 | CMD + 4 |
| Temporarily turn off snap-to-grid while dragging a clip | ALT | CMD |
Quantizing
Let’s be honest; quantizing isn’t the most fun thing in Ableton. It can feel very tedious but do not underestimate how important it is. Whether you’re quantizing audio or MIDI, these shortcuts will eliminate the in-between steps of finding certain quantizing features.
| Windows | Macintosh | |
| Quantize | CTRL + U | CMD + U |
| Change quantize settings | CTRL + Shift + U | CMD + Shift + U |
| Move a warp marker that’s selected | Left and right arrow keys | Left and right arrow keys |
| Sixteenth-note quantization | CTRL + 6 | CMD + 6 |
| Eighth-note quantization | CTRL + 7 | CMD + 7 |
| Quarter-note quantization | CTRL + 8 | CMD + 8 |
| 1 bar quantization | CTRL + 9 | CMD + 9 |
| Turn quantization off | CTRL + 0 | CMD + 0 |
Comping
Comping is a new feature in Ableton Live 11, known as take lanes within the software. Admittedly Ableton was a little late at implementing this feature, but now that it’s here, recording and editing takes in Ableton has never been easier.
| Windows | Macintosh | |
| Show Take Lanes | CTRL + ALT + U | CMD + ALT + U |
| Replace the audio in the main track with the selected part | Enter | Enter |
| Quickly try out a take | T | T |
| New take lane | Shift + ALT + T | Shift + ALT + T |
| Duplicate take | D | D |
Session View Shortcuts
Session view is the user interface in Ableton designed for live performance. These shortcuts can be a good alternative if you don’t have a Launchpad.
| Windows | Macintosh | |
| Play Selected Clip | Enter | Enter |
| Select Other Clips | Arrow Keys | Arrow Keys |
| Copy Clips | CTRL drag | ALT drag |
| New MIDI Clip | CTRL + Shift + M | CMD + Shift + M |
| New Scene | CTRL + I | CMD + I |
| Deactivate Selected Clip | 0 | 0 |
Arrangement View Shortcuts
The other user interface is the arrangement view, designed with producing and creating in mind. It may seem over the top to say that time is wasted by right-clicking and finding certain features, but imagine how much those seconds add up.
| Windows | Macintosh | |
| Split A Clip At The Marker Position | CTRL + E | CMD + E |
| Change Arrangement Width To Focus On the Selection | CTRL + J | CMD + J |
| Crossfade | CTRL + Alt + F | CMD + ALT + F |
| Insert Silence | CTRL + I | CMD + I |
| Change Arrangement Height To Focus On Selected Tracks | H | H |
| Change Arrangement Width To Focus On Selection | W | W |
| Reverse selection for audio clip | R | R |
Tracks Shortcuts
Grouping tracks in Ableton is similar to using buses in other digital audio workstations. It allows you to process multiple tracks together and organize your session.
| Windows | Macintosh | |
| Group tracks | CTRL + G | CMD + G |
| Ungroup Tracks | CTRL + Shift + G | CMD + Shift + G |
| Show/Hide grouped tracks | +/- | +/- |
Creating new tracks is required for almost any session you’ll be making. Luckily, the three types of tracks (audio, MIDI, and return) all have shortcuts.
| Windows | Macintosh | |
| New audio track | CTRL + T | CMD + T |
| New MIDI track | CTRL + Shift + T | CMD + Shift + T |
| New return track | CTRL + ALT + T | CMD + ALT + T |
Of course, after creating new tracks, you can use these shortcuts to rename, arm, solo, and mute (deactivate) them.
| Windows | Macintosh | |
| Rename a track | CTRL + R | CMD + R |
| Arm tracks selected for recording | C | C |
| Solo tracks selected | S | S |
| Mute track | 0 | 0 |
READ NEXT:
If some shortcuts aren’t working, it may not be the shortcut but the actual feature itself. Look at our fix on the arm track feature not working in Ableton.
Automation Shortcuts
Ableton is the absolute best DAW for automation. It is just so intuitive and easy to follow. These shortcuts will make automation in Ableton even smoother.
| Windows | Macintosh | |
| Turn on and off automation mode | A | A |
| Curve a part of the automation graph | ALT | ALT |
| Change automation across a selection | Shift-drag | Shift-drag |
| Toggle draw mode | B | B |
MIDI Shortcuts
You can use the computer MIDI keyboard feature if you don’t have a MIDI keyboard or controller. This allows you to play MIDI through your computer keyboard. These shortcuts are essential to your performance in this setup.
| Windows | Macintosh | |
| Computer MIDI Keyboard | M | M |
| Change computer MIDI keyboard octave | X for a higher octave, Z for a lower octave | X for a higher octave, Z for a lower octave |
| Change computer MIDI keyboard velocity | C for a higher velocity, V for a lower velocity | C for a higher velocity, V for a lower velocity |
After recording MIDI parts, you can easily change the velocity of the MIDI notes to add even more dynamics to your playing.
| Windows | Macintosh | |
| Change velocity in the MIDI piano roll | ALT drag | CMD drag |
Plug-Ins Shortcuts
Accessing your plug-ins is essential if you’re consistently using third-party plug-ins. You can group audio effects and plug-ins into an audio effect rack using the same shortcut to group tracks.
You can also quickly change over devices, or their presets by hot-swapping.
| Windows | Macintosh | |
| Toggle plug-in window | CTRL + ALT + P | CMD + ALT + P |
| Group plug-ins | CTRL + G | CMD + G |
| Hot-swap device presets and devices | Q | Q |
Related Questions
How Do You Customize Ableton Shortcuts To Fit Your Workflow?
Use the key mapping feature to assign any features to a keyboard shortcut. Use the MIDI mapping feature to set any parameter to your MIDI controller.
How Do You Quickly Switch Between Different Warp Modes In Ableton?
Unfortunately, there is no shortcut for warp modes in Ableton. You have to open clip view and select them from the drop-down menu.
How Do You Quickly Select All Clips In A Specific Section Of A Track In Ableton?
You click at one end of the part you want to select, drag the mouse across the clips while holding the click down, and let go once you’ve reached the other end.
Is There A Shortcut For Resizing Multiple Tracks At Once In Ableton?
Select the tracks you want to resize by clicking the first one and the rest while holding down the shift. Then go to the top or bottom edge of the track head. Your cursor will turn into a double-headed arrow. Click and drag to resize.
Is There A Shortcut For Saving A Live Set As A Template In Ableton?
Unfortunately not. Templates are one of my favorite aspects of Ableton to implement in my workflow, but you still have to go to the file menu and save the template that way.
READ NEXT:
There are more ways to save time and improve your workflow in Ableton. For more, check out our article on Ableton templates.