KEY TAKEAWAYS:
The vocalist must know their parts well, perform amazingly, and use a decent microphone—record in as dead of a room as possible, with multiple takes. Stitch the best takes together and edit out unnecessary in-between noise. Mix the vocals using pitch correction, modulation, EQ, a de-esser, saturation, compression, reverb, and delay.
Vocals In Ableton
Creating great sound vocals in Ableton is easier than you think.
It requires a tremendous vocal take and a decent microphone, first and foremost, but that’s obvious. We will discuss what else we can do to ensure that incredible vocal sound.
By utilizing relatively basic audio effects, we can transform your vocal sound from a frog to the prince that it is.
I will guide you through good recording conditions, give advice on how to edit, and finally teach you how to mix your vocals using only stock effects, plus some suggestions for 3rd party plugins that I adore.
Recording Vocals In Ableton
Equipment
First, you need the equipment to record your vocals into Ableton. You have two real options. The first uses an audio interface with a mic, and the other uses a USB microphone.


If you’re looking at recording vocals and other instruments, I recommend an audio interface with the appropriate number of inputs and outputs you need.
However, a USB microphone can satisfy your needs if you’re only recording vocals.
Furthermore, you will need headphones that let out as minimal sound as possible to avoid it being heard through the microphone.
Environment
The space in which you record is also significant. You want to be in as quiet of a place as possible to avoid background noise in your recording.
Also, the less reverb and sound reflections in your recording space, the better. It will produce a clearer recording this way. To achieve a less reflective room without buying acoustic treatment, you can use quilts, pillows, and blankets to create a fort around the microphone, big enough to fit you in it.
Recording
Firstly, make sure the vocalist knows their parts well. Uncertainty about a musical idea comes through in a recording. You want to focus on the performance in a recording session, not the learning of the part.


Make sure you also don’t push your voice too much. We all can get frustrated when a take isn’t going well, but you keep going and going. This will result in fatigue and a rubbish vocal take. Instead, warm up correctly, take regular breaks, and try not to get too much in your own head about it.
If you have the luxury of knowing someone that can help you engineer the session, then great. Even someone pressing record and dealing with Ableton while you perform is helpful if you’re the singer.
Editing Vocals In Ableton
Selecting The Best Takes
Since Ableton Live 11, we have been given the take lanes feature. This is a game changer in Ableton and the reason I entirely switched over to Ableton rather than using another DAW to record using their takes features.
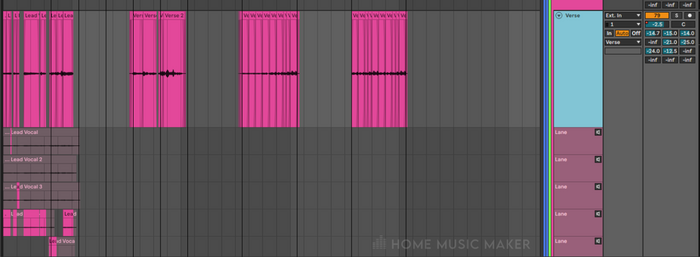

You can record over the same track, and it will create a new take lane with the previous recording on it, and this can be done multiple times.
When selecting takes, you must press CTRL+ALT+U/CMD+ALT+U on the track to open up the take lanes. You can choose parts of different takes from here for the final vocal track.
I do this by listening to each take one line at a time and seeing which one I like best. I limit cutting between takes for each line only, but if one line needs two different takes to sound, it’s best, then so be it.
Removing In-Between Noise
Between certain parts of the vocals, there will be gaps. This is usually filled up by the sound of breathing and background noise. The compressors we will apply later will amplify these unwanted noises, which will be evident in the mix. We need to remove them.
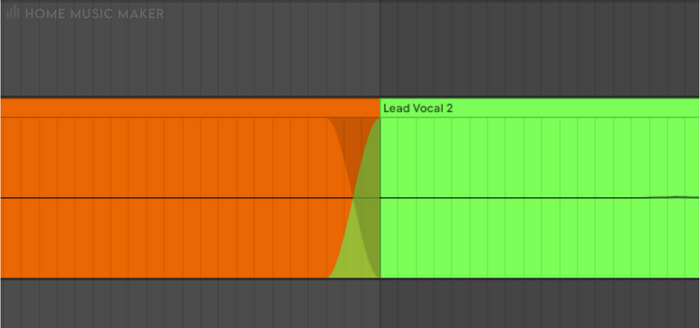

Luckily, this is super simple. Go to the audio clip from which you want to remove the in-between noise, and click at the start of the vocal phrase. Press CTRL+E/CMD+E to split the audio clip at this point. Repeat this for the end of the vocal phrase. After doing this for all the lines, you can remove the audio clips between the phrases, which will remove the unwanted audio.
You may need crossfades on the audio clips to make this sound more natural. This can be for an audio clip crossfading into another or fading into the empty space. It’s a gentler way of coming out of that audio clip than ending it abruptly.
Mixing Vocals In Ableton
I will break down each effect when using effects to mix vocals in Ableton. The order of effects is my particular order in my vocal chain, but feel free to experiment with the order. Where an effect is in the signal chain impacts the sound, it is vital to consider.
I will start with the stock effects that Ableton comes with. I will also recommend any third-party plugins in my vocal chain instead of the stock effects.
The only exception is pitch correction, as Ableton doesn’t have an automatic pitch correction tool. You can manually adjust the pitch, however. Instead, for this, I will suggest a free plugin.
Pitch Correction
Pitch correction can be a touchy subject for some vocalists. However, it’s used on almost any modern song in pop, rock, rap, etc. Music listeners are used to hearing perfect pitch when listening to vocals.
There are different levels of pitch correction, from a robot sound to a completely natural sound. It all depends on your style and taste, but I recommend using it to some degree to get better-sounding vocals.
However, do not use this as a fix for a bad performance. Get the best take possible; use this to push it further into a professional vocal sound.
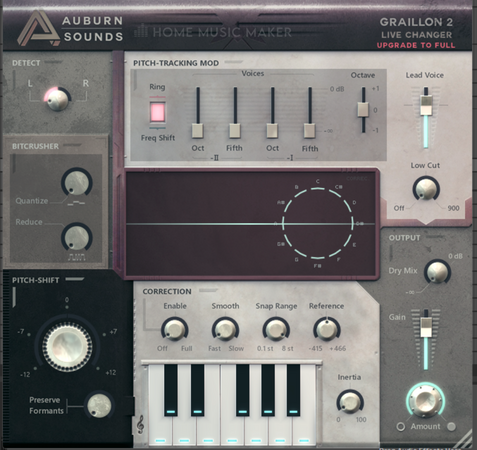

I recommend Graillon 2 by Auburn Sounds for a free pitch correction plugin.
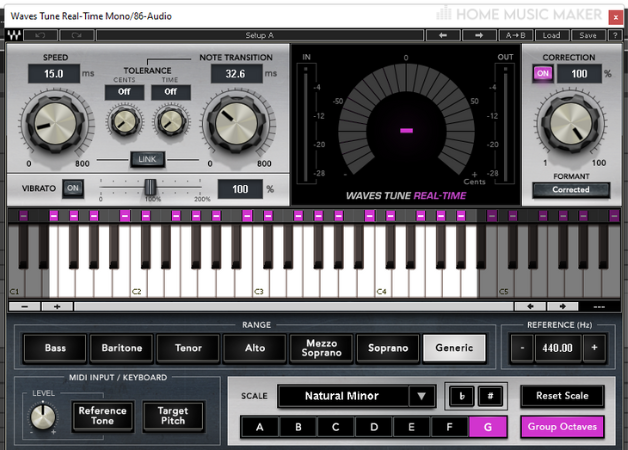

My personal choice for pitch correction is the Waves Tune Real-Time.
READ NEXT:
Unsure of the differences, if any, between pitch correction and autotune? Check out our article on pitch corrections versus autotune.
Modulation
The subsequent effect in my vocal chain is some form of modulation. This is usually a chorus effect. However, sometimes I will swap it out for a flanger or phaser if the song calls for it.
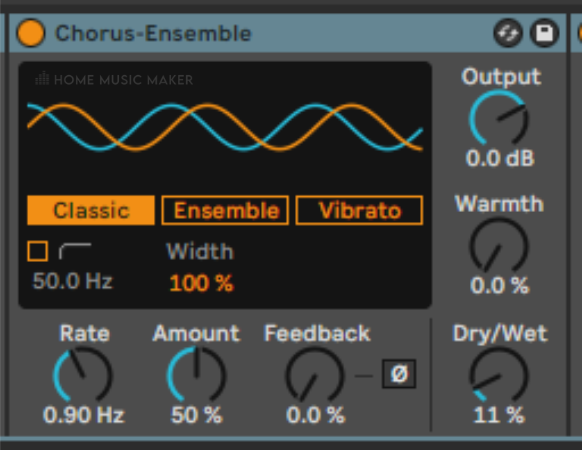
This effect is doing minimal work, with the dry/wet parameter set to 11%. However, it adds a subtle brightness to my vocals that I enjoy and a bit of color to the sound.
My go-to chorus effect is actually the stock chorus-ensemble effect in Ableton. There are some tremendous analog emulations of chorus effects. However, I love the sound of the stock chorus and how much you can shape the sound.
EQ
EQ is one of the most essential effects in all of mixing. It allows you to shape the sound, cut out harsh frequencies, and give space for other elements in the mix.

I have this third in my vocal chain as I want the pitch correction to process my raw audio before the other effects. I also want to cut out any part of the modulation I don’t particularly appreciate after it’s been applied.
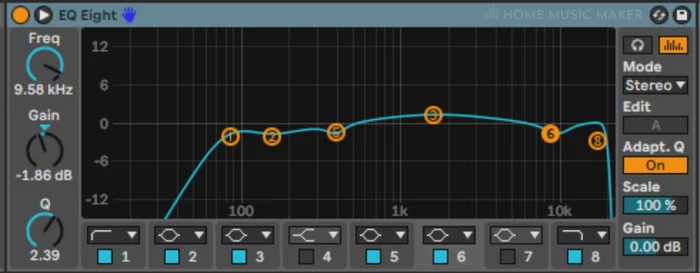
For vocals, I prefer to use a graphic EQ. This allows me to hear the frequencies I am affecting and see them. I will sometimes add an analog style EQ after the graphic EQ to add a specific flavor, but mostly it’s the graphic EQ.
I will use a high-pass filter to cut/reduce any frequencies 80Hz and below, with a low-pass filter reducing frequencies above 1990Hz. These frequencies are not contributing to the sound, and a build-up of them over all the tracks can leave you with a very muddy or harsh mix.
Of course, the general curve of the EQ will vary depending on the singer, mic choice, environment, and equipment. That being said, here is my general curve that I start with to get good results.
I will reduce frequencies to around 150Hz, 611Hz, and 8300Hz. For me, this cleans up the vocal sound and reduces harshness in the case of the last frequency. Suppose I am trying to reduce a general muddiness or boom. In that case, I will have a smaller Q, but for something more specific, it will be larger.
Furthermore, if I detect any problem frequencies, I will have a notch in the EQ, with the largest Q possible, at full gain, searching for this frequency and then cutting it as low as possible.
I reduce more frequencies than add, as my other plugins bring out the pleasant-sounding frequencies. However, I have a little boost with a small Q between 1kHz and 2kHz. This is a way to brighten my vocals without making them harsh.
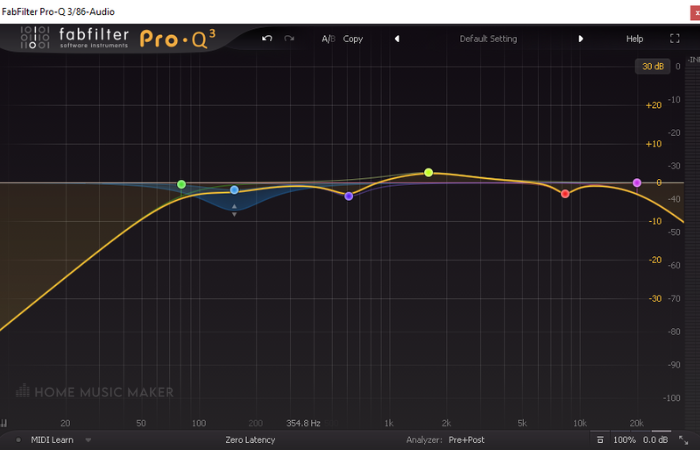
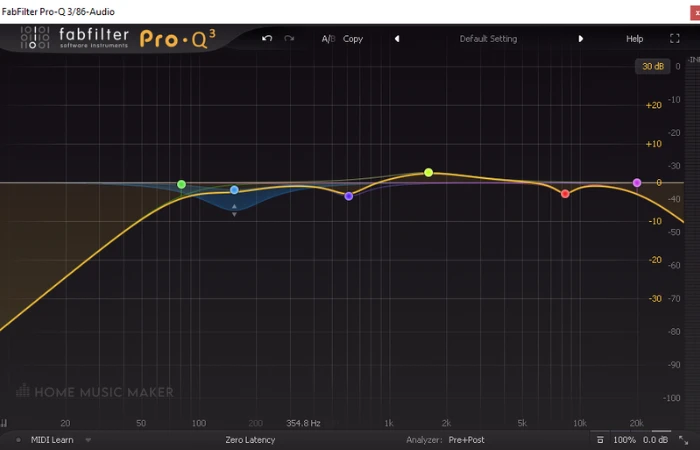
Of course, all of this is possible with the stock EQ. However, I recommend taking a look at Pro Q3 by Fabfilter. This EQ is easy to work with and has fantastic features, such as affecting the frequencies in different areas of the stereo spectrum and a dynamic EQ allowing you to apply compression to a specific frequency range.
De-esser
To further control the frequencies of the vocal audio, I am utilizing a de-esser. This allows me to compress a frequency range in the higher end of the spectrum to reduce any harsh consonant sounds coming through.
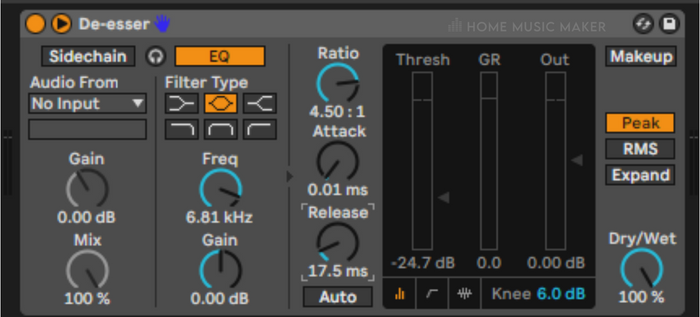
I want bright vocals but don’t want them to be harsh. This allows me to control that much better. I go for a frequency range of 5.7kHz and up. This contains all of the problem frequencies, and then I will play around with the threshold, range, and ratio to dial it in for each vocal.
In Ableton, there isn’t a specific de-esser tool. However, the stock compressor allows you to specify a frequency range (to an extent) that will only be compressed. There is even a preset in the stock compressor called de-esser.

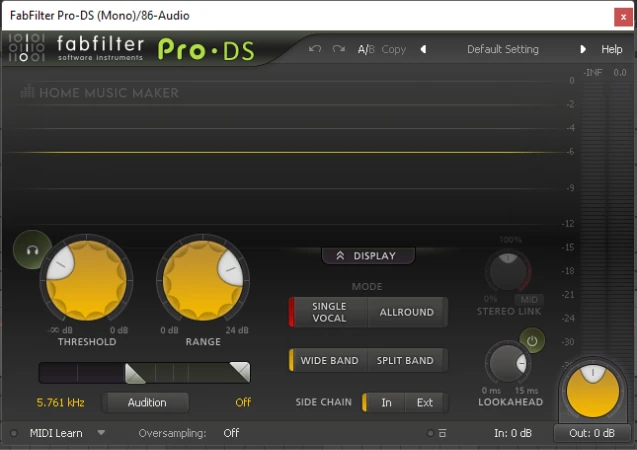
However, if you’re looking for a de-esser with many more options for controlling the effect, I highly recommend the Pro DS by Fabfilter. You can select a more specific range of frequencies, plus there are different modes for different situations. This is specifically a de-esser tool, so it’s more comprehensive for this effect.
Saturation
Saturation (or distortion) can do many things for a vocal sound. It can make the vocals sound warmer, decreasing the harshness, nicely coloring the sound, and compressing the vocals to an extent.
I have a low saturation level for my vocals, but you may want more depending on your style and genre. If I go for a really blown-out distorted sound, I usually separate this part into another track and apply the distortion.
Here we are talking about my general use of saturation in my go-to vocal chain.
I am a big fan of the stock saturator within Ableton. It may not look like the fancy saturation plugins, but it gives them a run for their money.
Regarding settings, it depends on the level going into the plugin. But the overall sound we aim for is to add subtle warmth and compression without hearing much of the saturation in an obvious way.
I actually use a combination of two saturation plugins to achieve the sound I want. I am a guitar player, so this comes from me pairing overdrive and distortion pedals for years to create a specific tone.
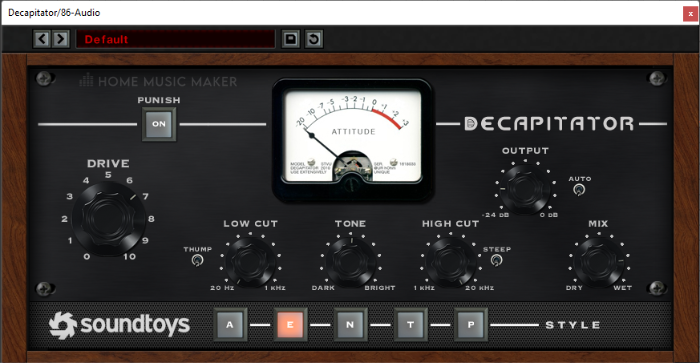
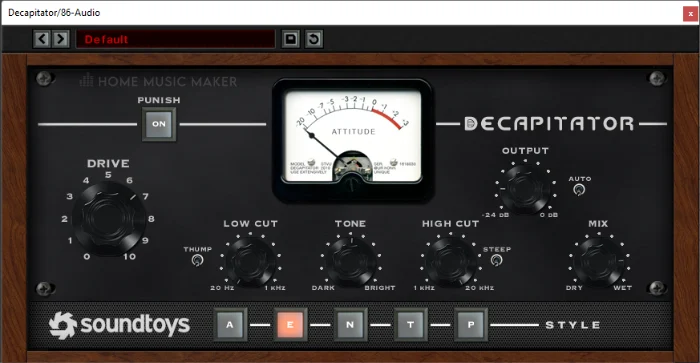
The first saturation plugin in my chain is the Decapitator by Soundtoys. This is an extremely popular distortion plugin, and it’s easy to see why. It accurately emulates analog saturation, allows you to choose from 5 styles, has a low and high cut, a tone parameter, and more.
I have my drive set to 7, the saturation style as E, and my mix set to around 77%. I also have turned the output down, which will affect the overall distortion. In the analog world, which this plugin is modeled after, the preamp would do most of the distortion here, not the power amp, as the output is lower.
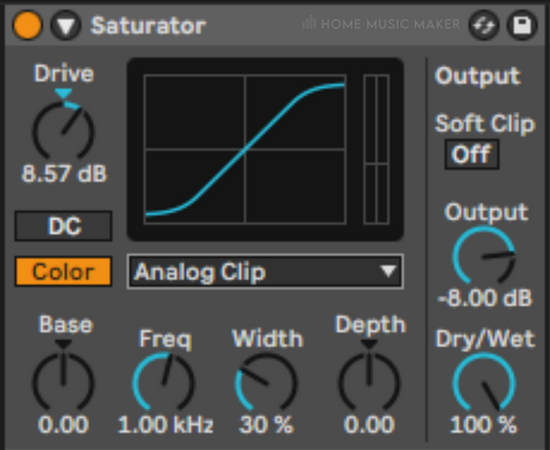
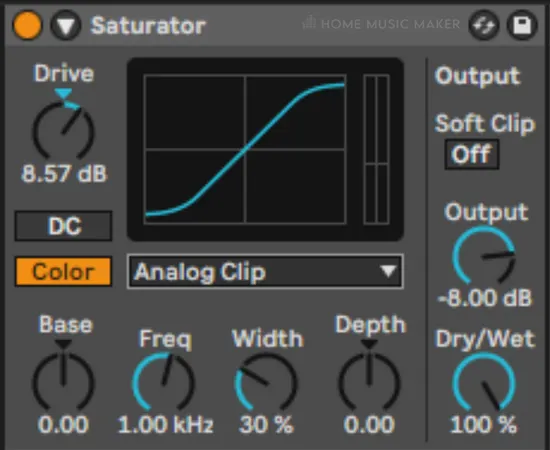
Next is the stock saturation effect in Ableton. I have set the drive at 8.57dB, with the mode set to analog clip, the color button turned on, and everything else is the default. Of course, if you want to pair saturation effects, you can do this with the stock saturator by changing the saturation mode on one of the effects.
Compression
The final part of my vocal chain is two compressors. Like many others, I find that using two compressors to get a more even level of dynamics in my audio sounds much more natural than cranking the hell out of one.
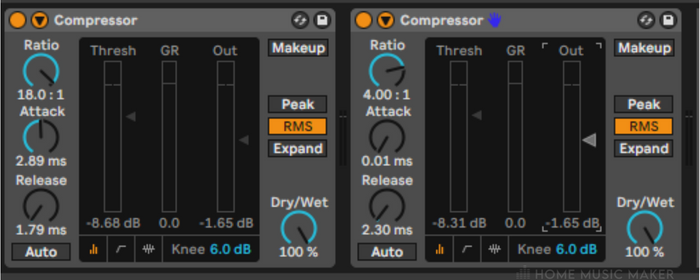

My first compressor is generally bringing down those louder transients and creating more consistent dynamics in the vocals. This is achieved by having a medium attack speed, a fast release speed, and a high ratio.
Depending on the song’s style, I usually aim for a gain reduction of between 8dB and 15dB, which I achieve by altering the compressor’s input, output, and threshold. I want this compressor to really smooth out the vocals.
The next compressor is catching those loud peaks that are still coming through, even after the first compressor. It further evens the vocals and allows for a consistent sounding performance, rather than uncontrollable loud and quiet moments taking you out of the song.
The second compressor has a fast attack and release speed, with a 4:1 ratio. I typically aim for 5dB to 10dB of gain reduction, depending on the style.
This can all be achieved using the stock compressor in Ableton very well. Using the stock compressor, I learned how compression works and found the user interface intuitive. Plus, Ableton has the incredible feature of explaining each parameter in its effects.
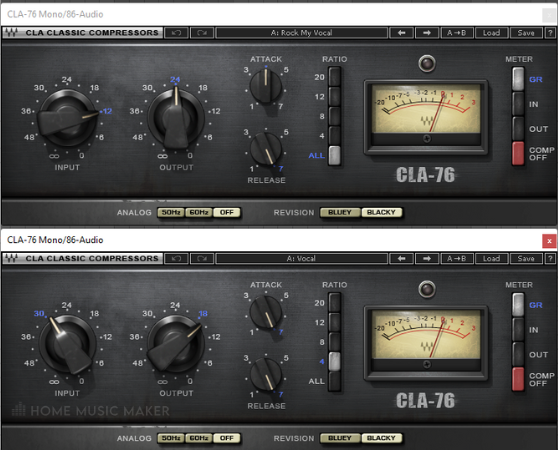
My personal choice for a compressor plugin is the CLA-76 by Waves. This is an excellent emulation of the classic 1176 hardware compressor. It’s not flashy or fancy, but it has everything you need to control your vocals and sounds lovely.
Reverb And Delay
I do not include reverb and delay as part of the vocal chain. Instead, I utilize return tracks for these effects. I have three reverb sends and four delay sends that my vocals use. I am mixing them into the 3D sonic space and also bringing out the best in them.
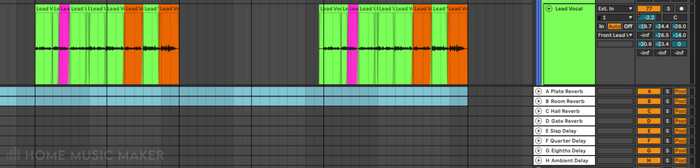

I use stock reverb and delay effects from Ableton, with presets they come with. If I feel the mix is muddy, I may add an EQ at the end of the return track to clean it up. Also, the delays are all being sent to the reverb return tracks to blend in better with the rest of the space.
For reverb, I have:
- A plate reverb, which is my main vocal reverb.
- A room reverb to get a sense of the closeness of the vocals in the mix.
- A hall reverb that is very low in the mix, as I want the vocals closer up, but it adds a nice effect.
For delay I have:
- A slap delay, with a quick delay time and low feedback, and repeat.
- A quarter-note delay, which is doing straight quarter-notes for the delay time.
- An eighth-note delay doing eighth-notes for the delay time with a little swing.
- An ambient delay with high feedback. This has eighth-note triplet echoes in the left ear and quarter-note triplet echoes in the right.
READ NEXT:
A lot of plugins come in the form of mono and stereo, so which one do you use for vocals? Read our article on using mono or stereo plugins for vocals for more.
Related Questions
How Do I Create Harmonies?
This is simple music theory. Look at the chord you’re singing over, identify the note that the main melody revolves around, and choose one of the other notes to base that part of the harmony. Make sure you stay within the scale of the song in the harmonies!
What Is A Basic Vocal Recording Setup?
There are two. One is to have a small audio interface with one or two inputs and a microphone connected to it through an XLR cable.
The other is to use a USB microphone directly into the computer.
Headphones are also required, and ideally, ones with minimal noise bleed.
Does Ableton Have A Pitch Correction Effect?
No, Ableton doesn’t have an automatic pitch correction effect. However, you can change the pitch of each audio clip to a precise degree. In each audio clip, you can put a tuner onto the vocal track and manually alter the pitches by cents or semitones.
Can You Use A Gate To Remove In-Between Noise?
Absolutely, and I do this with live drums all the time. However, I recommend doing it manually for vocals, as you can get very specific with the noise removal. Since the vocals are at the front of the mix, I take these extra steps to ensure a higher-quality sounding mix.
How Do I Make My Voice Sound Like Someone Else?
Within Ableton, you can change the pitch and formants of an audio clip in the complex pro algorithm of warp mode. It’s a great creative effect, especially for a delay effect in the background.
READ NEXT:
Now that you know how to create amazing vocals in Ableton, ruining them with unknown mistakes would be a shame. For more, check out our article on common mistakes when recording vocals.