To correctly map MIDI in Ableton Live, you must first ensure that your MIDI device is plugged in and selected as a MIDI input device within Ableton’s preferences. Then you turn MIDI map mode on and proceed to MIDI map your control surface.
Mapping MIDI In Ableton?
Have you ever tried to map MIDI in Ableton live and been frustrated when it didn’t work? Did you ever wonder why the MIDI mapping feature in Ableton Live won’t work and how to fix it?
Look no further because this article has all the answers! By the time you’re done reading this, you will be on your way to becoming a MIDI master!
So sit back and read on! You’ll be MIDI mapping like a pro in no time!
Understanding What MIDI Mapping Is
MIDI mapping is a feature in Live that allows you to create custom links between physical controls on your MIDI controller/control surface and digital parameters on your soft synth or Live device.
Let’s take a look at what this actually means.
First, a MIDI controller also called a MIDI control surface, is a hardware device that doesn’t even do anything by itself.
Instead, it is intended to be paired with specific compatible software. When it is, it acts as a sort of remote controller for the software mentioned above.
Think of it like an Xbox controller you would use to play an Xbox video game.
It’s the same concept; only we control various parameters of a virtual instrument instead of controlling multiple parameters of a video game character.
MIDI controllers come in all shapes and sizes, from standard keyboards like the Novation Launchkey, aimed mostly at piano players, to the hybrid drum-machine-on-steroids layout of Ableton’s very own Push 2.
These custom controllers can help speed up the music creation process and make the whole experience more enjoyable. Still, they are not always as easy to set up.
And some of these keyboards can get crazy; I’m talking like, set-your-whole-weekend-aside-and-prepare-for-hell-and-user-manuals type of crazy.
Which reminds me, speaking of confusing topics, what even is MIDI anyway?
Why Is MIDI Mapping Not Working In Ableton?
MIDI mapping is one of the most powerful features in Ableton Live. It lets you see and play any on-screen control with your physical device.
But what happens when it doesn’t work?
The most common reason MIDI mapping may not work is that Ableton isn’t receiving any MIDI from your MIDI controller.
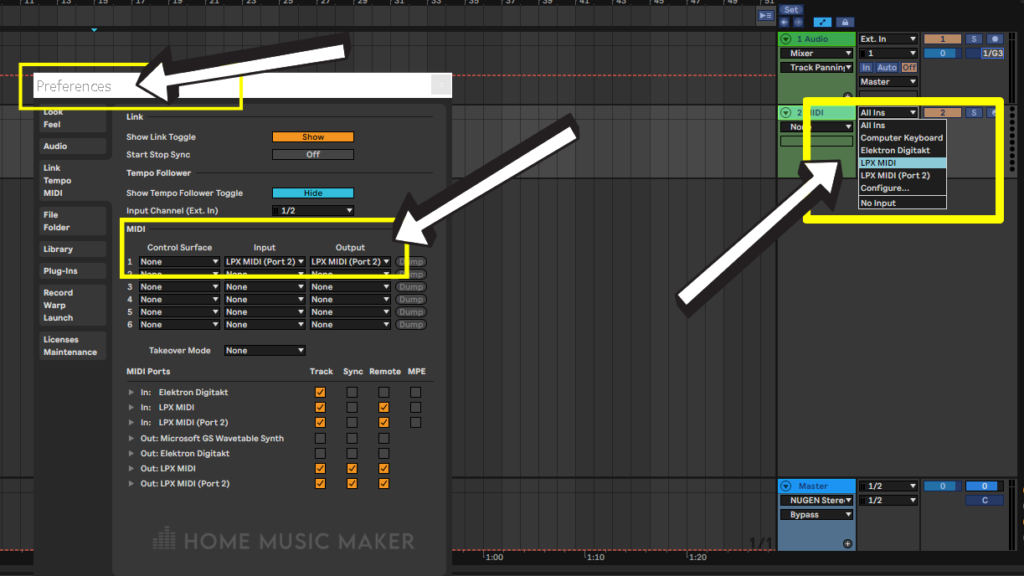
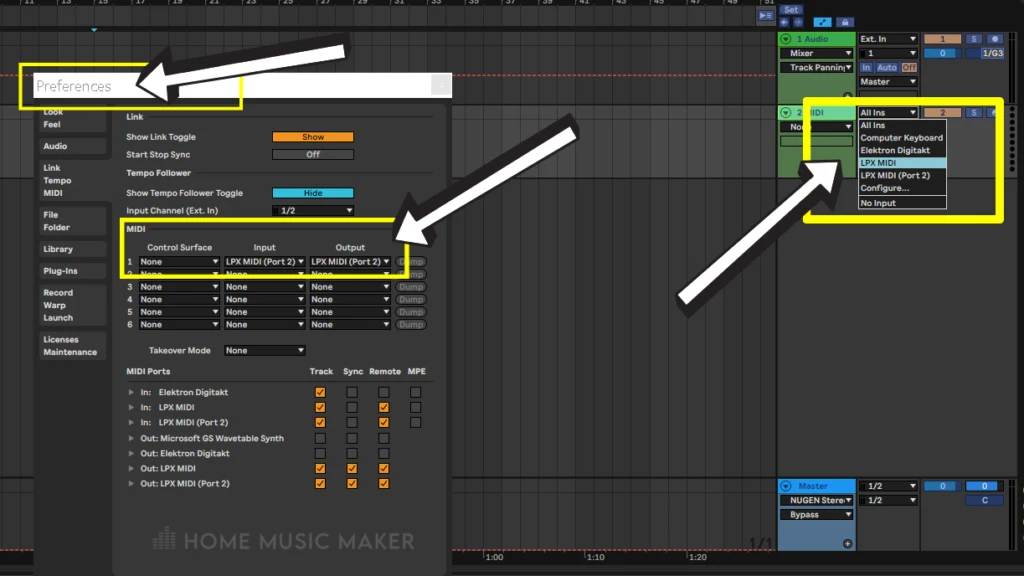
If this is the case, you need to ensure that the input for your MIDI controller has been set up correctly in the preferences.
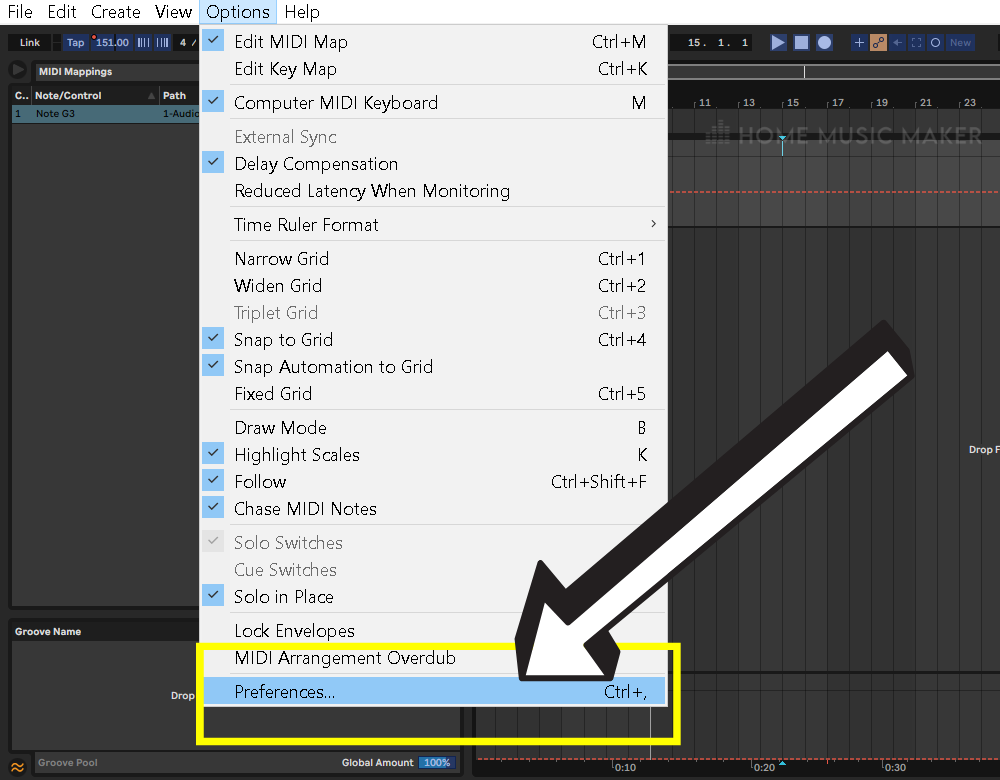

Open Preferences -> Devices -> Input.
Ensure that there is a checkmark next to Show input devices.
You will then be able to select which input device should send MIDI into Ableton and which output device should receive MIDI data being sent from Ableton.


If you don’t see your device listed among the “MIDI In” devices in Ableton’s MIDI preferences, then double-check that your MIDI controller is turned on and plugged in.
For help, I recommend checking out the user manual that came with your MIDI controller.
When that is done, ensure you have any necessary drivers installed if it still doesn’t show up. These can usually be found in the support or downloads section of the product page on the manufacturer’s website.
If the issue persists, you may need to contact customer service with the manufacturer.
How To Setup Your MIDI Mapping Correctly In Ableton (Step-By-Step)
Step 1
The first step to setting up your MIDI mapping in Ableton is ensuring you receive MIDI properly.
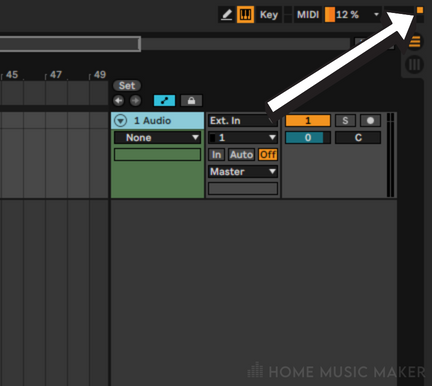
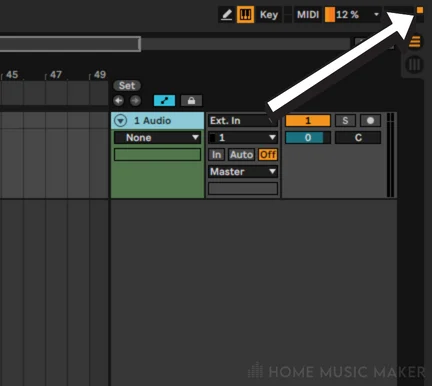
You can quickly tell by looking for a little orange light in the top right-hand corner of Ableton, next to the CPU usage indicator.
If you are receiving MIDI, then every time you move a control on your MIDI controller or play a MIDI key, that orange light should blink.
If not, you should review the section titled “Why Is MIDI Mapping Not Working In Ableton?“
Step 2
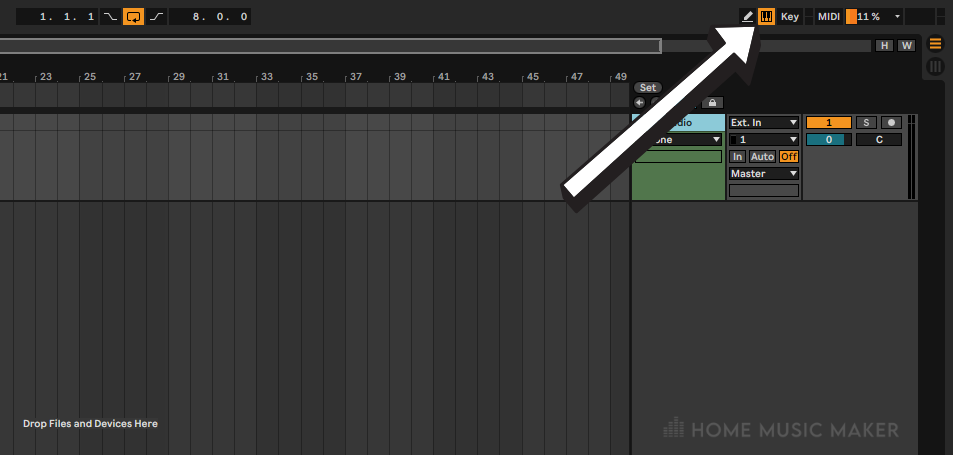
Click the MIDI map mode switch to put Ableton into MIDI map mode.
You can find it directly to the left of the CPU usage indicator. Just look for the button that says “MIDI.”

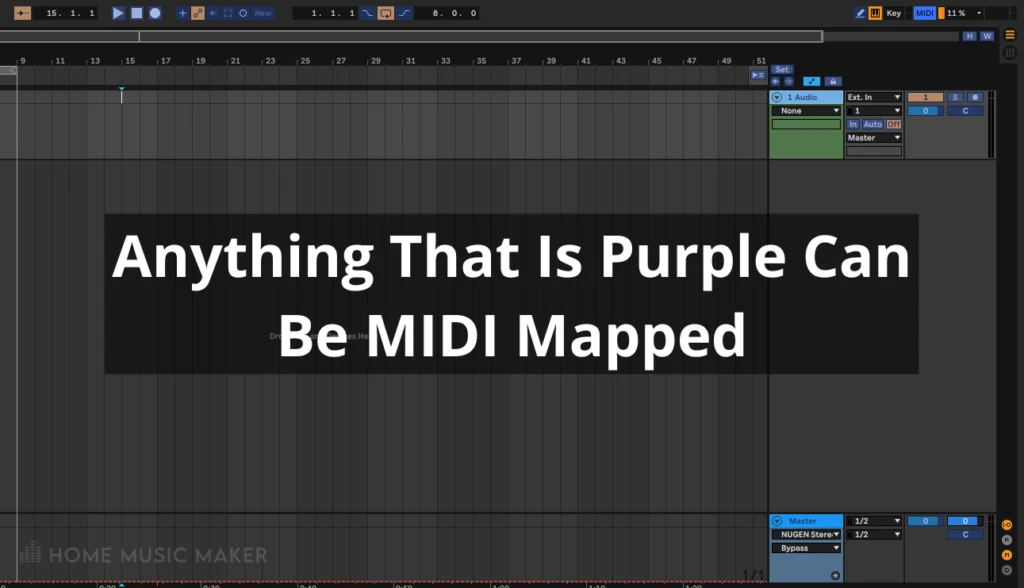
Step 3
You will know Ableton is in MIDI map mode when a bunch of the on-screen controls turns purple. This is to indicate what is and isn’t MIDI mappable.
For example, anything that is purple can be MIDI mapped.

Step 4
Now the only thing left to do is click on whatever on-screen control you want to map and then move the physical control that you want to control that parameter.
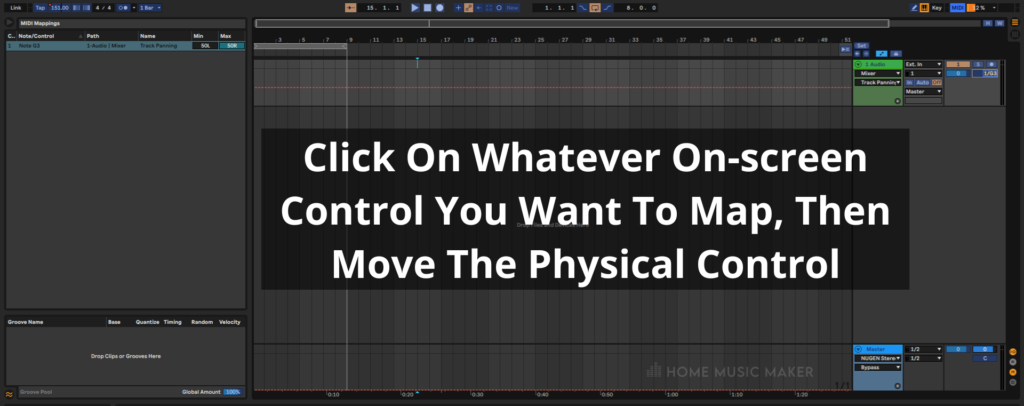
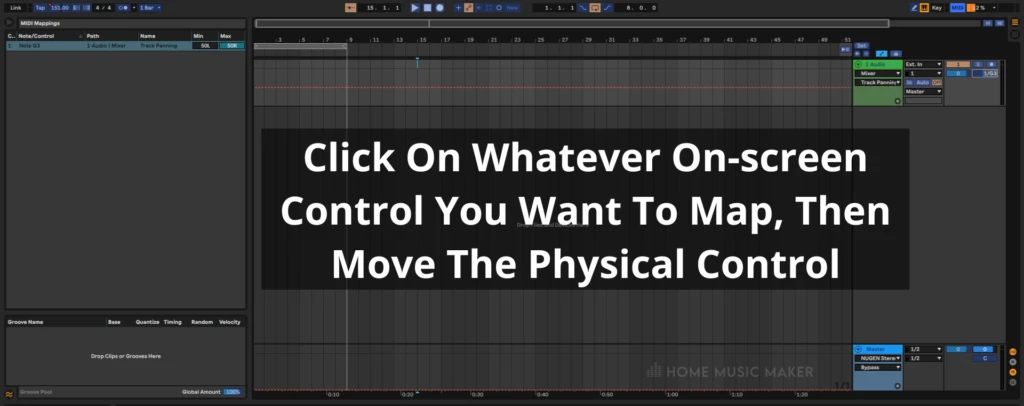
Now when you take Ableton out of MIDI map mode, you can control the parameter with your MIDI controller.
Step 5
Repeat this process for every control that you want to map.
What Is MIDI?
MIDI is the name for a protocol that allows two or more independent devices to communicate musical information with each other.
It’s a type of data format that is widely pre-programmed into digital audio products to allow communication.
And when you look at it as a data format for programming computers, it starts to get confusing pretty quickly.
But looking at it from a musician’s perspective, it becomes a lot simpler (unless you are just a natural-born coder who can write javascript in their sleep… and in that case, I only have one question…
What will it take for you to go to my class and pass my finals for me?
Honestly, I doubt anyone would even notice…
I’ll take the silence as a resounding maybe.
Since new technology lets us work with MIDI data effortlessly (you just click a button, now that’s my kind of college exam!)
MIDI is nothing new. In fact, It’s been around since 1981 and was used back then to allow synthesizers, drum machines, sequencers, computers, etc., to work together in real-time.
This way, when you turn, for example, the “Filter Cutoff” knob on your midi controller, it changes the filter cutoff value inside of your DAW.
But what happens when you want to use your Native Instruments Maschine, a MIDI controller not designed with Ableton Live in mind, to control your filter cutoff value in Ableton?
This is where MIDI mapping comes in.
MIDI mapping is where you assign digital software controls inside Ableton to physical hardware controls on your MIDI controller.
Most of the time, the process involves downloading a file from the manufacturer of your MIDI controller. This file tells Ableton how the MIDI should be mapped.
But if you are ever in a situation where you don’t have and can’t get that file, or even worse, if that file doesn’t exist, well, this is where it pays off to know about MIDI mapping and how to do it by hand.
How To Use MIDI In Ableton
As you now know, MIDI is a technology that enables devices to talk to one another. Essentially, MIDI is a protocol for synchronizing messages between devices.
To use MIDI in Ableton, you must set up your controller or keyboard to send and receive MIDI notes.
The simplest way of doing this would be through a computer interface like USB or Thunderbolt with a device that supports MIDI over USB.
If you have this, plug your device into the port and select it as an input source under preferences for audio/ MIDI devices.
If you want to send MIDI notes to an Ableton instrument, ensure the track holding the instrument is set to “In” to receive the MIDI input.
Now you can map the inputs from your controller to different sections of the screen by following the directions above.
How To Save Your MIDI Mappings In Ableton
If you want to be able to reuse your MIDI mappings in the future, then you will need to export them.
Exporting is easy and will save your map for a later date.
Ableton makes this process pretty easy because saving your project will also keep the MIDI mappings.
But what if you want to use the same MIDI map on multiple future projects?
Simply save the instrument that you have MIDI mapped as a rack preset by right-clicking on the Ableton instrument’s title bar and clicking “save as default preset” in the drop-down menu.
Once you do that, all you need to do is open up a new Ableton session, create an empty instrument rack, and drag your saved preset into it!
Related Questions
Do You Need A MIDI Controller For Ableton?
A MIDI controller is not necessary to use Ableton. However, most people will agree that using a MIDI controller with Ableton brings many benefits and is worth the investment.
Why Is Your Keyboard Not Working On Ableton?
One reason could be that it is not selected as the MIDI In device within Ableton Live’s preferences.
How Do You Know If Your MIDI Controller Is Working?
By looking at the MIDI event indicator LED, you can know whether your MIDI controller is working. It is a small square in the upper right-hand corner of the screen, and it will blink orange whenever Ableton receives a MIDI event, such as a key press or knob turn.
How Do You Save MIDI Mapping In Ableton?
You can save a MIDI mapping as part of an instrument rack preset. When you save the preset, Ableton will automatically also save any controls that you have custom mapped.
How Do You Edit A MIDI Map In Ableton?
You can edit a MIDI map in Ableton by clicking the MIDI map mode button next to the CPU meter in the top right-hand corner of the interface.
How Do You Enable The MIDI Keyboard In Ableton?
You can enable your MIDI keyboard by selecting the MIDI settings section of Ableton Live’s preferences and selecting the appropriate MIDI device.
Check out this next article on recording MIDI in Ableton without overwriting.