KEY TAKEAWAYS:
Create an audio effect rack by selecting the effects in a track you want to include, then press CTRL+G/CMD+G. Click the floppy disk button at the bottom left corner of the effect rack to name and save this effect. Use audio effect racks by dragging them onto a track.
Effect Presets In Ableton
While you may be familiar with plugins having their own presets, can you group a collection of plugins together and save them as an audio effect rack?
Not only can you group these plugins together, but you can group them with the parameters within each plugin being stored as a part of this audio effect rack.
This can save you so much time when working in Ableton, especially if you have plugins and settings that you frequently start with.
This article will explain how to create a general audio effect rack. Then, we will dive into some examples of using them for recording and mixing.
Creating, Saving, And Using An Audio Effect Rack
Creating an audio effect rack is one of the most straightforward actions in Ableton. There are two ways to do it. I prefer the first way I will explain. However, I will show you another way in case that’s your preference.
By Grouping
The first way to do this is to use the grouping feature in Ableton. You may already use this for tracks. However, you can apply the same logic to effects.


First, load the plugins and effects that you want into a track. Then select them all by clicking on one of the effects headers and then clicking on the others while holding down the shift button. When you select the effects, the headers change from gray to light blue.

Now press CTRL+G/CMD+G to group the effects together into an audio effects rack.
By Using An Empty Audio Effect Rack
Go to the left-hand sidebar and select audio effects. Within here, click on utilities to see the audio effect rack as the first option.

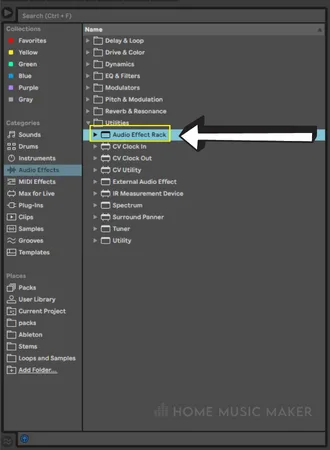
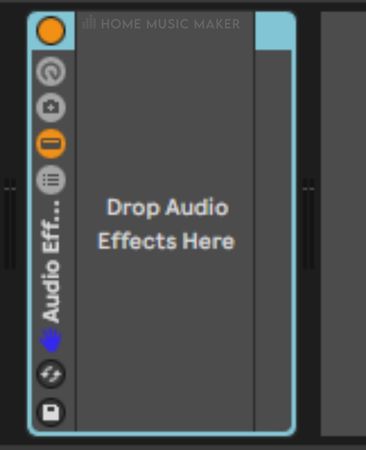
Drag this into a track, and an empty audio effect rack will appear. Now all that’s left to do is to drop your effects into the empty audio effect rack.
Saving The Audio Effect Rack
Now that you’ve created the audio effect rack, it’s time to save it. Press the floppy disk button at the bottom left corner of the audio effect rack.
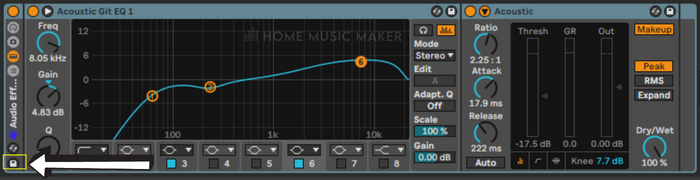
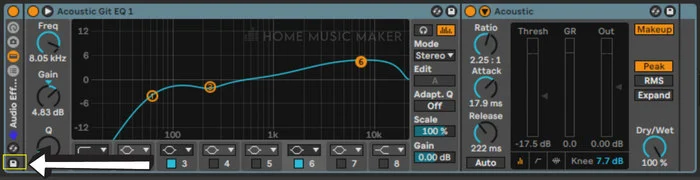
When you do this, the left-hand sidebar will show the audio effect rack presets within the user library. Type a name to call the effect rack and press the enter button. This finalizes the save.
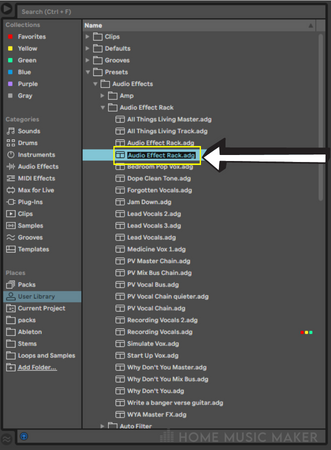
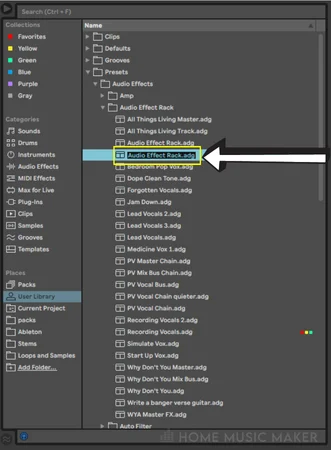
Using The Audio Effect Rack
You need to go to audio effects in the left-hand sidebar to utilize these effect racks you’ve made. From here, click on utilities and then audio effect rack. With this open, you can see all of the options Ableton already has in more folders. Underneath are the user-created ones.
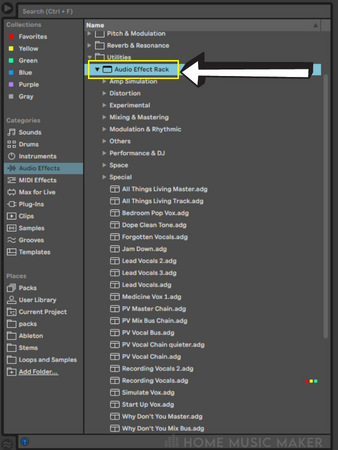
Select an audio effect rack, and drag it onto the desired track. That’s all!
Audio Effect Racks Examples
I rely primarily on audio effect racks for vocals, whether recording or mixing them. Let’s go through my audio effect rack for recording vocals and then mixing them.
Recording Vocals
For recording vocals, the purpose of the effects is to make it sound pleasing to me in the headphones so that I give a good performance. However, I don’t want to use them to mask a bad performance.
Another thing to consider here is being sparse with effects, so you have minimal latency when recording.
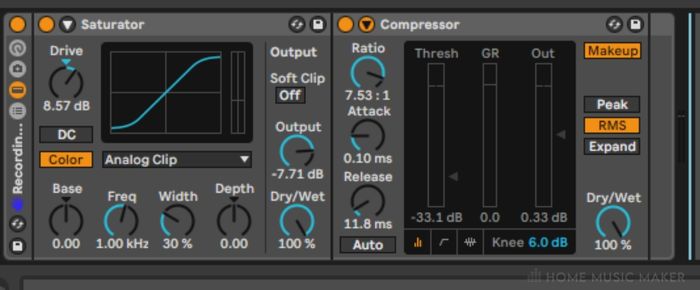
My first effect is a saturator to color the sound and compress the signal. Then a compressor follows to reduce the peaks of the recording further. A more consistent volume means that I am not thrown off if something is suddenly too loud.
These effects are already set how I like them for my vocals and setup, so no tweaking is necessary. However, even if you need to change things, the audio effect rack is an excellent place to start and saves time loading individual effects.
Of course, I also use delay and reverb when recording vocals, as dry vocals are super weird. I have these on sends, but you can include these effects within the effects rack.
READ NEXT:
For an even deeper guide to recording vocals, please read our article on how to record vocals in Ableton.
Mixing Vocals
When mixing vocals, I have a typical vocal chain that I use. Sure, I will sometimes add or remove effects from this vocal chain, but it has all the plugins I use 80% of the time on vocals.


First, I have a utility plugin to control the level going into the following effect. For my setup, it works better to record at lower volumes than the following plugin prefers, so this adjustment compensates for that.
The following plugin is an autotune to tighten the performance, followed by another utility plugin to bring the level back down after the pitch correction. This is followed by the stock chorus effect within Ableton, with only 11% on the dry/wet parameter. This brightens and pleasingly colors the vocals.
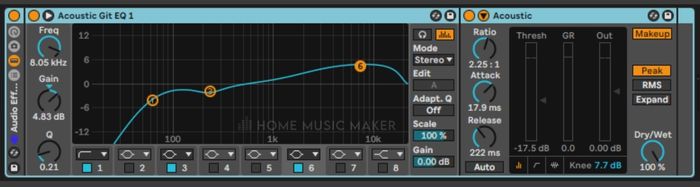
Now we have the EQ plugin to reduce, cut and boost specific frequencies to bring out the best sound for the vocals and to help the vocals sit in the mix well. I use a de-esser to remove those harsh high-frequency consonants.
I have two different saturation effects for more color, pleasing distortion, and compression. They aren’t set to extreme levels, but it slightly warms up the vocal sound.
I use two different effects together as I come from the world of guitar and pedals. Stacking overdrive and distortion is a common practice to achieve a specific tone, so I used that knowledge within my vocal chain.
Next is two compressors. The first is generally compressing the vocals to moderately squash the dynamics of the audio. The second is faster acting and picking up any peaks that are still a bit much in the dynamic range.
Finally, in the end, I have another utility effect which I automate the track level with. I prefer to keep the volume parameter of the track free from automation for gain staging.
READ NEXT:
A key effect in mixing anything, especially vocals, is reverb. But with so many choices, how do you choose? Check out our article on the best Ableton reverb effects to guide your decision.
Related Questions
Can You Download Audio Effect Racks?
Yes, you can. There are many places to find them, including Ableton’s website under the packs tab.
How Do I Install Downloaded Audio Effect Racks?
All you have to do is drop them into your audio effect rack folder in the user library. Then you can access them within Ableton from the user library.
The audio effect rack folder for Windows is located in C:\Users\[username]\Documents\Ableton\User Library\Presets\Audio Effects\Audio Effect Rack.
For Mac, this is in Macintosh HD/Users/[username]/Music/Ableton/User Library/Presets/Audio Effects/Audio Effects Rack.
Where Are Ableton Audio Effects Stored?
Within the audio effects folder in the user library.
For Windows, the audio effect rack folder is located in C:\Users\[username]\Documents\Ableton\User Library\Presets\Audio Effects.
For Mac, this is in Macintosh HD/Users/[username]/Music/Ableton/User Library/Presets/Audio Effects.
What Is The Difference Between Audio Effect Racks And Instrument Racks?
An audio effect rack contains audio effects. In contrast, an instrument rack can hold a software instrument, MIDI effects, and audio effects.
READ NEXT:
With all these effects now at your disposal at the click of a mouse, it could slow down Ableton if your system isn’t up to it. To minimalize this issue, read our guide on how to make Ableton run faster.