The key to working with OBS and FL Studio is getting the configuration and settings adjusted and working correctly. The most common issue is not recording the audio coming from FL Studio in OBS. Routing the audio properly is the trick to getting things working and running smoothly.
Using OBS With FL Studio
If you’re a musician or music producer interested in broadcasting your FL Studio session live across the web or recording tutorials on-screen, OBS is a great free solution. Unfortunately, this can lead to technical issues though.
One common problem you might encounter is the audio from FL Studio doesn’t record or stream.
Let’s take a look at how to solve this problem so you can get up and running with your live streaming or video recording sessions.
What You Will Need to Follow This Tutorial
- FL Studio 12 or higher
- Computer with peripherals to control the FL Studio User Interface
- OBS freeware
- Audio routing software (Blackhole)
Step By Step Instructions for Setting Up OBS With FL Studio
Step 1. Download And Install OBS
OBS stands for Open Broadcaster Software. OBS Studio is a free application available for Apple, Windows, and Linux. You can download OBS Studio here.
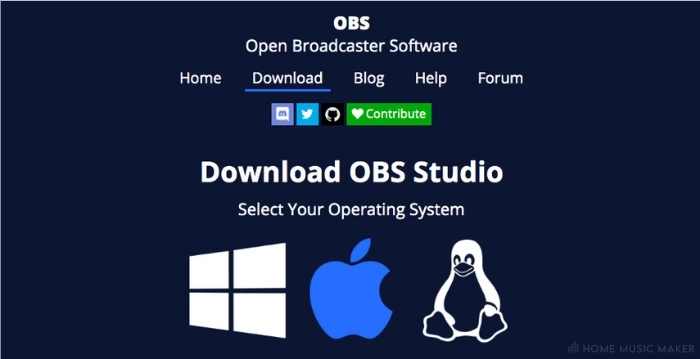
Download the installation file specific to your operating system to your Desktop or somewhere you usually download files.
When the download has been completed, double-click the installation icon.
Follow the instructions through each step of the installation process. It’s pretty straightforward, but visit the OBS Forums if you have problems.
Here is further detailed information for installing on Windows if you need it.
Here is further information for installing on Mac if you need it.
The one caveat I found with Mac is that you may need to grant permissions to the installation application to run. If you’re not familiar with this process, you can find more detailed help here.
Step 2. A Minute To Talk About Routing
I would ponder that most, or at least many, people go through the experience that I did with OBS. Initial uber excitement of all the possibilities and then a lot of head-scratching maybe some words of frustration muttered at the computer screen under your breath.
When you playback the videos you record or while you’re streaming, the sounds that should be coming from FL Studio are absent.
So, rather than launching OBS Studio right away and fumbling around until you get things to record, only to have no FL Studio sounds saved into the video file… Like I did. Let’s walk through the setup process and mix in the crucial and often overlooked step of properly routing the audio.
This is going to differ depending on the operating system you’re running.
I’m on a Mac, so we’ll look at that first. Windows users, don’t worry. There will be information provided for you as well.
Step 3. Setup Routing For Mac
The operating system on Mac is a weird one in terms of how the default OS level audio support and routing are handled. This is one of those cases where a third-party application is required to bridge between two other applications.
To solve the issue of FL Studio sounds not routing into OBS Studio, we can use Blackhole. Don’t worry! Blackhole is free, and it’s a solid little app that I used myself and would recommend to a friend.
Downloading Blackhole does require an email address, but so far, I haven’t received an egregious amount of spam or anything, so happy days!
Download Blackhole here.
Follow the same process as before with OBS Studio. Download and then launch the installation application.
It’s an easy installation process; however, once the Blackhole is installed, you’re not going to use it or launch it like you would a typical application.
Let’s look at how to know if it’s been installed and then how to configure it for FL Studio and OBS Studio.
Let’s use Spotlight to launch the system application Audio MIDI Setup.
This is the key area of the operating system to interact with Blackhole and ensure the installation process was successful.
If you’re unfamiliar with Spotlight, you can learn more about it here.
Press Cmd+Space to quickly open Spotlight. Then type Audio MID, and you should see the application appear in the list of search results. Use the down arrow key to select it and press Enter. This will launch the Audio MIDI Setup control panel.
Here you can see it’s been successfully installed on my system. Yours should look similar to this.
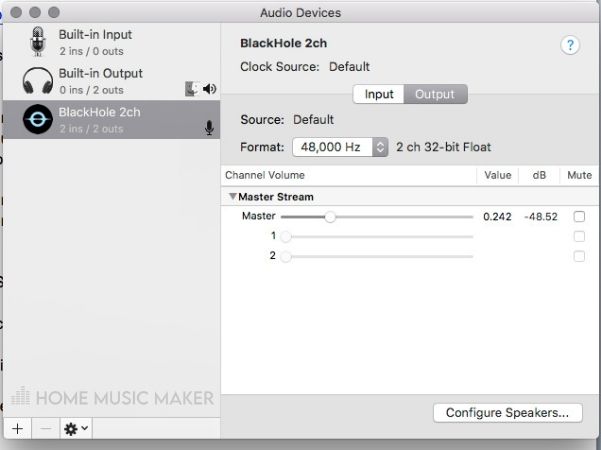
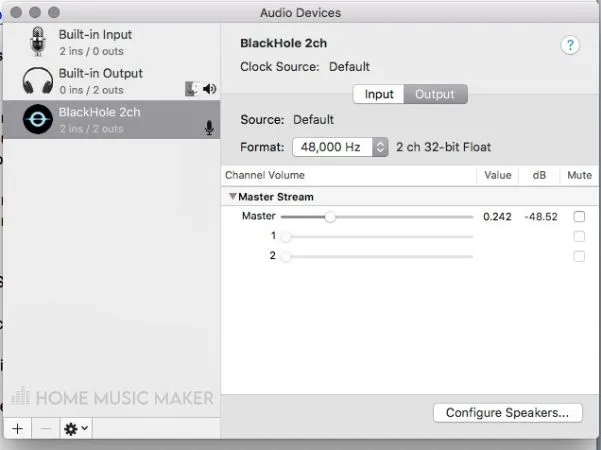
You may have other routing going on, and that’s fine. Just ensure that Blackhole is now showing up for you, as seen in the image.
The next step is the secret sauce, which is crucial, so don’t miss this part.
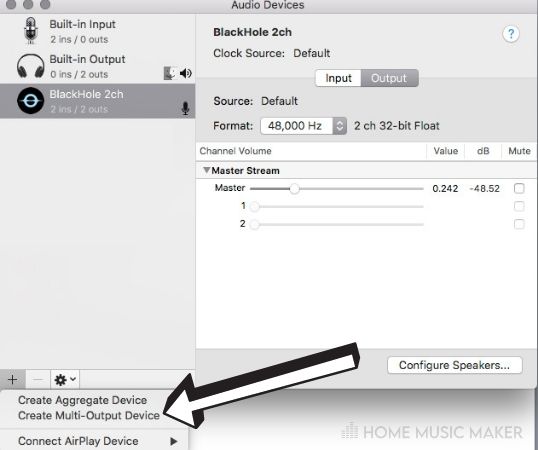
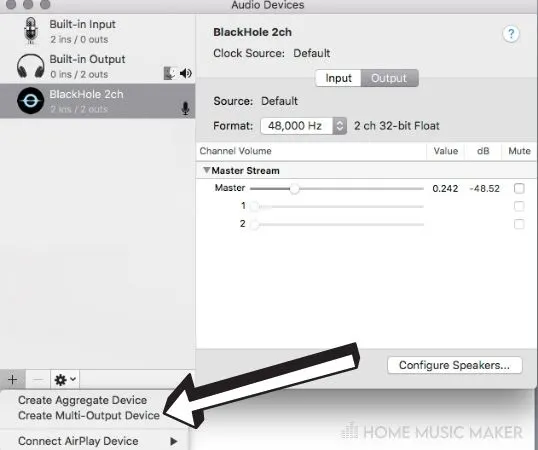
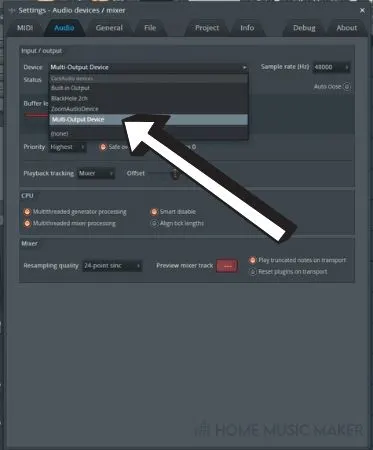
You now need to add a Multi-Output device. This is easily accomplished by clicking the small plus icon in the lower left-hand corner of the Audio MIDI Setup window.
In the menu that appears, select the option to Create a New Multi-Output Device.
After you’ve created the new Multi-Output Device, click it if it’s not already selected. Make sure both the BlackHole 2ch and Built-in Output are enabled and have the check mark next to them, as seen in the image.
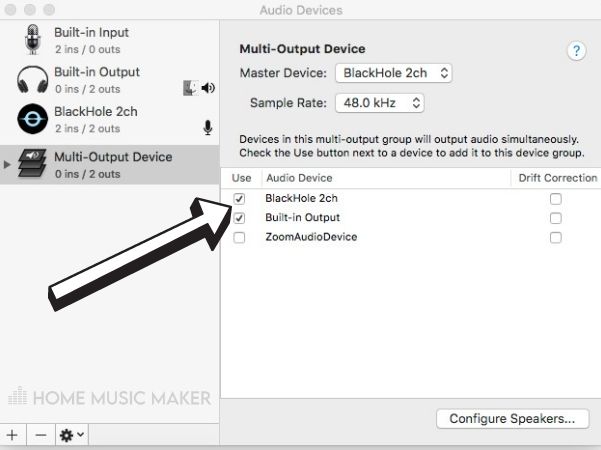
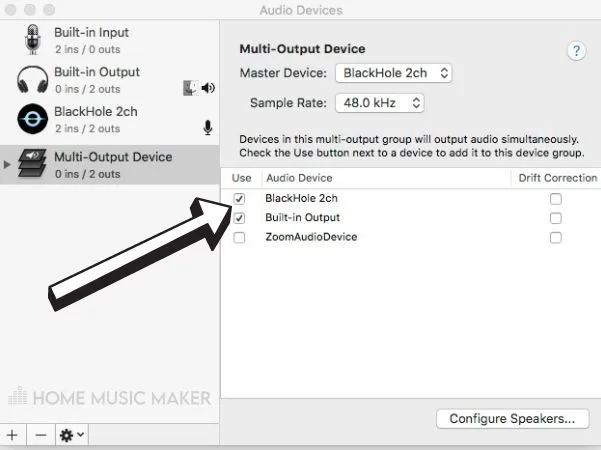
Deselect the Drift Correction option. Deeper details on that can be found here if you’re interested.
That’s it for configuring BlackHole. It’s not that difficult, but getting the correct combination of settings can be tricky. Using and creating the Multi-Output Device can be a bit out of the norm.
FL Studio also requires you to change the Device it’s using. This is done under Options, then Preferences, then Audio Settings.
In the Audio Settings, open the drop-down for Device and select Multi-Output Device.

Step 4. Setup Routing For Windows
Don’t worry; we’re not leaving Windows users out.
If you read the routing for Mac in step three, the concepts are more or less the same. There’s a bit of difference in the exact technical steps. It’s not that difficult though.
You need to enable the FL Studio ASIO driver. This is in the FL Studio Preferences under the Options menu. Select the Audio tab and then the Device drop-down menu. Select the FL Studio ASIO option.
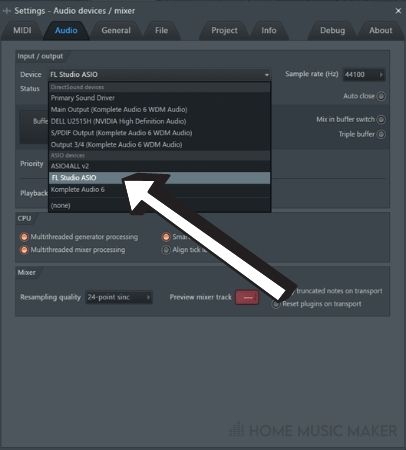
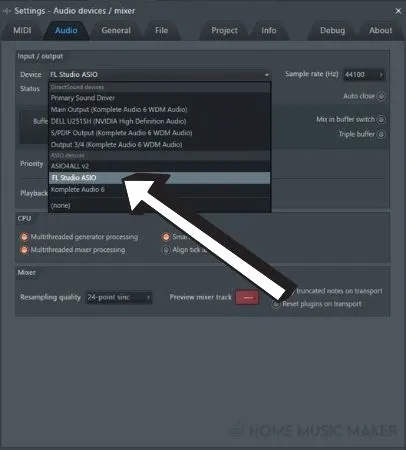
ASIO means Audio Stream Input/Output. It’s a low latency driver enabling live audio recording and tracking in the Windows OS.
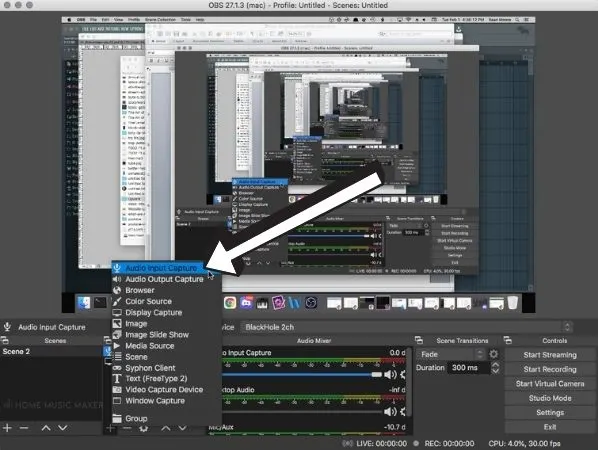
Step 5. Create an Audio Input Capture
Next, we need to create an Audio Input Capture in OBS Studio. To do so, click the plus button to the lower-left under Sources.
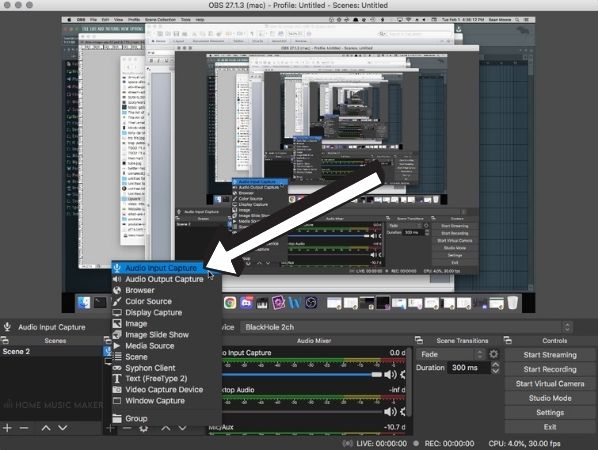
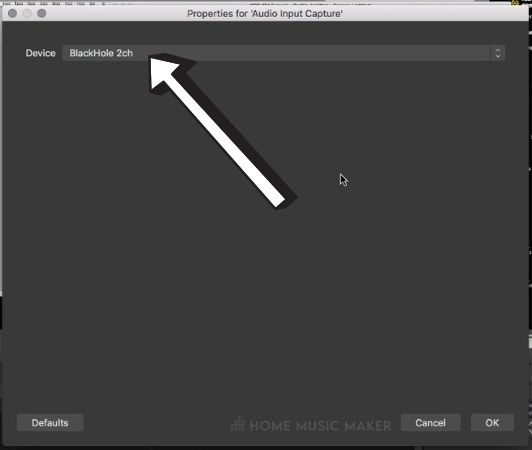
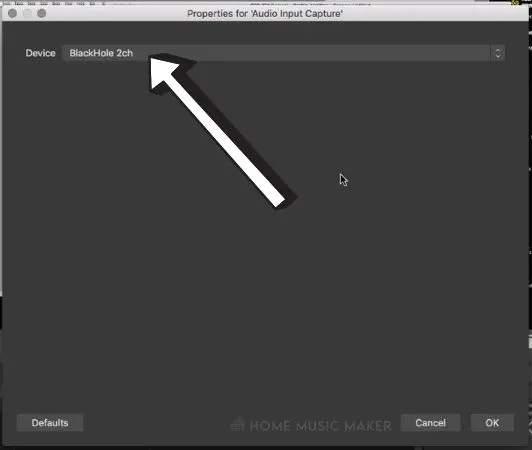
After the Audio Input Capture has been created, double-click it to open the options. You’ll need to select BlackHole in the drop-down menu that appears.
At this point, you should be all set and ready to record or stream the audio from FL Studio into OBS Studio.
Bonus Tip
If you’re struggling to figure out how to record a video, you’ll need to add a new Display Capture and configure it.
Luckily this is very easy, and you simply follow the same path you used to create the Audio Input Capture.
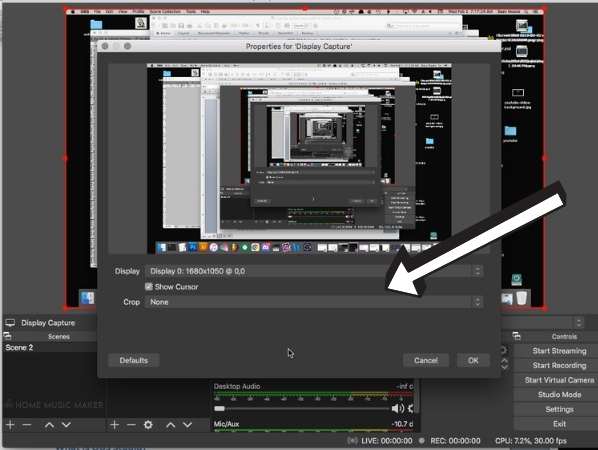
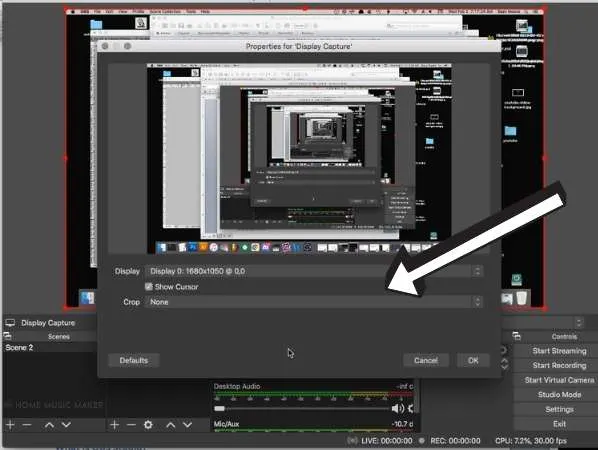
Click the small plus icon to the lower left under Sources. Then select Display Capture.

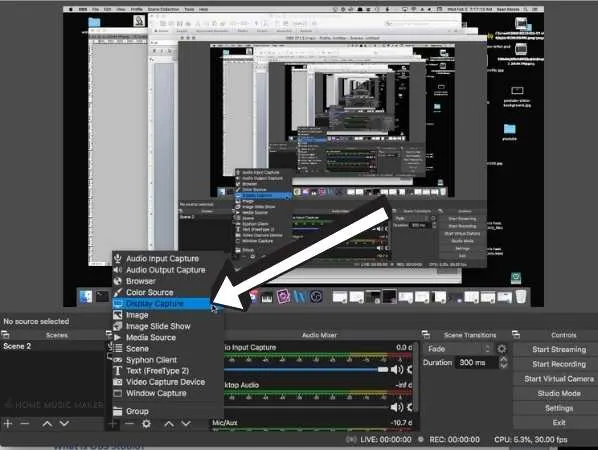
Double-click it to configure the Display Capture and then choose the window or area you would like to stream or record.
Related Questions
What is OBS Studio?
OBS Studio is an application that presents the opportunity to stream and record the screen on your computer. It’s commonly used for Twitch streams and YouTube. It’s freely available and easy to use.
Learn more and download OBS Studio here.
Why Isn’t There Any FL Studio Audio in My Recording?
A widespread issue is to play the video back you recorded with OBS Studio while using FL Studio. Maybe for a tutorial, there are no sounds present from FL Studio. So, you’re playing a song you’re making, showing how to adjust compression or something, and no sounds playback.
You haven’t correctly routed the audio from FL Studio into OBS Studio. Depending on your OS, you may need to download routing software.
Refer to this article for information about how to get OBS Studio and FL Studio playing together nicely.
How Do I Record FL Studio Screen and Audio Together?
This is easily handled using OBS Studio. If available, it will record your computer monitor, a microphone, guitar, other instruments, and the audio coming from FL Studio.
Recording (and streaming) the audio in FL Studio requires some additional setup to work correctly. This is a common pitfall. Refer to this article for the information and process to enable recording the audio from FL Studio together with a visual screen recording.
Why Are There No FL Studio Sounds In My OBS Recording?
There is no audio playback in the video recorded by OBS Studio because the audio routing is not configured correctly. The process is a little different depending on the operating system you use.
Refer to this article for detailed steps on getting OBS Studio and FL Studio working properly together and recording the audio from FL Studio.
What is Blackhole?
BlackHole is a free application that is used on the Mac operating system to route audio. In the scenario of OBS Studio and FL Studio, it’s the secret sauce that will get the audio playback from FL Studio properly recorded in OBS Studio.
Want to change the look of your FL Studio? Click here to change the FL Studio skin.