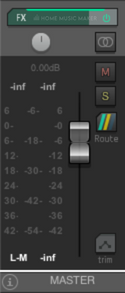
The REAPER Master Meter is the final volume meter of your audio signal chain in REAPER. The level displayed on this meter is the sum of all the instruments in your track. You can change its settings to affect how you see this master output audio level displayed.
Metering Your Master Volume In REAPER
Without a master volume meter, you would have no way of metering the master volume of your track in REAPER or any DAW (Digital Audio Workstation).
Don’t worry, though.
Not only does REAPER have a master volume meter, but it is easy to use and super customizable.
I love the REAPER Master Meter and how you can use it to measure your master volume in many different ways.
In this article, I want to show you REAPER’s Master Meter and how you can use it during your mixing/mastering process.
What Does The REAPER Master Meter Show Us?
The REAPER Master Meter is a volume meter that shows us the sum audio level of every single track and instrument within our REAPER project.
Let’s move on and look at how you can find the REAPER Master Meter and change its settings.

Where Can I Find The REAPER Master Meter?
Let’s start by looking at the volume meter for the Master Track in REAPER and where you can find it.
Here are the different ways that you can find the Master Track Meter in REAPER:
- On the bottom left of the mixer
- By pressing View>Master Track
- By pressing View>Floating Mixer Master
Now that you know where to find the Master Meter in REAPER and what it looks like let’s check out the different settings you can change.
REAPER Meter Settings
To open the REAPER Master Meter settings, right-click the master track meter.
Here are the different settings that you can change there:
TCP Meter (Track Control Panel Meter (lets you choose whether your Track Control Panel VU Meter shows you ‘Peak’ or ‘Loudness’)).


Mixer Meters (lets you decide whether you want the VU Meter on your mixer to show you ‘Peak,’ ‘Loudness,’ or both simultaneously).


Mixer Top Readout (changes where the meter displays ‘RMS’ and peak).


Multichannel Peak Metering checkbox (turns multichannel peak metering on or off, this is helpful if you have more than two tracks on your master track).


Oversampled Peaks (“true peak”) checkbox (this will show you the highest level the signal could reach after you resample to a different rate).


We also have the ‘Loudness Metering Settings‘ right here:
Meter (this dropdown menu lets you choose whether you want loudness displayed in ‘Stereo RMS,’ ‘Combined RMS,’ ‘LUFS-M,’ or ‘LUFS-S’).


Readout (this dropdown menu lets you have your loudness readout displayed as ‘Maximum,’ ‘LUFS-I,’ ‘Current,’ or’ LRA’ (Loudness Range)).
Keep in mind that unless you have your ‘Meter’ settings set to either LUFS-M or LUFS-S, you cannot enter a value here.


RMS Window (this changes the time window in which the VU Meter measures loudness, I recommend setting this between 250-300 ms)


Display Offset (this offsets your VU Meter’s visual display by whatever value you choose)


Display Gain (this adds gain to your visual display but does not affect the sound of your track)


Red Threshold (this affects the threshold of when you will see the red in your loudness meter)


As you can see, the REAPER Master Meter settings control how we view our track’s output levels.
Applying FX To The Master Track
Because REAPER routes all of the individual tracks within a project through the master track, applying FX or plugins to the master track will process every single element within your track.
Because of this, you should be light-handed with any mixing you put on the master track, or it will mess up your mix.
Any processing you apply to the master track in a DAW is technically mastering since you affect the entire mix.
Remember, however, that there is much more to the process of mastering than just slapping a few plugins on your master track and calling it a day.
Is There a LUFS Meter In REAPER?
Yes, you can view your track’s volume in terms of LUFS using the REAPER Master Meter. To do this, right-click the master meter to open the ‘Master VU Settings.’
From here, select either ‘LUFS-M‘ or ‘LUFS-S‘ from the ‘Meter’ dropdown menu under ‘Loudness Metering Settings.’
Metering your track’s master output level in LUFS is helpful when mastering different streaming services.
This is because each streaming service normalizes/limits the music people upload to the platform to a different LUFS level.
For example, Spotify normalizes to -14 LUFS, Apple Music normalizes to -16 LUFS, Amazon Music normalizes to between -9 and -13 LUFS, and so on.
Although it’s a pain making different masters for different streaming services, it can improve the listening experience of your music on each platform.
How Do I Adjust LUFS In REAPER?
Here are a few ways to adjust the LUFS output level of your track in REAPER:
- Add/adjust plugins on your master track to increase or decrease your track’s LUFS readout.
- Go back and make some adjustments to the gain staging in your mix (be careful with this one, you do not want to mess up the mixing work you’ve already done)
- Change the volume on your master track volume fader (I typically do not recommend this method and tend to leave my master volume fader at 00.0; I instead use gain staging during the mixing process to control the output of my tracks in REAPER)
Is LUFS The Same As RMS?
LUFS and RMS are two different ways to meter volume in audio production.
LUFS stands for ‘Loudness Units Relative To Full Scale‘ and is often used during the mastering process of music production.
RMS stands for ‘Root-Mean-Square‘ and measures the average level of an audio signal.
Many different types of volume meters that can display both LUFS and RMS, but they are not the same thing.
How Do I Show The Meter In REAPER?
To view the REAPER Master Meter, you can click View>Floating Mixer Master, View>MasterTrack, or View>Mixer.
Either one of these options will show you the REAPER Master Meter, where you can meter the master volume of your REAPER project.
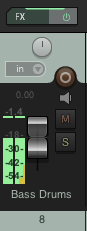
REAPER Volume Meter For Individual Tracks
Let’s also look at the volume meter for individual tracks in REAPER.
Each individual track within the REAPER mixer has its own volume meter that you can use to help you monitor the loudness of every aspect of your mix.
Here is what an individual track’s volume meter looks like in REAPER.

Related Questions
Is The REAPER Master Meter a VU Meter?
The REAPER Master Meter is a super versatile and customizable volume meter, but it is not technically a VU Meter.
However, REAPER does have a plugin called ‘JS: VU Meter.’ You can use this VU Meter plugin on any track in REAPER, including the master track.
Does Every DAW Have a Master Meter?
Yes, a master meter is something that every digital audio workstation has. It is essential for metering the master output level of your track.
Without a master meter, you would not be able to know the master volume of your track or whether it’s clipping or not.
Should You Bounce Your Finished Song Through The Master Track In Your DAW?
Yes, the default routing in any DAW makes it so that all the tracks in a project go through the master track.
Because of this, the correct way to bounce or render a finished song is through your DAW’s master track.

You’ve just checked out the Master Meter, but now you can take a detailed look at REAPER’s VU Meter.