If you are new to Ableton Live or are new to automation as a way of manipulating sound, you may be wondering how to copy automation in Ableton Live.
How can you copy one track or clip’s automation to another – creating similar audio effects across multiple tracks?
In this short article, I explain how to copy automation from one track or clip to another in Ableton Live, using the filter sweep.
Step 1: Apply auto-filter to a track

Attach auto-filter to a track in Ableton.
To see the automation options, you may need to press ‘A’ on your keyboard.
Then click the frequency knob on the auto-filter.
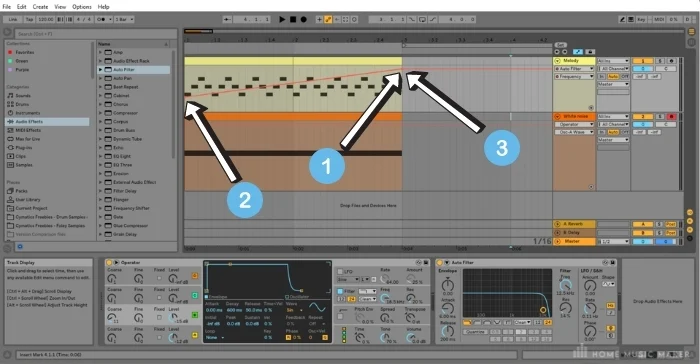
In the arrangement view, you will see that the automation control chooser for my melody track has now turned to ‘frequency,’ which use to automate the melody clip; otherwise referred to as a clip envelope.
Step 2: Automation

In the arrangement view, I put an automation point at the end of the clip and an automation point at the start of the clip.
I then lower the first automation point so that the track filters from low frequencies to high frequencies using the auto-filter, thus creating the clip envelope or automation curve.
This gives the track that sweeping audio effect that we find in a lot of music production.
Step 3: Copy the automation the easy way
I now want to copy the same automation across to a white noise track that I have made with Ableton’s Operator.
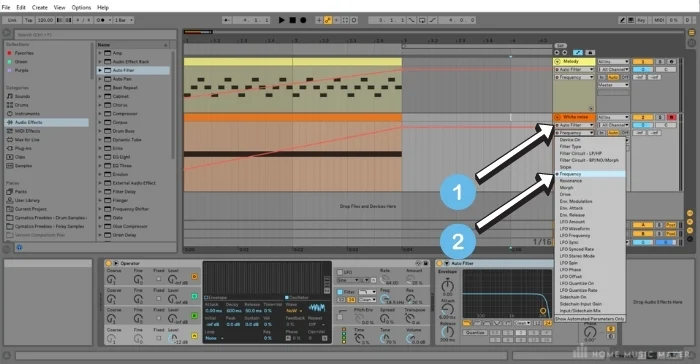
The easiest way to do this is to copy the auto-filter effect from the first track by right-clicking on it and selecting copy and right-clicking and selecting paste on the track you want to have the same effect and automation.
Doing this will automatically copy the automation/clip envelope across.
If you click the device chooser and select auto-filter, you will see a dropdown menu where you can then select frequency.

In some instances, you may want to copy the automation to a different effect or parameter. To do that, do the following.
Step 4: Copy the automation the harder way
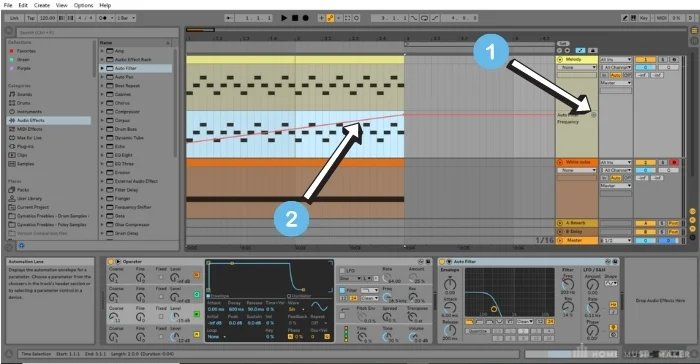
In the arrangement view, click the little plus sign at the bottom of the track you want to copy the automation from.
You will now see the automation lane, which shows the automation under the clip.
Go ahead and select the automation clip by clicking and dragging the mouse over the automation you want to copy.
Right-click the highlighted automation clip and select copy.

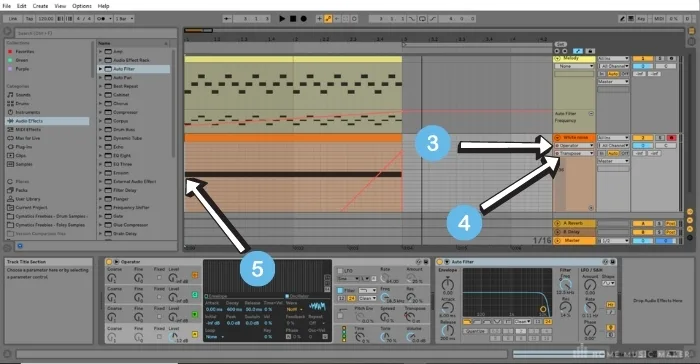
On the second track, select the effect and parameter you want to automate, using the device chooser and automation control chooser. Here, I want to automate the transpose parameter of Ableton’s Operator to create more tension with the white noise.
I click on that, open the automation lane, click at the start of the clip, right-click and select paste.

Hey Presto! I have copied automation from one track to another, applying it to a totally different parameter.
FAQ – How To Copy Automation In Ableton
Can you copy automation from a track to a track in another song?
You can copy the whole track across to a new project if needed by following the above steps.
How can you copy automation from lane to clip in arrange?
Follow the steps provided above.
What about copying automation curves from one parameter to another?
Do the same as described above but copy the automation to another parameter on the same audio or midi track. Then using the automation control chooser to select the desired parameter.
Final Words
Copying automation in Ableton is really straightforward but an essential skill to have in your production arsenal.
By following the simple steps above, it will soon become second nature, and you’ll get faster and faster at doing it.

 Want to connect with other music producers for help and guidance?