How To Fix FL Studio Crackling
Knowing how to fix FL Studio Crackling can be as simple as increasing the buffer length within the audio settings menu. When set to a higher number, the buffer length allows your CPU more time to process a given audio signal. This, in turn, stops the audio signal from distorting and crackling when playing your project.
Crackling can be a real annoyance when you create music within FL Studio and can often get in the way of productivity. If you are affected by this issue, you will be happy to hear that the fix is usually relatively simple to pull off.
In this article, we will look at the common causes of this crackling and how to fix them, so you can get back to producing!
Step 1 – Locating FL Studio Audio Settings

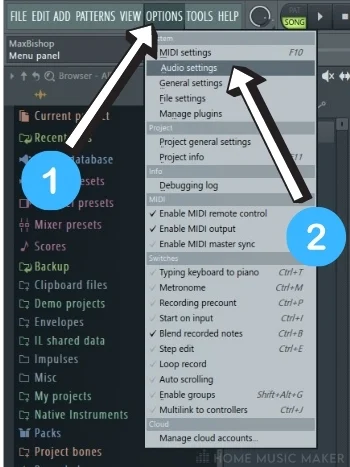
First of all, you are going to want to locate the audio settings tab within FL Studio. This can be found under the ‘Options‘ drop-down menu, located in the top right of your DAW (1). You can then click on the ‘Audio Settings‘ option (2).
This will then open up the audio settings tab within your DAW.
Step 2 – Select FL Studio ASIO Driver
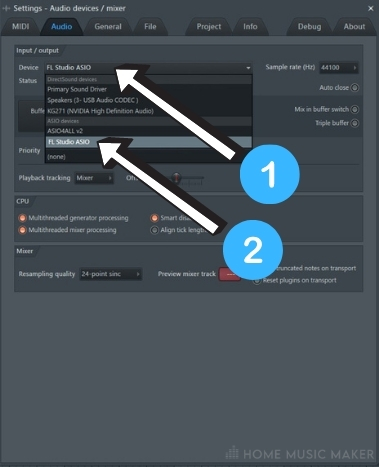
After opening the audio settings window, you can navigate the ‘devices‘ drop-down menu (under input/output).
You will want to have that selected here; otherwise, it is best to go with the FL Studio ASIO driver.
Step 3 – Select FL Studio Sample Rate
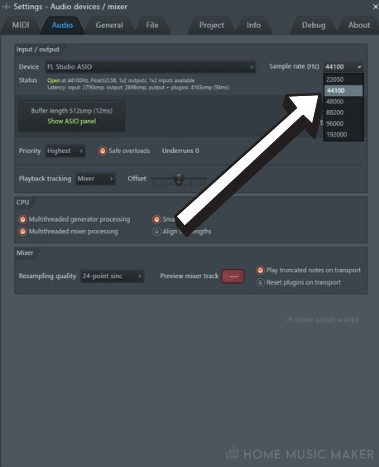
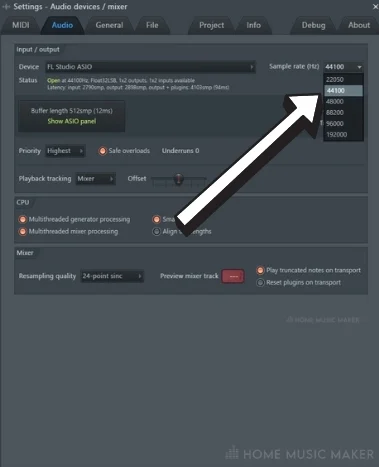
After you have selected the correct audio device, you can then adjust your audio sample rate in the next tab to the right.
It is recommended that you set this to 44100Hz, as this is considered standard practice when exporting audio.
Step 4 – FL Studio Buffer Length
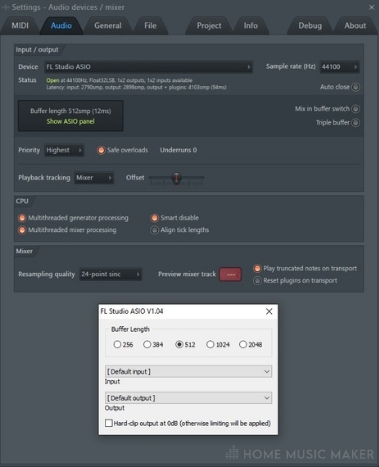
(Image above shows the buffer tab when the FL Asio driver is selected, it may look different with other audio devices selected)
Once you have selected your sample rate, you can move your attention to one of the most important parameters in the audio settings screen.
Buffer length determines how long your CPU is given to process the audio coming from FL Studio.
Choosing a longer buffer length will also mean a longer delay between a registered sound and a sound actually being played. This means that it is crucial to try and find a balance between finding a buffer size that eliminates crackling, but that doesn’t cause an unnecessary amount of audio delay.
Step 5 – FL Studio Priority

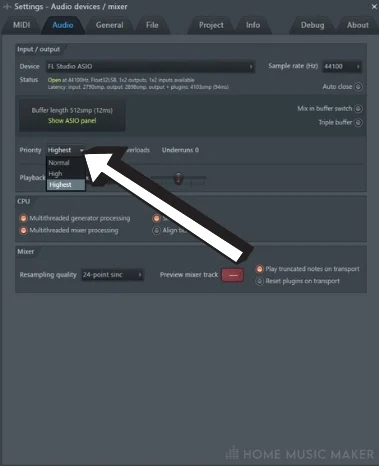
After selecting your buffer length, you can then move down to the ‘Priority‘ section.
Here you change the CPU priority to the mixer, where most of the heavy lifting occurs with projects.
These two options together should help to reduce further any audio distortion coming from your project.
Step 6 – CPU


Next, we will look at the CPU section of the audio settings tab.
This section will make sure that the ‘Multithread generator processing,’ ‘Multithread mixer processing,’ and the ‘Smart disable’ options are all checked.
Step 7 – Mixer
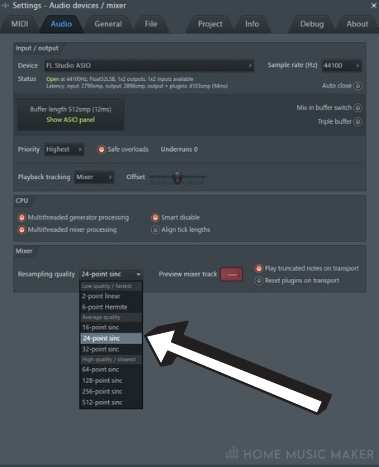
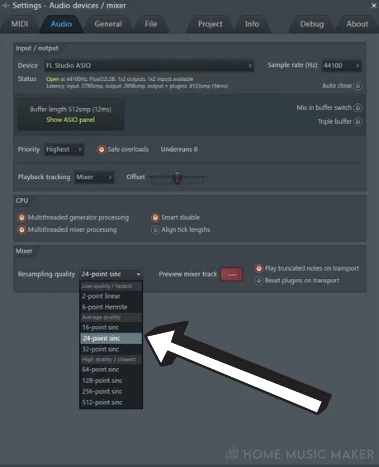
In the final section of the audio settings, we will look at the mixer settings.
You will likely want to choose one of the ‘average quality’ presets for the resampling quality. These provide the best middle ground between performance and quality.
Related Questions
What causes crackling and popping?
It is usually caused by the audio buffer length not being long enough. Still, it can be caused by various settings that have been talked about in this article.
How to fix popping sound?
Popping sound will likely be similar to crackling sound and can be fixed with the same techniques.
Do you need an audio interface?
Audio interfaces are not required in music production. Still, they can be helpful if you want better sound quality from high-end speakers or record instruments/microphones.
Where can you download the drivers for your audio or midi interface?
An up-to-date audio driver can often be found with a simple browser search. They can sometimes help to alleviate audio issues.
Do other DAWs have crackling audio?
Yes, DAWs like Ableton, Cubase, Studio One, etc., all suffer from unwanted noise depending on the settings and hardware used. But like with FL Studio, these issues can be resolved through settings tweaking.
Which buffer size setting should I use in my DAW?
This depends on both the complexity of your project and the power of your computer. More complex projects require a larger buffer size, as well as less powerful computer hardware.
What if tweaking the audio settings hasn’t fixed the audio crackling issue?
It may mean that the crackling is coming from the audio clipping/distorting somewhere actually in the project or that some part of your hardware is faulty.
Final Words
With all of these steps taken into account, you should no longer have any annoying crackling noise in your FL Studio when playing back audio.
If you still have some issues, try tweaking the parameters in the audio settings until you find what works for you and your hardware.
As a final resort, it’s also worth checking any cables you are using (if applicable) to ensure they aren’t causing any crackling noise.