EZdrummer is used just like any other VST in Studio One. You find your EZdrummer VST in the Instrument section and drag and drop it onto the main Studio One window. After the samples are loaded, EZdrummer is ready to be your virtual drummer.
Most bedroom musicians rely on programmed drums to demo their songs or even do a whole album production.
The logistics and gear needed to record a full drum kit properly are usually beyond the reach of most producers. So it’s only natural that we’re looking for the second-best thing.
In this article, we will discuss how to use toontrack EZdrummer in Studio One since EZdrummer is one of the most popular drum libraries on the market right now.
I’ll also share some tips to make it sound as natural as possible and point out some genre-specific things to look out for.
How To Use EZdrummer In Studio One?
Using EZdrummer in Studio One is relatively straightforward – you go to your “Browse” section at the bottom right corner. Within the “Instruments” section, find the Toontrack folder containing your EZdrummer VST.
Afterward, you can either simply drag the VST to your main Studio One
window or drag it onto the instrument track you’ve already created.
After a short time, the software loads all the samples, and you’re pretty much ready to go. You can audition samples by clicking on individual kit pieces.
Before you begin writing any MIDI for it, it’s the right time to choose the kit you’ll be using for your project.
You’ll notice how each kit piece has a dropdown menu – this is where you can select various kit pieces and immediately audition them.
EZdrummer is quite a large drum library – depending on whether or not you have expansion packs, you can expect to have over 30 GB of samples. This means there are plenty of snares, kicks, cymbals, and toms.
I personally find them all to sound great for various purposes and genres.
Software Layout
EZdrummer is laid out in 4 tabs – Drums, Browser, Search, and Mixer.
Let’s briefly look into what each of them does.
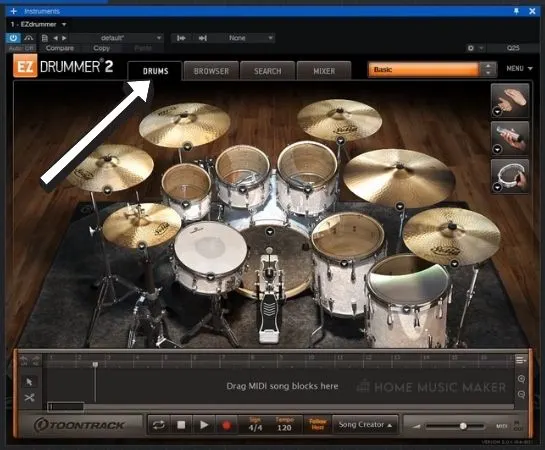
Drums
The Drums tab is where all of your kit adjustments happen. Here you can swap different drum pieces and adjust your kit size depending on your needs.
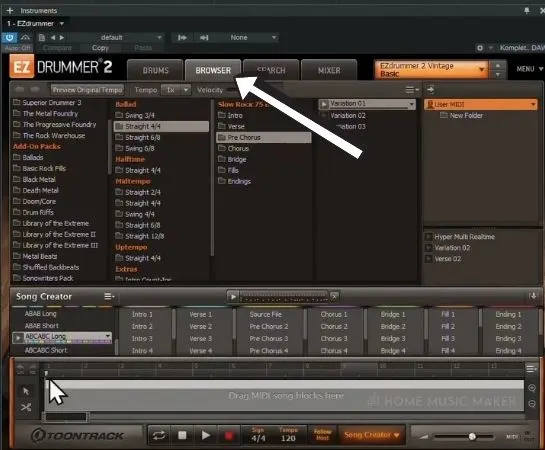
Browser
The Browser section is convenient for navigating your Ez expansion packs and midi grooves. Here, you can drag and drop various drum patterns into the timeline at the bottom of the interface and quickly create quite decent drum parts for demo purposes.
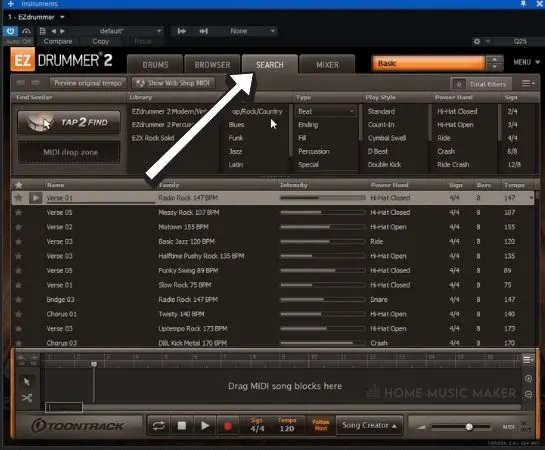
Search
The Search tab is kind of an advanced Browser section. Here you have a couple of useful tools such as “Tap 2 Find” and the Intensity slider. Tap 2 Find is an excellent tool for needing a specific drum pattern.
Here you can simply click your kick and snare pattern to a metronome. EZdrummer will automatically find the groove that most closely resembles the one you’ve tapped.
The Intensity slider is a great way to make your grooves busier without having to dig in and manually adjust hits. Sliding to the right will make the groove sound more complicated, whereas the opposite will simplify it.
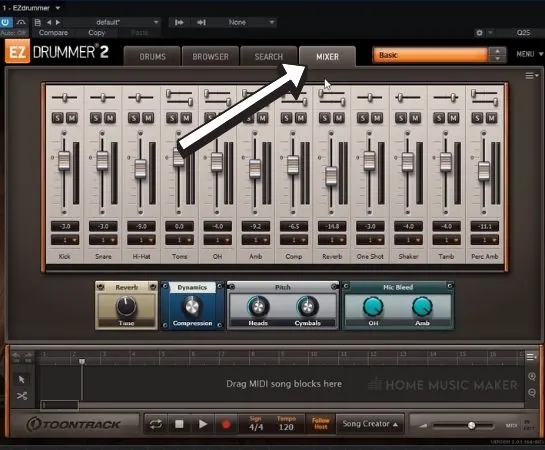
Mixer
And finally, the Mixer tab allows you to adjust each drum piece’s volume and do some basic mixing.
Here you can also adjust the bleed level and mute channels which you don’t find fitting your song.
At the top of the mixer, you also have the option of panning every individual kit piece within the stereo field.
If you find all of the customization tiresome and you’d just like to get a decent drum sound quickly, you can select a preset at the top right corner.
There are various kits and genre-oriented drum sounds, so you’ll have no trouble finding the right one for you.
Writing Custom Drum Parts
Once you’ve loaded your EZdrummer, double-click on the instrument track to create a blank MIDI block. You can use the piano roll to determine which note corresponds to which hit inside the MIDI event.
A classical set up is C1 for kick, D1 for snare, F#1 for hi-hat, and toms on A1, G1, and F1. Of course, you can look for other articulations such as cymbal chokes, rimshots, and various hi-hat articulations on other piano keys.
The key component is velocity if you’re looking for a natural-sounding performance. You definitely don’t want to have the same velocity on every drum piece throughout the drum track.
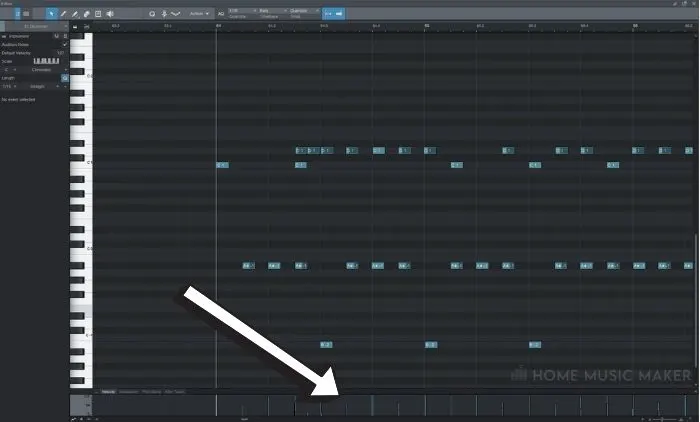
A very obvious giveaway on whether drums are programmed is the hi-hats.
In a real-life scenario, it’s almost impossible for a drummer to hit the hi-hat simultaneously. It’s so dynamic and produces drastically different sound depending on the place where you hit it, so you should try to replicate that inside the EZdrummer as well.
The best way to achieve this effect is to change the velocity for each hi-hat hit. Velocity changes don’t have to be drastic – a 5 – 10 difference will do the trick.
Speaking of velocities, they do change the drum sound drastically.
In a typical rock (and especially metal) setting, I always crank the snare hits all the way to 127. Kicks I usually keep at around 110, 120 for some essential accents. The same goes for toms. I try to be subtle with hi-hats and cymbals if there is a closed hi-hat part. Otherwise, I like to crank those as well.
I’d recommend not going too crazy with any drum piece for less heavy genres. Velocities up to 100 should be plenty. Cranking snare a bit higher than that might result in a performance that’s not fitting the song.
Routing Each Kit Piece To A Separate Channel In Studio One
An essential part of using EZdrummer is applying our own plugins to sculpt our perfect drum sound. For this, we need to route every kit piece to a separate channel.
You’ll notice that the whole kit goes to a single stereo out. This is fine if we want to process the entire kit, but we can’t isolate individual pieces.
To do that, you should go to the Mixer section. At the bottom of the mixer, just above the microphone names, you’ll notice that all of the channels are routed to channel one. Once you click that number, you can route it to a different channel. You can group your channels whichever way feels the best to you.
For example, you can set all the kick microphones to channel 1, snare mics to channel 2, hats on channel 3, cymbals on channel 4, and toms on channel 5. After this, there is only one minor tweak you need to adjust to get your tracks to appear in Studio One’s mixer.
At the left of your Studio One mixer, you’ll notice the “Instruments” section. Here you will see your activated EZdrummer plugin.
Afterward, you should click on the dropdown arrow and choose “Expand .” This will now list all of your EZdrummer channels.

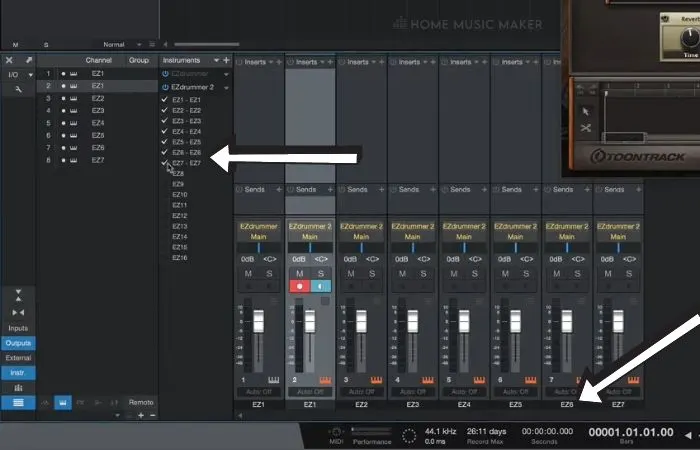
Now it’s just a matter of checking all of the channels we’ve routed our pieces to (in the example given, channels 1,2,3,4, and 5 ).
And there you have it; each kit piece should now be visible in your Studio One mixer and ready to be processed.
Related Questions
Does Studio One Artist V4 Support EZdrummer?
Yes, Studio One Artist should have no problem booting EZdrummer.
What Is the Best Drum Software on The Market?
There are many excellent ones, and it’s hard to tell which one is the best. There are only ones that will work better in your particular situation. If you choose Addictive Drums, Toontrack Superior Drummer, or EZdrummer, you really can’t go wrong.
What’s the difference between Superior drummer and EZdrummer?
Superior Drummer is a more advanced drum software. It has a larger drum library and goes more in-depth in terms of the way you can adjust your kit.
What’s the difference between EZdrummer and Addictive drums?
I find that EzDrummer sounds a bit “cleaner,” if that’s the right word to describe it. This may or may not be a good thing for you. Addictive drums sound less processed and more natural than EZ drummer.
Is the core library in EZdrummer good enough or do I need to buy additional expansions?
You can absolutely do great work by using the core library. You have enough various kits to pull through just about any scenario. Expansions are great but not necessary.
Want to learn how to change the tempo in Studio One? Find out more here.

 Want to connect with other music producers for help and guidance?