The whole point of using grooves is to add those subtle extra details to a part that breathes a little more life into it. My favorites for this are:
- Beguine Accent 16ths
- Calypso Accent 16ths
- Cha-Cha-Cha Shaker 8ths 127bpm
- Hip-Hop Wonky 16ths 80bpm
- Rock Fatback Accent 16ths
These grooves seem to get the dynamic range, timing, and accents in the right places. I may tweak certain settings from there, but they are great starting points.
Using Grooves In Ableton
Using a drum rack in Ableton can often feel lifeless without variations in the MIDI clip, such as velocities and timing. Using grooves in Ableton is a quick and great way to bring life to your drum part.
In this article, I will show you my favorite Ableton grooves. I’ll also go over how to quickly apply grooves to a beat and swap grooves to compare them, giving your music humanistic and live sound quality.
Top Picks For Ableton Grooves (Especially Good For House Music)
Swing Notator 16D
- Five stars
- Best overall
- Velocity dynamics are perfect for dialing in
- Quintisential house swing
Swing MPC Funker 16ths 60
- Four stars
- A close second
- More variation in the dynamics.
- It really emphasizes specific beats.
Swing SP 1200 16ths 54
- Four stars
- Very subtle but adds character
- Less variation, more of an addition to the general vibe of the beat
- Consistent in the variation
What Are Grooves In Ableton?
First, I feel it is important to know what a groove is.
Groove is something that is much more feeling based than music theory. It’s the variation within the rhythms, how late or early a beat hits, and how it makes you feel in your body.
Typically this is applied by the player of a drum kit, for example.
A groove is very much the same in Ableton; only it is applied electronically. When you listen to the preview of a groove, you will hear a click sound representing it. This click will give you the rhythmic and dynamic feel of the groove by how early or late the click is and how loud or quiet it is.
Using Grooves In Ableton
A groove can be applied to any MIDI drum track in Ableton using the built-in drum rack or a 3rd party plugin, such as Native Instruments Superior Drummer or Addictive Drums.
The use of grooves on your MIDI drum part will instantly elevate your tracks with minimal effort and is used by everyone from beginners to professionals.
It allows you to add dynamics such as swing and shuffle to your drum part without needing any music theory knowledge.
Applying a groove to your MIDI drum part will give it the feeling of live drums, that your parts were actually played on a drum kit rather than MIDI notes being drawn in.
This is more energetic and less predictable.

How Do You Add Groove To Drum Rack In Ableton?
First, let’s find the grooves. They are located in the left-hand bar of Ableton, and there are two ways of locating them.
One way is by selecting the Grooves category.

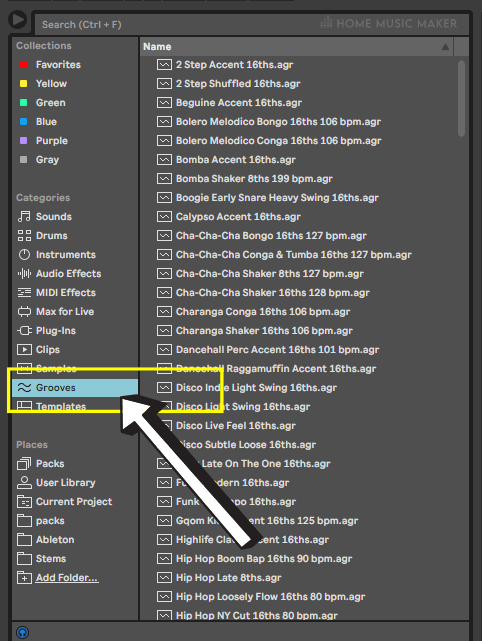
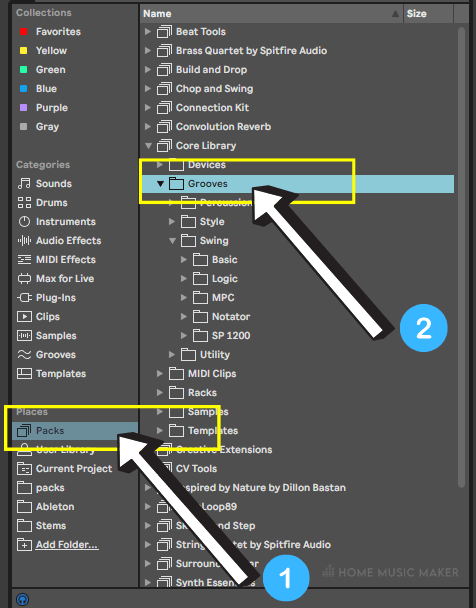
However, my preferred way is to go through packs located in the same bar under places. Click on packs and find Core Library.
Within this, you will see grooves, and within grooves, the different options for grooves are organized for ease of use.
Personally, I think this makes more sense than just having an extensive list of grooves.

Next, you will need to locate Ableton Live’s groove pool.
Click the button with two waves on it near the bottom of the left-hand side navigation bar.


Now, go through the grooves and pick the ones that you like.
Clicking on each of these grooves will allow you to hear them through a click sound. When you find one you want to try, drag it into the groove pool.


Finally, you can apply the groove to your drum beat.
Double-click on your MIDI clip to open it up in clip view.
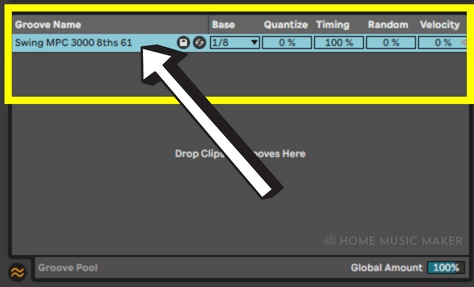
In the first section of the clip view (under the clip’s name), you will see a groove option with a drop-down menu.
All of the grooves you have in your groove pool will appear here.


All you have to do is select a groove in the drop-down menu and press play.
This will temporarily apply the groove to your drum part.
You can now adjust the note length (e.g., 8th note, 16th note) and the percentage of the quantizing, timing, randomness, and velocity applied to the MIDI clip from the groove.

If you are happy with this, you can apply it to the MIDI clip by clicking the commit groove button to the right of the groove option, the button with an arrow pointing right. This will then change the MIDI notes in the clip to have the groove.


Related Questions
How Do You Save A Groove In Ableton?
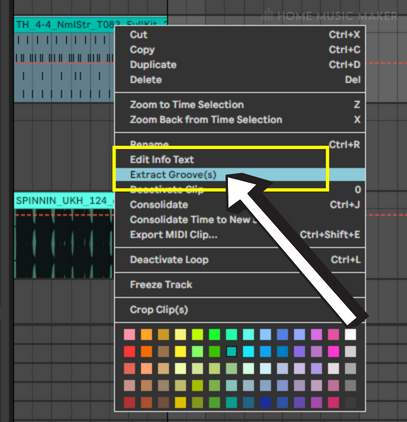
First, locate the MIDI clip or audio clip from which you want to extract the groove. Right-click and click on extract groove. Once this is done, the groove will appear in the groove pool. Click the save button; that is the floppy disk button right next to the name of the groove. Name it, and it will be in your user library.
How Do You Make Grooves In Ableton?
You can make a groove by adjusting the velocities and timing of your MIDI clip. Then save the groove by following the instructions in the previous question.
How Do You Flex Audio In Ableton?
Flexing audio is a term used in Logic and is available as a feature in many other DAWS, such as Pro Tools. Ableton is no exception. Here it is called Warping, and you have to click the Warp button on your audio clip to get started. You can adjust the quantization, the warping algorithm, and the timing.
Are you looking for more? Check out this article on the best reverbs for Ableton.