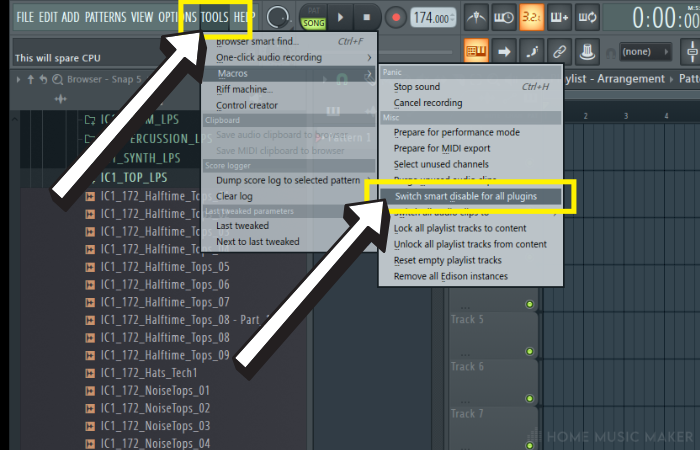
The quickest method to free up RAM (Random Access Memory) for use in FL Studio is to close any background PC applications or to use the “Smart Disable For All Plugins” option under Tools > Macros > Smart Disable. This shuts off any plugins that aren’t currently being used.
Quality Over Quantity, Or Is It Both?
While the quality of your music production may be paramount, it could be unattainable if the quantity of your computer’s performance is lacking.
The quantity of short-term memory (RAM) processes much of the data within your FL Studio projects. Naturally, the bigger your project, the more memory will be required to run it smoothly.
I have been caught out with this in the past. I’ve had audio sample-heavy projects running loads of plugins, and FL Studio has almost locked up entirely.
Perhaps you’ve had the same?
Read on, and I’ll explain how this frustrating issue can be prevented and circumvented for you.
How To Allocate More RAM To FL Studio On PC (Avoid Running Out Of Memory)
Increase your PC’s Virtual Memory
Step 1 – System Settings
Navigate to your explorer window and right-click a blank space to select properties, followed by Advanced System Settings.

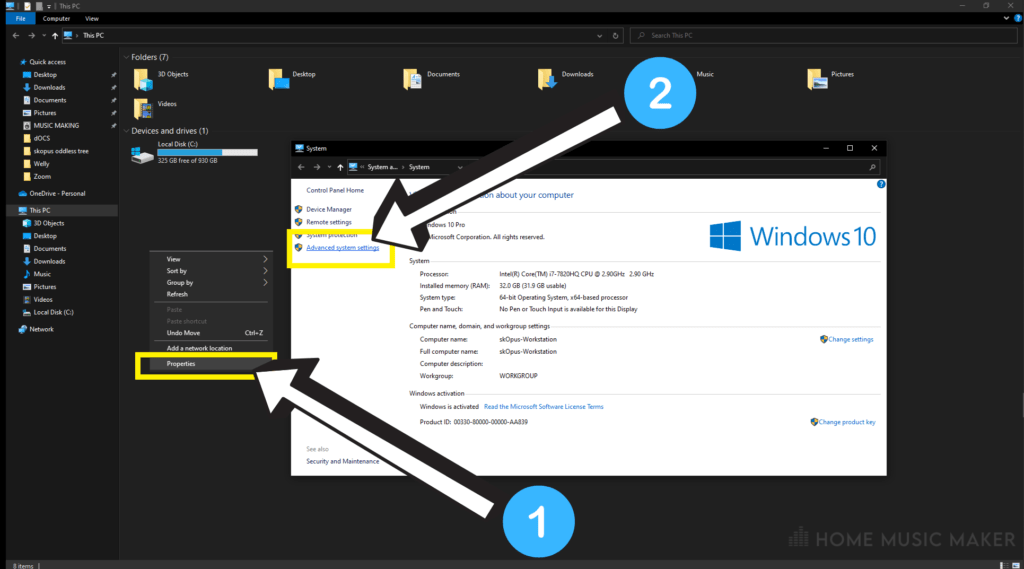
Alternatively, this can be searched directly by hitting your Windows Key and typing Advanced Settings.
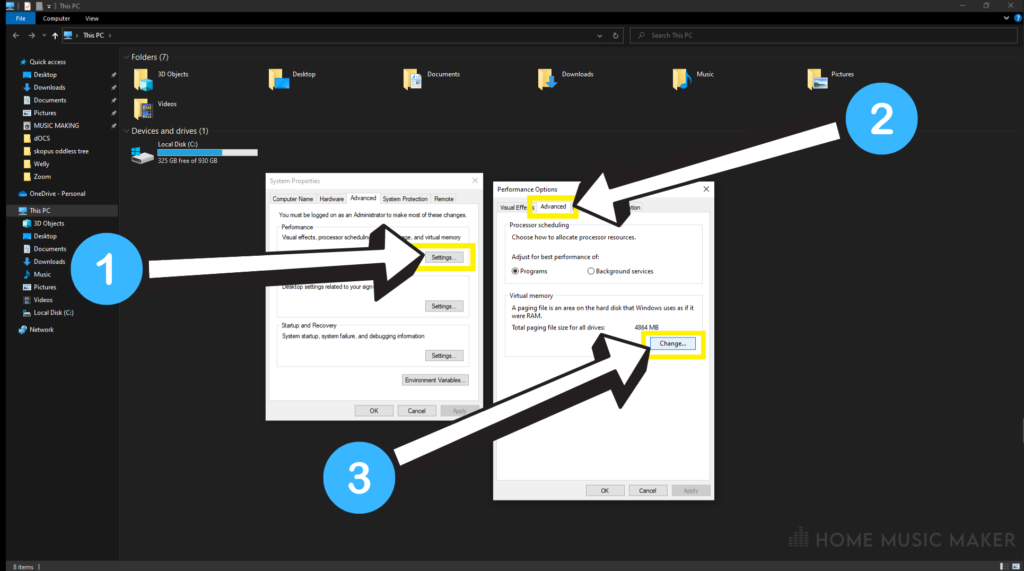
Step 2 – Change Virtual Memory
In the new window under “performance,” go to Settings > Advanced > Change as indicated above.

Step 3 – Edit Allocation
Uncheck the box at the top that auto allocates. Then head to custom size and input your new sizings.
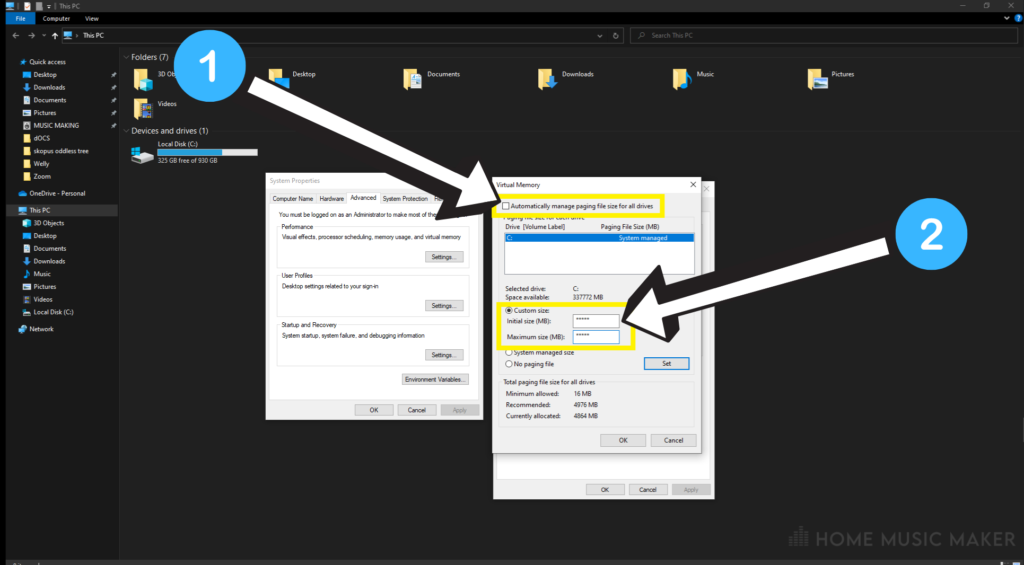
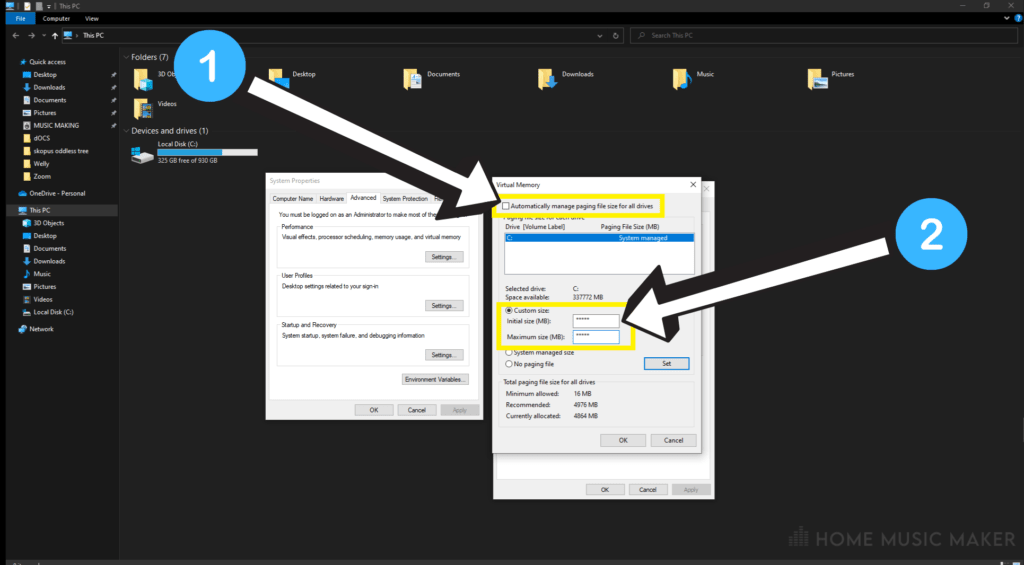
Microsoft recommends an initial size of no more than 1.5 times your computer’s RAM size and a maximum size of no more than three times your computer’s RAM size.
Hit set to finish.
Tips On Improving RAM Usage In FL Studio
A less drastic approach, but often a few tweaks to how the memory behaves, can solve many problems in FL Studio.
Here are some of my tricks:
Smart Disable For All Plugins
My go-to, as this setting stays on for the duration of the project and will remain so each time you open your FL Studio project.
Tools > Macros > Smart Disable.
Closing Open Programs
Too many windows or applications running on your computer could be using memory and processing power.
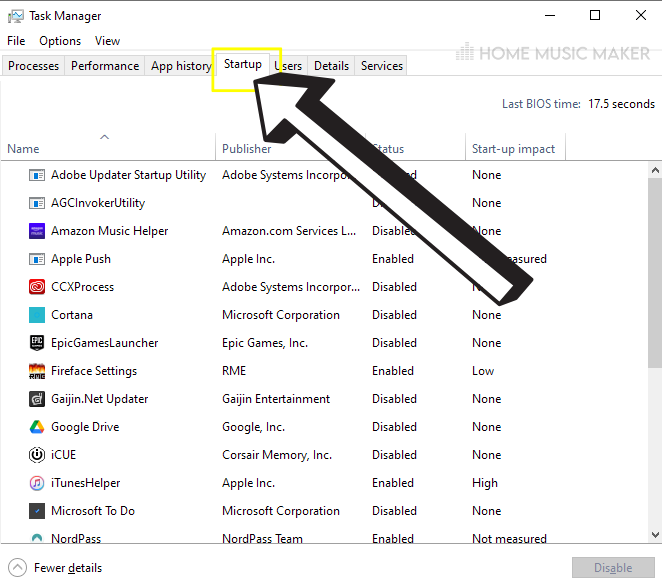
Disable Programs At Startup
Often many programs by default will try and load in the background when your PC boots up.
Head to task manager quickly by pressing CTRL+SHIFT+ESC (CMD+ALT+ESC for MAC) > Startup tab > Disable unwanted programs.

Remove Unused Audio
This is a 2-in-1 win.
FL Studio will scan your project, and any audio clips put on your playlist that are now not present will be deleted, saving heaps of processing time for your CPU and your memory too!
Tools > Macros > Purge unused audio clips.
Why Should You Increase The RAM And Reduce The Memory Usage In FL Studio?
Ultimately you want your computer and FL Studio to work seamlessly and without effort.
Memory is considered a short-term process. There are lots of them going on all the time – more memory and less usage mean a more manageable workload!
How To Tell If FL Studio Is Out Of Memory?
Depending on the process you attempt, such as loading a heavy-duty plugin or recording into Edison, you may get an error message notifying you about the lack of memory available.
Alternatively, FL Studio may start to stutter when playing back your audio.
There is also an indicator in your top toolbar that shows both your CPU core percentage and the amount of memory in Megabits being used.
Watch out for high readings.
How Much RAM Does FL Studio Use?
While there is no specific amount, as it can vary from project to project, it is recommended to have at least 4GB of memory available on your computer for FL Studio to run without issues.
Does Having More RAM Help With Music Production In FL Studio, And Does It Matter?
Absolutely. You want to allocate/assign/upgrade the highest amount of memory possible to get the best out of your DAW (Digital Audio Workstation) and your computer.
Nobody wants their creativity to get bogged down, so don’t let your computer do it either!
How Do I Allocate Or Boost My CPU Usage In FL Studio?
Method 1 – Buffer Settings
Firstly, you want to use either the specified audio driver from your interface or the FL Studio ASIO Driver or ASIO4ALL.
These will run the smoothest for your project as opposed to the Primary sound driver.
Take note of the highlighted areas below, which show the drop-down to select drivers, the CPU settings (which should be checked and highlighted as shown), and, more importantly, the buffer size.
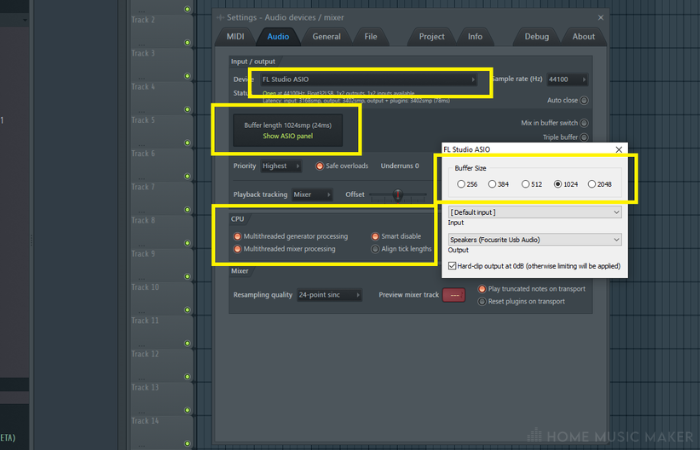
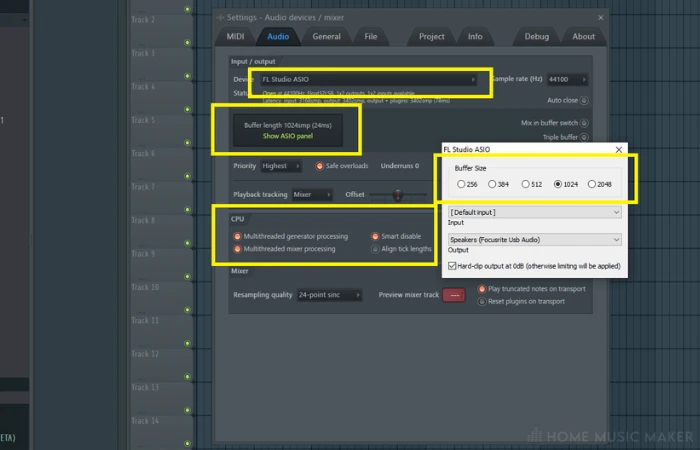
A higher buffer size will take the load off your CPU and make it run faster/smoother.
Method 2 – Smart Disable
As mentioned, smart disable not only helps with memory, but high-usage plugins also are heavy on your CPU load, so turning these off when not in use will assist you.

Method 3 – Remove Unused Channels
Go to Tools > Macros > Select Unused Channels. This will select and highlight any channels you aren’t using.
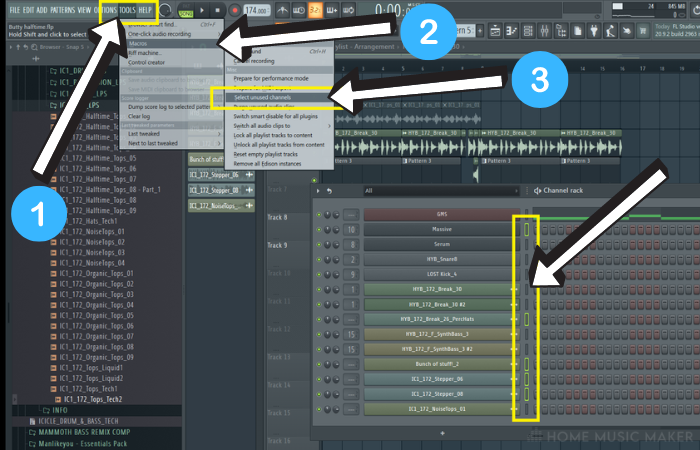
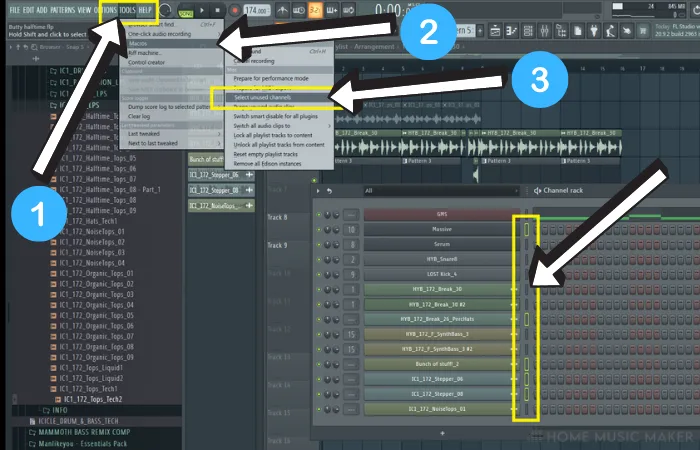
These could be samples or plugins, perfect if you’ve made multiple instances of a CPU-heavy plugin that can be dropped to help you manage the load.
Method 4 – Plugin CPU Meter
This is best used on busy, down-the-line projects where you may have loads of patterns, automations, and plugins running.
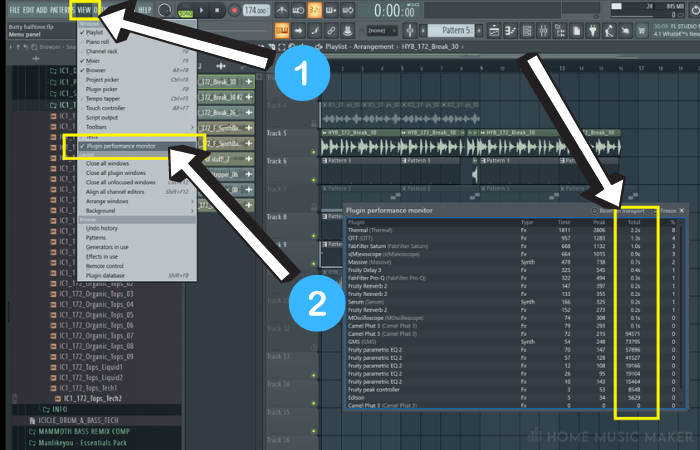
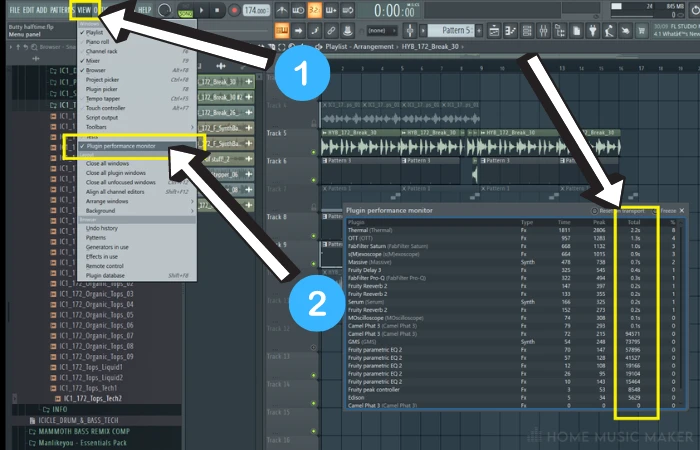
The program scans everything running in your project and gives a reading of its run-time, thereby showing you what is the most hungry for your processor.
Related Questions
Is There Anything I Can Do Outside Of FL Studio That Can Help?
Go to Power Setting > Advanced Settings > High Performance Mode for Windows only. This will prevent your PC from conserving battery power and optimizes your performance output.
What Is Triple Buffer In FL Studio?
Enabling this can reduce audible underruns when your CPU is running high. It can be helpful but bear in mind this doubles your ASIO latency, potentially resulting in delays in the sound, which can be a problem when recording vocals or an instrument.
What Is A Good Buffer Length For FL Studio?
As a rule of thumb, I leave my buffer set at 1024, as it is optimal for me to get good sound quality without sacrificing CPU or latency. Remember that using your interface driver may prevent you from playing audio from other applications, such as SoundCloud or YouTube.
What Specs Should Your Device Have For Music Production?
At least a quad-core 2.5ghz or higher CPU and at least 4GB of RAM.
Check out this next article on fixing FL Studio from lagging.