To automate parameters using the faders/knobs in REAPER, open the ‘Track Envelopes’ menu on the track you want to control, set the ‘Automation mode’ to ‘Latch,’ and locate/arm the envelope that you want to automate. Now, you will automate this parameter by turning the correlating knob/fader.
Envelope Automation In REAPER
Here’s a scenario, you are working on a track due in less than an hour.
All you have left to do is volume and envelope automation.
But your MIDI fader controller is malfunctioning.
Ahhhhhhhhh, not good!
Thankfully, there is a way to automate parameters in REAPER using nothing but your mouse or laptop trackpad.
I love REAPER’s envelope automation features, and utilizing them with a mouse is surprisingly quite smooth!
In this in-depth article, we will look at REAPER’s automation features and how to record a fader in REAPER using your mouse or trackpad.
What You Will Need To Follow This Tutorial
Here is a list of everything that you will need to follow along with this tutorial:
- REAPER DAW (Digital Audio Workstation)
- An audio/MIDI track to automate the parameters of in REAPER
- A MIDI controller with faders (optional)
What Is REAPER Automation?
REAPER has features that you can use to automate different parameters within your track using automation envelopes.
REAPER’s automation features are great, in my opinion. You can use them to control the volume, pan, width, plugin parameters, and much more of the tracks in your project.
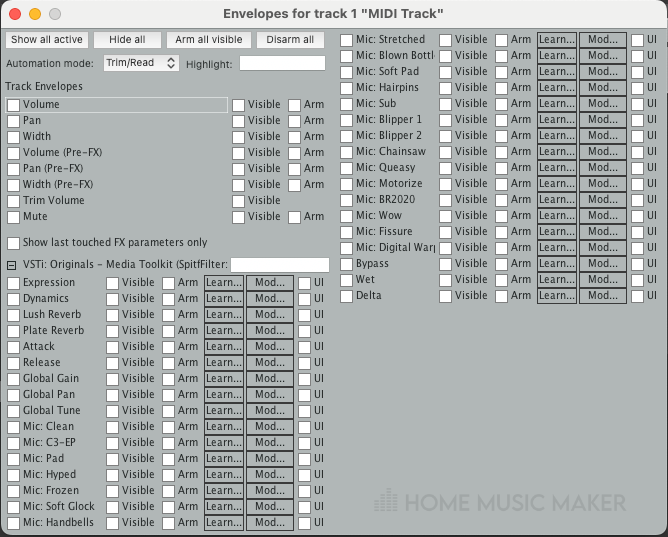
Take a look at the REAPER ‘Track Envelopes’ menu.
Step One – Automation Mode
The first step for recording the automation of a particular parameter in REAPER using the in-DAW faders/knobs is to set the ‘Automation mode’ to ‘Latch’ on the track you want to automate in the ‘Track Envelopes’ menu.
You can also use the ‘Write’ mode to automate.
Still, it will record automation all the time, which can result in losing the automation data you have already recorded. So I recommend sticking with Latch mode.
Step Two – Select and Arm Your Automation Envelope(s)
The next step to automating in REAPER is selecting and arming the envelopes you want to automate in the ‘Track Envelopes’ menu.
You can do this by locating and checking the boxes for each envelope.
You will notice that an automation envelope will become visible in the tracklist on the left of REAPER for each parameter you arm.
Step Three – Program Your Automation
The final step for this process is to program your automation using REAPER’s faders and knobs.
To do this, turn your faders and knobs for each automation envelope as your track plays, and you will record automation for each parameter.
You can also shift-click on the automation envelope to manually enter points to control automation. This can be a painstaking process, so I recommend using REAPER’s faders/knobs to control automation.
Bonus Method – Using A MIDI Controller To Control Automation
Another topic I want to go over is automating envelopes in your track using a MIDI controller/control surface with faders/knobs.
This method requires getting a MIDI controller unless you already have one, but it is well worth it!
Controlling automation using a controller is much easier than without one.
Let’s take a look at how to automate parameters in your track using a MIDI controller with faders/knobs.
Step One – Enable Your MIDI Controller In REAPER
The first thing you need to do to use a MIDI controller to perform automation in REAPER is to enable the said controller.
To do this, select Options>Preferences>MIDI Devices and locate your MIDI controller from the MIDI inputs menu.
Now, right-click the device and select ‘Enable input’ and ‘Enable input for control messages.’
If your MIDI controller is connected correctly but not showing up in your MIDI devices window, you might need to install an audio driver or other applicable software for your controller.
Go to the manufacturer’s website, and you should be able to find downloads and instructions.
Step Two – Set Automation Mode
Now that you have enabled your MIDI controller, set the Automation Mode for the track you want to automate to ‘Latch’ mode in the Track Envelopes menu.
Take note, you can also use Write mode, but this might result in the loss of automation data because it constantly re-writes automation.
Latch mode only re-writes automation if you are adjusting the fader or knob.
Step Three – Arm Automation Envelope(s) And Learn MIDI Fader
The next step is to arm the envelope that you want to automate by finding it in the Track Envelopes menu and checking its three boxes.
Because we will be using a MIDI controller to control this envelope, we also need to press the ‘Learn’ button and move the MIDI fader/knob on our controller that we want to perform automation with.
This will assign the MIDI fader to the automation envelope.
After you have done this, you should be able to control the selected parameter using your MIDI controller.
Step Four – Automate Your Parameter
With your MIDI controller now automating the parameter you assigned it to, the last step is to play your track and adjust the parameter automation using the fader/knob on your MIDI controller as you go.
This technique might be a bit awkward at first and will take some time to master and get smooth. However, it is well worth the time investment with the control it gives you over the automation in your mix.
MIDI controllers are incredible when it comes to automating different parameters in your track.
What Is Automation?
Automation is a way to control different parameters of a track as it plays automatically.
You can use automation with almost any parameter of a track, including volume, panning, width, and practically all plugin settings.
For example, you can set a filter on an EQ plugin and make it so that it does a ‘sweep’ effect at different times in your track.
Getting creative with parameter automation can make for some fascinating mix details and is very popular in modern audio/music production.
What Is Volume Automation?
Volume automation is the process in music production in which you can make one or more elements of your project change in volume automatically as your track plays.
Volume automation is quite handy when it comes to making certain parts of your mix stand out at certain times and controlling the overall dynamics of a song.
Any professional audio engineer will tell you that using volume automation is vital when nailing a mix.
Related Questions
Is REAPER a Professional DAW?
Yes, REAPER is a professional DAW that you can use to accomplish basically anything in the world of audio/music production.
Other than a lack of virtual instruments and audio samples, I believe that the REAPER DAW is incredible and will only grow in popularity as time goes on.
Why Would You Want To Automate The Volume Of a Track?
Here are some reasons that you might want to automate the volume of a track in your song:
– Make the track stand out in a particular section
– Make the track duck down for a specific section
– Increase the volume of a section of a track that you have recorded too quietly
– Make a track’s volume fade out at the end of a song
Should You Automate Master Volume?
Typically, the answer is no. However, it can work in some cases.
For example, if you want to make the chorus or hook section of your track stand out and have just a bit more presence, you can increase the volume of this section by just a bit.
For this trick, I never increase the volume by more than 1 dB since we are working with the master level.
Are you having problems getting your MIDI controller to work?
Fear not! Check this guide on how to fix the issue of no sound from your MIDI keyboard in REAPER.