Although there is no beat detective feature for REAPER like there is in Avid Pro Tools, there is a process that you can follow to get the same results. Use the ‘Dynamic Split’ function to split your drum tracks in REAPER based on their transients.
Editing Drums In REAPER
If you do not know the proper procedures and techniques, editing drums for a track will take ages.
Thankfully, there are certain tricks in REAPER that you can use to speed up your drum editing workflow, such as the ‘Dynamic Split‘ function.
Learning how to edit drum takes using the dynamic split function in REAPER has saved me countless hours of clicking and scrolling!
In this article, we will look at how you can edit drum tracks in REAPER based on their transients.
Beat Detective For REAPER
While it would be awesome if REAPER had its own designated beat detective feature for you to use, the dynamic split function is just as good.
Using the dynamic split function to break up individual drum hits by their transient is incredibly helpful in editing and quantizing drum tracks in REAPER.
Consider using the dynamic split function the next time you are editing drums in REAPER!

What Is A Transient?
Let’s start with what a transient even is in music production.
When talking about acoustics and audio, a transient is a short-duration spike at the beginning of an audio waveform.
Take a look at these kick and snare drum transients and then notice that my guitar and bass tracks don’t really have any transients; they are mostly just one solid block of audio.
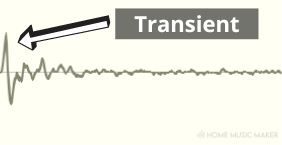

This shows that the type of instrument and the way you play it determines the amount and strength of the transient of a waveform.
You will learn from this article how to split an item based on its transients in REAPER.
This will help with your editing and quantizing workflow.
Step One – Solo Your Tracks
The first step is to select the drum tracks that you need. In this example, it will just be the kick and snare track.
The reason for this is that I usually only quantize drum tracks based on the kick and snare (the real beat keepers of the drum kit).
Once you have your tracks soloed, move on to step two.
Step Two – Match Their Levels And Render
The next step is to make sure that the levels of these two tracks are about the same so that REAPER detects the transients the same way and then render your drum BUSS to a new mono track.
Once you have your drum track rendered, move it under your drum BUSS and move on to the next step.
Step Three – Group Your Tracks
Now that we have our rendered drum track ready, let’s group all of our tracks together by selecting them all, right-clicking on one of them, and choosing Group>Group items.
Once you have your drum tracks grouped, you’re good to move on!
Step Four – Mouse Modifier
The next step is to set up a mouse modifier so that we are able to select only the rendered kick and snare track and ignore the rest of the tracks in the group.
To do this, click Options>Preferences>Mouse Modifiers and choose Media item: left click for the context.
From here, choose Alt as your modifier and Select item ignoring grouping as your behavior.
With this mouse modifier in place, you will now be able to select individual tracks out of a group.
Step Five – Process Your Tracks Using A Dynamic Split
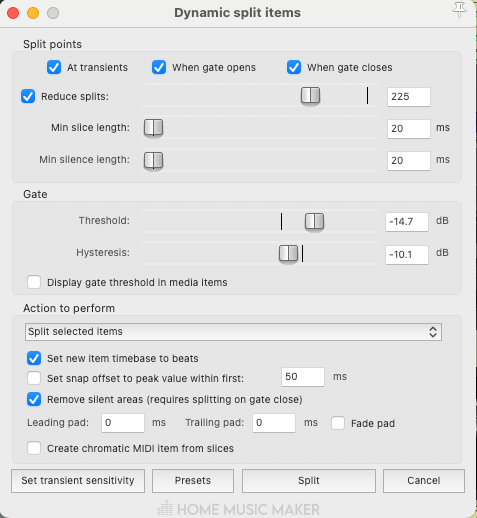
The next step for using the REAPER beat detective mimic feature is to perform a dynamic split on your items based on the transients in your kick and snare drum track.
Go ahead and select only the kick and snare track using our new mouse modifier, right-click it, and select Item processing>Dynamic split items.
From here, enter the settings for your dynamic split.
When it comes to splitting tracks based on audio transients, we want just the right amount of splits; one for each kick or snare hit. Too few will not help us quantize effectively and too many will make our tracks a big mess.
To control the amount of splits in your drum tracks, use the ‘Reduce splits’ feature as well as the transient threshold.
To set the transient threshold, open up the ‘Set transient sensitivity’ window located on the bottom left of the dynamic split-screen.
From here, control your amount and sensitivity of splits until REAPER includes all or almost all of your kick and snare transients in the dynamic split.
It’s okay if you miss a few of them, it won’t always be perfect.
The last thing to do before we hit split is to choose ‘Split selected and grouped items’ under the ‘Action to perform’ dropdown menu.
This will make it so that REAPERS splits all of the tracks within the group based on the kick and snare transients and not their own.
Step Six – REAP The Benefits And Quantize
The next thing for you to do is to quantize your track which will now be much easier since we have gone through this process.
Before you start quantizing, make sure that you have ‘Auto-crossfade media items when editing’ and ‘Trim content behind media items when editing’ both turned off.
Watch how easily I can now quantize my drum tracks by selecting them all, right-clicking them, and choosing Item Processing>Quantize Item Positions To Grid.
I have my quantize set to 1/16th notes, but you may need to adjust this depending on the track you are working on.
You can also move around individual drum hits by clicking and dragging. You’ll notice that all of our tracks move together because we grouped them.
Time for the final step!
Step Seven – Auto Fill Spaces/Crossfade
The final step for the REAPER beat detective mimic feature is to auto-fill the spaces of silence in our drum tracks.
In order to do this, you will need the SWS Extension for REAPER. It is completely free and safe, so I recommend getting it!
Once you have the SWS Extension installed, start by clicking ‘Action List’ and choose ‘SWS/AW: Fill gaps between selected items (advanced)’.
Select all of your drum tracks and press ‘Run’. When the new window opens, uncheck the box for ‘Stretch if needed’ but leave everything else the same. Now, when you press ‘OK’, REAPER will automatically fill the silent spaces and crossfade them together.
Just like that, you have split, quantized, and crossfaded your drum tracks! I hope this tutorial has helped you improve your REAPER drum editing workflow. Feel free to check out this other article on quantizing and editing in REAPER.
Other Uses For The REAPER Dynamic Split Function
Here are a couple of other ways that I use the dynamic split function other than editing drums:
Removing Silence from Audio
Let’s say you have a vocal take that has some sections where the vocalist was not singing. You can use the dynamic split feature in REAPER to remove these sections of silence.
To do this, right-click the vocal track and select Item processing>Dynamic split items.
Set your threshold to where you will only be separating the audio based on silence.
Press ‘Split,’ and watch REAPER delete the sections of silence.
Chopping a Vocal Track
Something else that I like to use the dynamic split function is to chop up a section of a vocal track to piece it back together differently.
Start by selecting the track you want to chop, right-click it, and select Item processing>Dynamic split items.
Now, set the threshold to split your track into your desired amount of syllables (transients) and press ‘Split.’
Now you can get creative with re-building a vocal chop with these words.
Related Questions
Is Avid Pro Tools The Best Digital Audio Workstation?
While Avid Pro Tools is not necessarily the best digital audio workstation, in my opinion, it is the industry standard for the majority of professional audio engineers.
I’m willing to bet that more professional recording studios use Pro Tools than any other DAW.
Which Is Better, REAPER Or Logic Pro X?
Although Logic Pro X is an incredible DAW, I prefer REAPER over Logic Pro X at this time. Here are some reasons I like REAPER over Logic Pro X:
– REAPER’s price point
– REAPER’s customizability
– REAPER’s ability to BUSS and sub BUSS tracks
– REAPER’s render by region feature
– REAPER’s render menu
– REAPER’s ease of audio editing
– REAPER’s mixer and routing layout
What Do You Love About REAPER?
My favorite things about REAPER are its visual display, organization, customizability, and audio editing capabilities.
REAPER is an easy-to-use DAW that you can tweak and adjust to fit your workflow and taste.
Final Words
I hope this tutorial has helped you improve your REAPER drum editing workflow!

Feel free to check out this other article on quantizing and editing in REAPER.