with is one of those techniques that sounded too weird to work, but once I tried it, I was pretty impressed with the results.
If you are having problems getting the levels right in your mixdowns, this might be the solution for you.
In this article, I will explain how to mix with discuss some pros and cons of this method and show some creative ways to use to enhance your sounds.
Let’s dive right into it!
What Is Pink Noise?
If you are unfamiliar with what the is, you are not alone. Remember that wash of old TVs used to emit once they were out of ? Well, that’s basically it.

Although it sounds like a mess of frequencies, a is actually a pretty well-balanced . It has an equal amount of energy per , covers all of the audible , and is calibrated to the . This is why is used in this method instead of , or .
However, is generally more “accurate” in terms of energy per individual . Whoah! That’s probably too much science for a article. Still, I thought it’s helpful to know why this particular sound is being used in this specific mixing technique.
- A Tone Generator plugin or a short audio recording of pink noise.
- Level meter / VU meter
- Multitrack recording session (Song you want to mixdown in your DAW).
- Spectrum Analyzer
What Is With All About?
This method is used primarily to get a quick, static balanced mix. We want to get a somewhat stable and cohesive base to build and refine our using the as a reference. So, why would you do that?
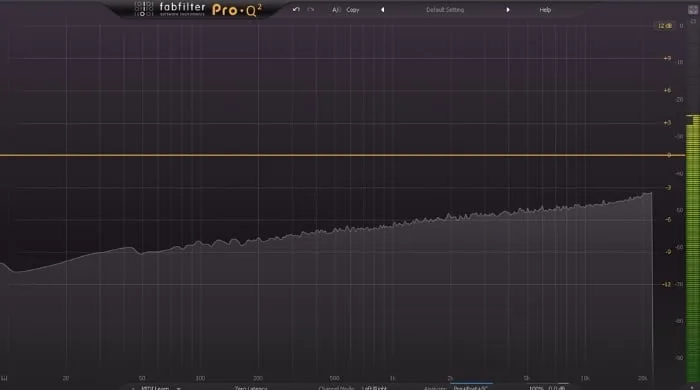
Since the is a constant and reliable source, we can predictably get good results every time. In audio engineering, there are so many variables… Our monitoring spaces are not perfect, and our ears are not always fresh or trained enough, so at times it really is useful to have this kind of a “cheat sheet.”
Even if you feel confident in your skills, this method could still help you double-check things. It might take away the “artisan” vibe of , but hey…whatever gets the job done. The process is pretty simple and straightforward and shouldn’t take more than a couple of minutes to do, so with that said, let’s do this!
How To Mix With Pink Noise
Step 1: Set The As A Reference
We can go about this in two ways. You can either use a plugin or download a short audio sample of the .
I’ve included a pink noise file that you can download below:
A Tone Generator is usually found as a stock plugin in most of the leading DAWs (Digital Audio Workstation) if you decide to choose that way of generating pink noise. If you don’t find one in your DAW of choice, there is a free plugin called MNoiseGenerator that does the job just as well. Make sure to put it on “” mode, and you are good to go.
However, there is one catch; make sure to have the plugin last on a Master Buss effects chain, so the won’t be affected by any processing you already have.
This will ensure that you get the best results.

Step 2: Set Reference Levels
This step is crucial to set a strong foundation for our . Setting the too high will result in our being already too hot. This can cause many problems further down the process, so it’s better to eliminate such issues in the first place and leave yourself plenty of .
Your should be debatable and highly dependent on the style of music you are producing. It can be as low as -14 RMS (Root Mean Square) or as high as -8 RMS. I generally wouldn’t recommend going above or below these limits since you may risk your track getting too hot or too quiet for any bus processing.
This means that any plugin you insert afterward will either clip straight away or not feed the plugin with enough volume to work as best as possible. If you produce aggressive genres like Dubstep, Drum & Bass, Rock or Metal, feel free to crank it up to -8. A range between -14 to -11 seems to be working just fine for most other genres.
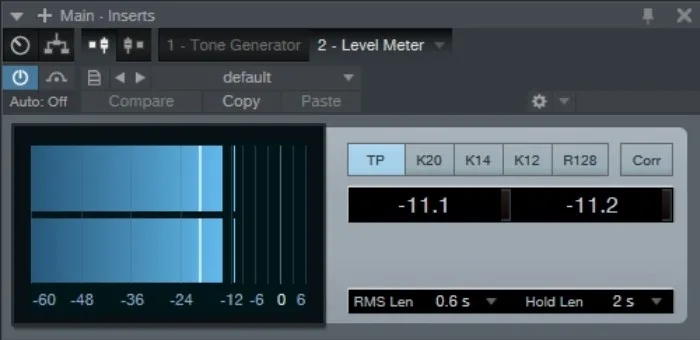
After the Tone Generator plugin, we will load a Meter as our next plugin on Master Bus and adjust the Tone Generator’s output section until our desired is reached. If you are not using the Tone Generator plugin but rather a , make sure to loop that sample on a separate and use the channel volume to adjust the to the desired .
Step 3: In Mono
This step is optional, but I would advise you to do it regardless. There are two benefits:
- You will get a better result if there are tracks that are recorded in stereo (like claps, shakers, and synths) because you will be able to judge their true against all the mono components of the (like kick, bass, and snare)
2. Getting a great-sounding mono will automatically make your stereo even better.
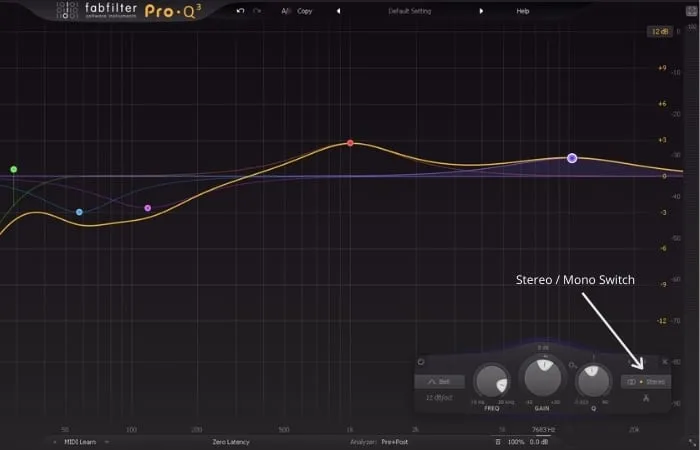
If you are unsure how to do this, there are various ways to do it, depending on the DAW you are using. Many have the mono button switch on Master Buss, but some plugins will let you do this, like Fab Filter Pro Q.
Step 4: Set Your Tracks Just Above The Pink N L
Now we are getting to the core of the matter and the most crucial part of the method. We set the volume faders of all tracks except the reference track all the way down and start bringing them back up, one at a time, just until they are barely audible over the . At this point, pull the down until it just slightly disappears into the and leave it there. That’s your for that channel.
Once you set the volume of one channel, you mute it and proceed to do the same to the next one until you have balanced them all against the . Some people choose not to mute the tracks once they are set against the and prefer to balance each element with the bigger picture in mind. This might be a bit more challenging approach, but I’d say that either way should produce good results.
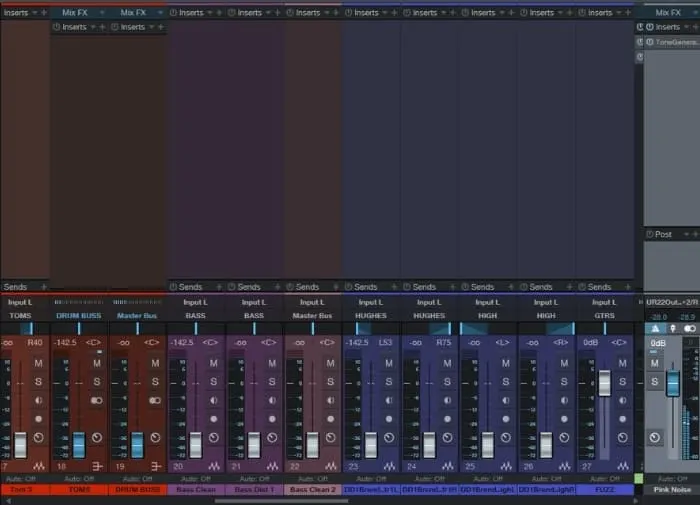
Make sure not to monitor too loudly while doing this. The coming out of your speakers should allow for a relaxed conversation in your room. This will ensure a better -balancing and save your ears from getting fatigued since is a high-energy that is not very pleasant to listen to.
Once you’ve gone through all of the tracks, turn off the Tone Generator or mute the channel, and voila! At this point, you should probably be in the ballpark as far as levels are concerned. You’ll probably need to tweak things to make it closer to your particular style of , but a nice, solid should already be there.
The balance between the lead vocal and backing vocals will definitely be off since you treat them in the same way against the pink noise. You can balance different mix elements using this mixing technique, but prioritizing which parts will take the lead will be your call.
Pros And Cons Of M With P
The Pros
with is probably the closest thing to being an actual “cheat sheet” in audio production. I am otherwise very suspicious of all hard and fast rules for handling creative tasks such as mixing music. But this works in a very reliable way, and every time you do it, you will get an approximately nice-sounding mix to start with. As easy as it sounds, setting levels is all but easy. It takes a lot of time to recognize which mix elements need to be prominent and to which degree.

Another bonus is that it’s speedy to do it. Once you get the hang of the process, balancing a single track should take you seconds to set up, and unless you have a massive session with 100+ tracks, it shouldn’t take you more than 5 or 6 minutes for a whole song. Although one might say that it takes even less if you set your levels manually, it’s still a pretty good trade-off since you do not have to spend 20 minutes tweaking things and then regret if you get disappointed with the results.
The Cons
And now for the cons. Since there will be quite a few of them, one might get an impression that this method is flat-out useless, but some of these are more of a practical guide to situations in which this trick doesn’t work so well than objections to the method itself.
Many people are not satisfied with the results once they mute the , and I’ll try to explain why this usually happens. Not all genres benefit equally from using the as a reference. This mainly has to do with the raw material you are .
Generally, the more samples you use, the better the outcome because most samples are constructed and layered, so they well-balanced already. If you work with raw sounds that need a good deal of EQ to good on their own, this method will produce an unbalanced .
A good idea is to treat the channels beforehand. Rock music seems difficult to get right with this method since you work with many unbalanced sounds that need a lot of attention before they start sounding decent. Also, distorted guitars cut through the rather well, so you will most probably turn them down way more than you should. On the other hand, electronic music with works wonders!

Many engineers also complain about having to listen to for an extended period. is not the most pleasant to listen to, even for a couple of seconds, let alone a couple of minutes.
It may take away the fun and joy of music and make it more of a chore for some people, and I completely understand that. You could try to monitor at lower volumes than usual just for the portion of balancing and then turn it up again once you are done with every channel. It might make easier to listen to.
Another issue might occur if you have huge sessions to . No matter how good you get at quickly balancing audio against the , if you have to do it 80 or 100 times, you will invest quite a bit of time which might go to waste if you end up dissatisfied with the results.

The biggest issue for me is that it is actually a “cheat” in a way, and I’m not saying this from the perspective of an audio purist. I have no problem with any method as long as it sounds great! Although with does produce results that can amazing, I believe it could stop you from growing as a engineer by not forcing you to judge the levels by yourself.
This is a skill that goes beyond being able to compile a . It is an integral part of your arsenal, and training yourself to become good at it, will be of immense value to your career in audio production. By relying on this method alone, I think you might miss out on developing some essential skills. That being said, I’d say that the method can be of great help while you are still working on improving your leveling skills.
Using P To Enhance Sounds
I’ve always been fascinated with the ’80s and ’90s production, especially the snare sounds of that era. I kept searching for ways to get that specific , and it turned out that many producers were using pink and to enhance the snare. can add some weight to the snare and even simulate the of the snare wires. It is handy for breathing some life into dull snare sounds. This is how you do it!
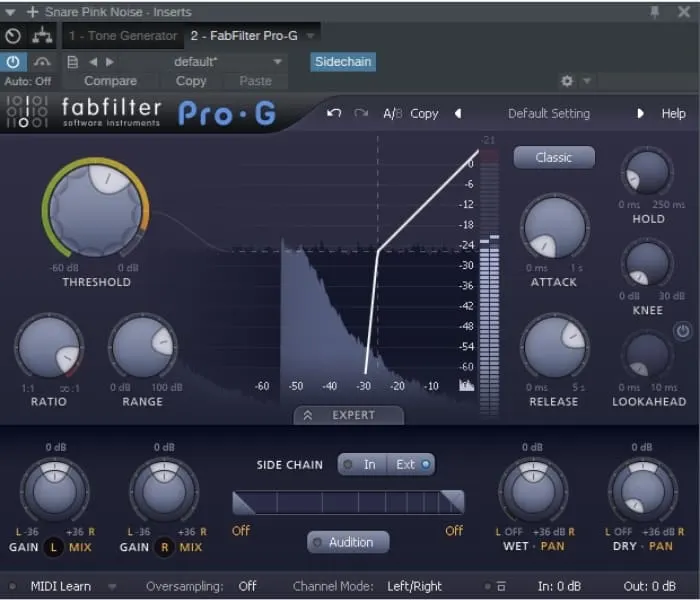
We start with the good old Tone Generator inserted on the snare track. After this, we add a gate plugin and set the threshold until we can no longer hear the . Through the sidechain, we key the gate only to let the Tone Generator play once the snare has been hit. Through “Attack” and “Release” options on the gate, we can shape the duration of the and, in that way, dramatically alter the of our snare.
With longer release times, you can get a “larger than life” type of snare that sounds epic and explosive, or by lowering the release time, you can get a tight snap you usually find in a well-recorded bottom snare .
You can send the gated to a ! In many cases, it can provide a better snare ambiance than sending the actual snare to a aux. Quite a sweet trick!
FAQ MIXING WITH PINK NOISE
What is a pink noise generator?
A noise generator is a piece of software that continuously produces various noises, pink noise being one of them.
What Hz is pink noise?
Pink noise covers a whole audible frequency spectrum, from 20 Hz to 20kHz. That’s precisely why it works so great for this application.
Why is it called pink noise?
It’s a bit of a scientific question. It has to do with the color that this particular combination of waves emits in a visible spectrum, which is pink.
How do you calibrate your speakers with pink noise?
Among many other things, pink noise can be used to calibrate speakers since it is a constant and balanced sound. The idea is to measure the loudness of each speaker in a stereo setup and adjust the volume of each one until they are the same.
Why is the pink noise signal most often used instead of the white noise for observing the speaker frequency response?
Pink noise is preferred since it emits a more balanced sound across the frequency spectrum. White noise is a bit on the bright side of the spectrum and has a distinct harsh sound which is good for some things but not for measuring the frequency response of speakers.
What is pink noise used for?
Besides sometimes being used in mixing situations, pink noise is used primarily in acoustics, specifically in measuring frequency responses of rooms and speakers.
Are people using pink noise for orchestral music?
I wouldn’t advise you to mix orchestral music that way since it is too dynamic, and you would most likely get inferior results.
Final Words
Mixing with pink noise will never substitute for a “proper” mixdown; however, it can definitely help get a rough mix together relatively quickly. You can then refine and polish the track to get it sounding exactly how you want.
I have to admit; I was skeptical when I first heard about this technique but thought, what the heck, it’s worth trying it out. I urge you to give it a go yourself and see how you get on.
You have nothing to lose; if it turns out it’s not your thing, you have spent 5 minutes on it, at least you have helped ease your curiosity if it works.
If you are looking for more mixdown tips, click here to learn about Mixing in Mono.

 Want to connect with other music producers for help and guidance?