Learning how to EQ drums can be challenging. I probably share the same frustration as many producers worldwide, failing to make my drums punch as hard as they do on my favorite records.
I have yet to see a Meme about struggling to get the right guitar sound instead of a good-sounding snare!
But a good thing that came out of this endless struggle to achieve the right sound is that I can help you in your quest to find one that works for you, so let’s dive right into it.
What Do We Need?
Any EQ, plugin or hardware, will do the job. Most of the EQs you find on today’s market sound great, and unless you want to do some crazy carving, 4 bands will be enough in most cases.
I am most comfortable using FabFilter’s Pro Q3, which seems to be most people’s cup of tea nowadays.
Step 1: EQ The Kick Drum

Ok, this kick EQ curve tends to be present on 90% of my productions. You should still be careful about doing automatic cuts and boosts to any signal as no recording sounds the same, but for the kick, this curve just works well.
We have a nice 3dB boost around the fundamental (this can vary anywhere from 50Hz to 85Hz). A healthy cut at around 300Hz (this move doesn’t have to be so dramatic, depending on the genre, but you would want to free up some midrange for other instruments).
Also, a gentle boost at around 3k to add some attack (you can vastly change the nature of the attack by setting your band anywhere from 1k to 6k, exploring and finding what you like) and a presence boost of 10k or higher.
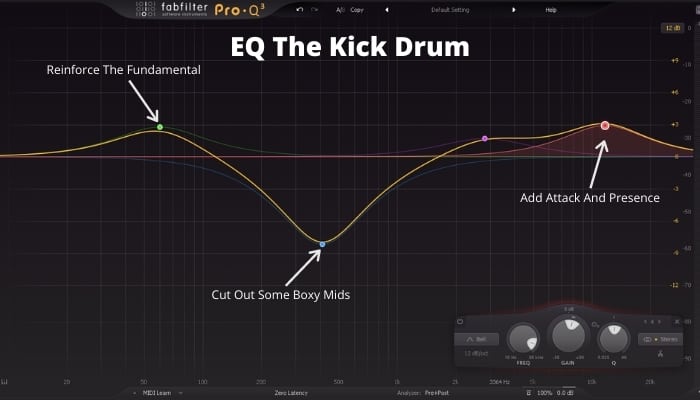
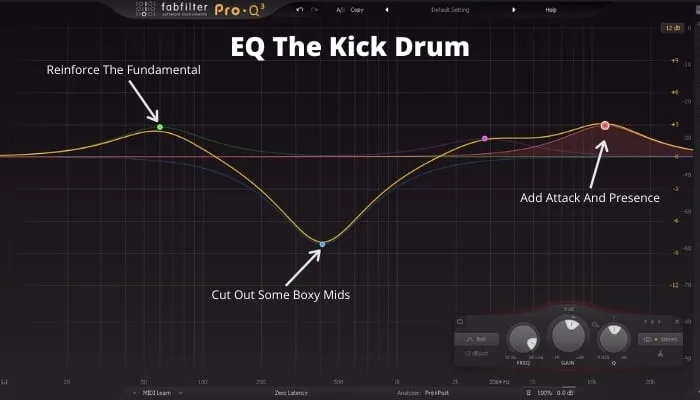
During your creative judgment, you can choose to pull down or remove the gain on each of these bands to fit the context, but a general idea behind this is:
- Boosting the low end.
- Deciding how much boxy midrange you want to cut.
- Adding attack and presence, depending on your taste and context.
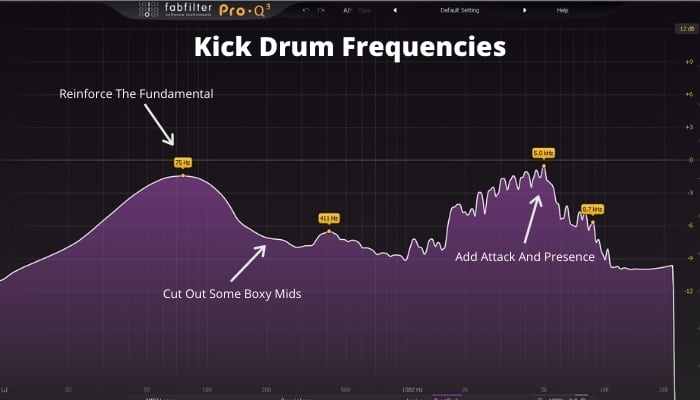
Other Major Frequencies That Significantly Affect The Sound Of The Kick Drum Are:
- 130 -150Hz – this is the ”impact” portion of the kick; boost it to get a punchier sound.
- 800Hz – I call this the ”old school” frequency; it gives the kick a vintage character.
- 1000Hz – you can increase the sound of the beater hitting the drum head in.

A well EQed kick is going to be of incredible benefit to your production. You want to go for a nice balance of body and attack as it will provide a good driving force to your mix. Together with the snare, it is the ultimate factor in judging the quality of your production.
If any of these elements don’t quite deliver, the whole mix falls apart, so you really want to make sure it sounds on point.
Take your time with it, explore how each band affects the sound, and in no time, you will EQ the kick like a pro!
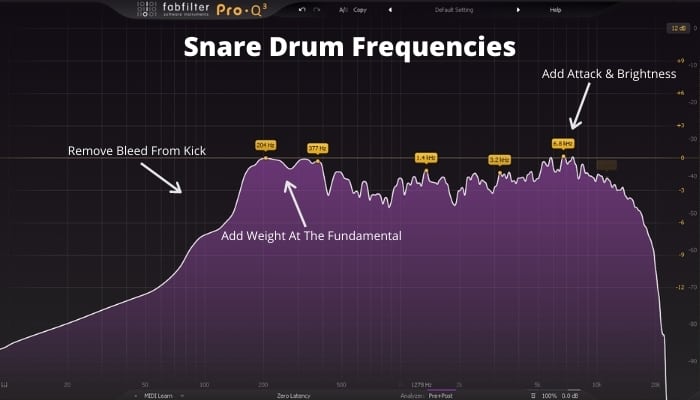
Step 2: EQ The Snare

The snare… the one piece of the kit that gives us nightmares! I was thinking a lot about why it is so hard to get a good snare sound, and one of the reasons that popped in my mind is that we probably overdo eq on the snare.
There really is no hard and fast rule in this case, like it was with the kick, but let me sell you this idea- try using small eq moves on the snare. Also, I caught myself dozens of times bypassing all of my plugins to find that the snare actually sounds better without any of the processing!
Here is an example of such an approach – A high pass filter at around 70Hz (especially if you are working with live drums, there will be a lot of rumble in that area from the kick bleeding into the snare mic.

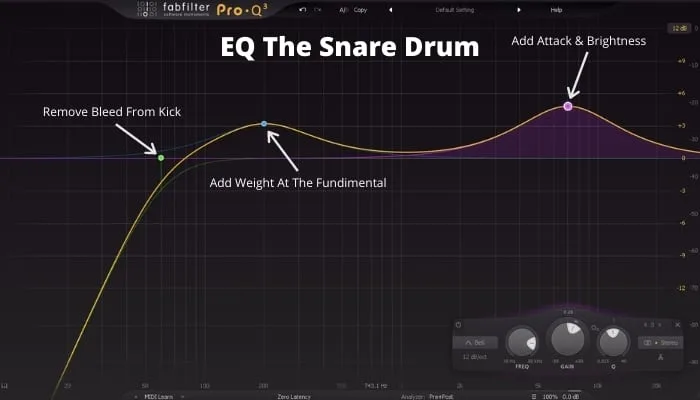
Boosting around the snare’s fundamental (this can range anywhere from 150 on a low tuned snare to 250Hz on piccolo snares) and a treble boost at around 7k. This 7k region is significant for the snare’s attack, and in 95% of the cases, microphones aren’t able to give you enough presence on the way in, so you usually have to bring it out in the mixing stage.
You might at this point feel a bit skeptical of this oversimplified approach but trust me- it will bring you much better results this way.
I see many people start cutting the ringing frequencies ( those ear-piercing harmonics usually found at around 2k) like there’s no tomorrow! In my experience, this makes the problem sound worse than just leaving it on the track. Overdoing the cuts to the midrange sucks the life out of the snare drum!
If you are still unhappy with the ringing sound, you can choose what frequency annoys you the most and cut it slightly- no more than 6dB with a very tight Q.
The other option is to use a gate on the close mic and prevent the ringing from lingering, but extract the room mics’ sound’s decay portion. That is a great trick that I started using some time ago, and I am very pleased with the results.
So, the main takeaways are:
- If you are working with a decent recording of the snare, use subtle, small EQ moves.
- Try and keep the midrange intact if possible, as it is crucial to a great snare sound.
- Use spot mics to get the punch, brightness, and attack. If you want a more extended snare, extract the decay from the room mics.
Other Notable Frequencies That Can Contribute To A Snare Sound:
- 500Hz – I just love this frequency on a snare drum! It gives such a pleasing fullness and sounds really old-school (by now, you have probably noticed that I’m a big fan of older productions).
- 10000Hz – It can add an excellent high-end lift, but be careful about it as it can throw your balance off, making snare wires sound too loud and sizzle too much.
If you are working with a decent recording of the snare, use subtle, small EQ moves. Try and keep the midrange intact if possible, as it is crucial to a great snare sound.
Use spot mics to get the punch, brightness, and attack. If you want a more extended snare, extract the decay from the room mics.

All of the EQ techniques mentioned above really depend on things like; the ratio between the top and bottom microphone, the amount of compression you are going to apply, the amount of saturation, etc. Try to let a snare drum be what it is – I think it’s a much better alternative than EQing it into a splat.
Also, don’t hesitate to use other microphones for breathing some more life into the snare. After all, we don’t listen to a snare drum by putting our ears right next to it, but within the context of our environment, so use those ambient mics!
Step 3: EQ On The Overheads – Cymbals


There are many ways to approach mixing overheads, as it is probably the most versatile part of the kit. Generally, there are 2 primary ways to approach the situation – use them strictly as cymbal mics or use them as the main reference point from which you will build the whole drum kit’s sound.
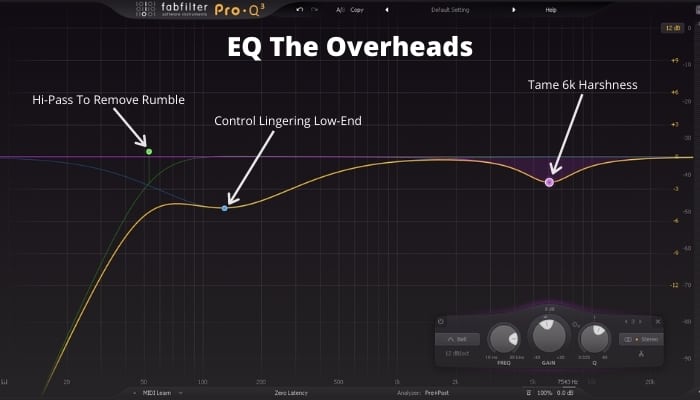
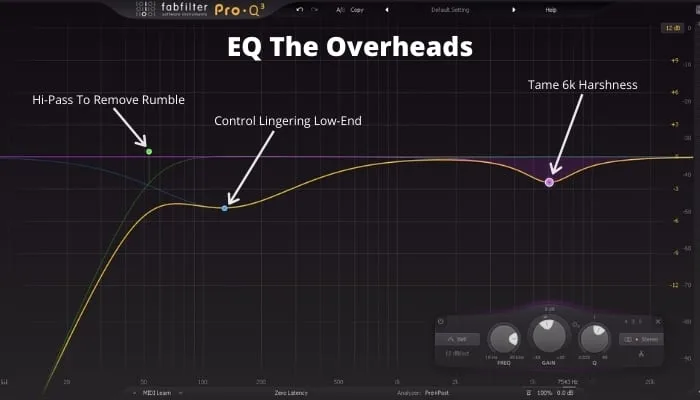
I have presented a typical situation in the image above where you lean towards using overheads as essentially cymbal mics but still manage to enhance the snare’s sound.
I usually start off with a high pass filter to remove most of the sub information. This prevents me from having phasing issues against my kick drum. I won’t go into any detail about phase, as it deserves an article on its own.
Still, I’ll just go ahead and say that learning about phasing (especially in a context of a drum mix) is extremely important. Perhaps just as important as learning how to EQ!
Anyway, next up is an EQ move addressing lower mids. I usually choose to make a healthy cut in this area. Still, if your production style favors fat and warm-sounding drums, it is usually a good idea to leave this area unaffected or cut surgically. My approach is to have these so-called ”waves of low-end” coming from the drum kit.
This means that I want the drums to explode with low-end on the kicks and snares and then shortly after disappear. Having the lower mid area upfront in the overheads channel ruins this effect, as you get a constant low-end boom.
The next crucial frequency is the cymbals themselves. I have EQ’d dozens of overhead tracks, and there is always a 6k region that drives me insane when I hear it! Right after I make this cut, the cymbals receive a facelift. They start sounding so pristine, yet they do not lose their presence in the mix.
Those 3 little EQ moves are pretty much standard when I mix any overheads. Following the logic of previous drum kit pieces, I keep EQ moves really simple.
The General Logic Behind EQing Overheads Is As Follows:
- High pass to remove extreme rumble in the low-end.
- Address the low-mids depending on the style of your production.
- Cut out, ear piercing, higher-mids as necessary.
- 500 – 1000Hz – We might imagine that cymbals have only the high-end information, but actually, there is such a thing as the ”body” of the cymbals. Be careful when you make cuts in this region, as it will seriously affect the punch and weight a cymbal has.
- 10000Hz and above – It is not uncommon to actually low-pass this region. Again, it might seem counterintuitive, but more often than not, cymbals have excessive sizzle and nasty harmonics in this region, so address the issue if necessary.
- 1200 – 3000Hz – This region is fertile ground for nasty ringing and harsh harmonics. I actually discourage using subtle EQing in this region as harshness can really break otherwise great-sounding cymbals.
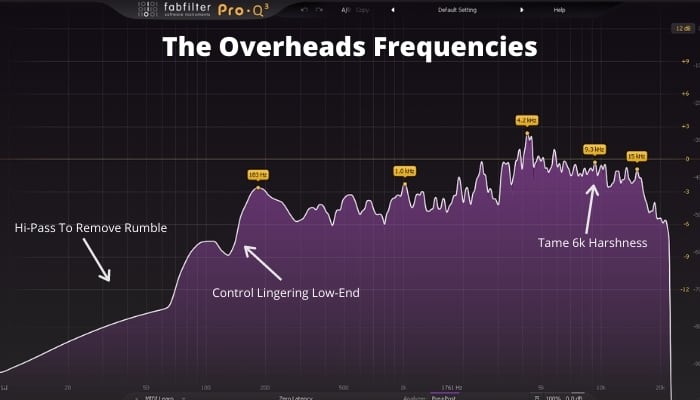
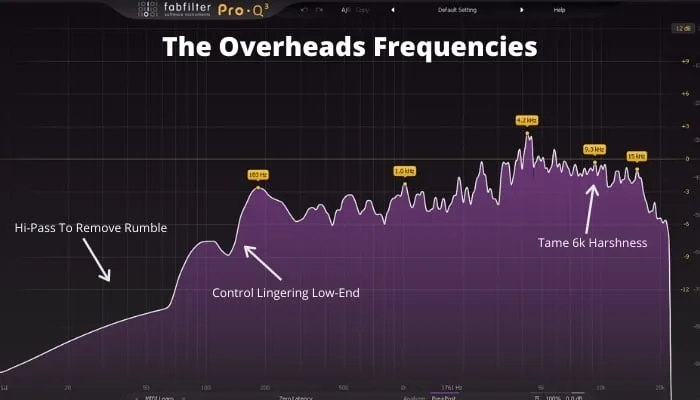
One thing I have mentioned but haven’t talked about yet is the snare in the overheads microphones. If you have nicely recorded overheads and a snare played by a great player on your hands, use it by all means!
In that case, there is a 1k region that sounds so fantastic and complements the snare sound in a way no other trick can do.
If you wanted to build your whole drum sound with the overheads in a different scenario, I’d advise you to keep that rich low-mid-region pretty much as it is and add the close mics until you are happy with it. This way, the drums will sound more open at the cost of less punch. It’s just a matter of what kind of sound your production needs.
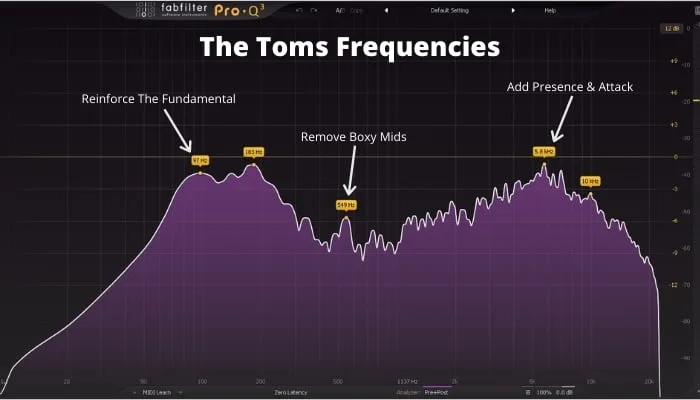
Step 4: EQ On Toms


Toms are probably the most straightforward piece of the drum kit to mix. If they are well recorded, you will be able to have them sounding great without much hassle. The downside is that if you have a poor tom recording… well, there really is not much you can do about it.
This EQ curve is pretty much a golden standard. It is being used by pros and beginners alike. It just works! The only EQ band that changes is the one regarding the amount of mids, but more on that in a second.
First, we have the high-pass, which is not too extreme. We want to get rid of some rumbling and create more headroom. It is important not to interfere with the tom’s fundamentals (unless it’s too loud, of course). The exact fundamental changes depend on the tom’s size, so smaller toms have their fundamental usually at around 80Hz, while bigger ones at 50-60.
The next move precisely enhances the fundamental region of the tom. Like I said, if the fundamental isn’t too boomy, it’s usually a good idea to reinforce it.
Next, we have a region that determines the production style of our toms. If we leave this region intact, we will end up with more vintage-sounding toms, and that’s totally fine. I don’t have a problem at all with having plenty of boxy mids in my toms. It brings out the character of the drum.
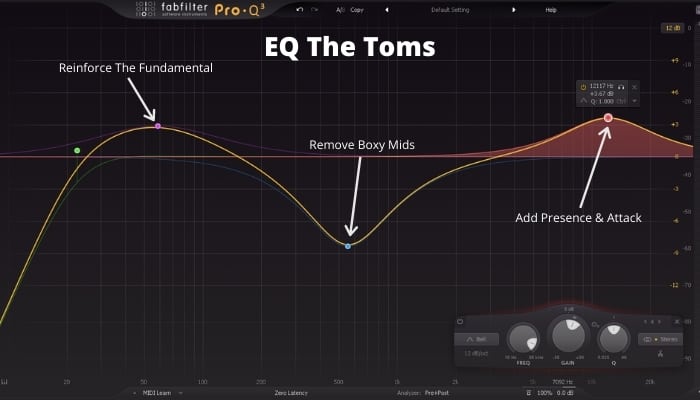

I think people obsess too much nowadays about midrange in drums. But if you are after a more modern sound, it is a good idea to cut some of the boxy 500-700Hz out, as I have done above. You shouldn’t go over the top with it, as too deep of a cut will ruin the sound instead of enhancing it.
And the final touch adds some sheen and presence to the top-end to bring out a little bit of attack and brightness as this region usually lacks the attention in live-recorded drums. The general approach to mixing toms is tried and true and goes as follows:
- Enhance the region of the fundamental and tame the ”boom” if needed.
- Cut out the midrange depending on the style of your production.
- Add some top end for brightness and attack.
Poorly recorded toms can cause a tricky situation. You may not know how to deal with it because it is tough (if possible) to make a bad recording of a tom come to life. Your best bet is to just let the tom be what it is. If you try to polish it, it will still sound like a polished, bad-sounding drum! So you might as well let it have some attitude.

Part 5: EQ On The Room Mics
My philosophy is to shift the sound’s weight towards the brighter spectrum (higher frequencies) when treating room mics. By now, you most probably have enough of ”weight” in your drum sound, and you just want some natural ambiance and sense of space.
I always start off with a high pass filter, as it removes a lot of sub noise and frequencies that really don’t contribute in any way to the sound I want to achieve. A boost at around 1k enhances the room’s explosive character, which I really like the sound of. The way you are going to EQ the room is entirely up to your taste.
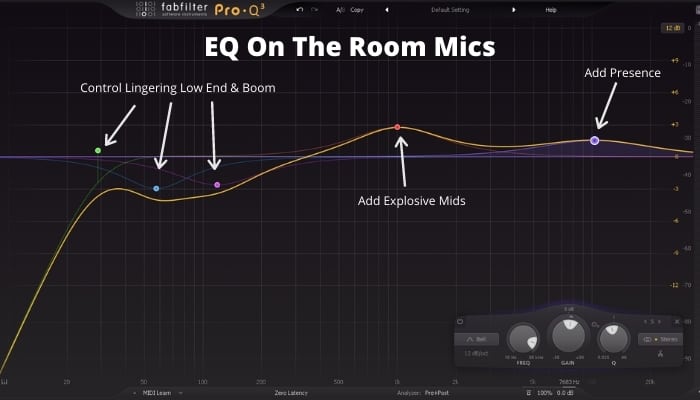
Do you like the boom you get on the snare hits? Then boost the lower mid-region. Do you prefer the wide sizzle and airy ambiance? Boost the high mid-range and top-end. It’s really straightforward.
The main takeaways are:
- Most room tracks are low-end heavy, so you might consider taming that region with a high pass and a wider cut if your drums already have a pleasing low end.
- Rooms are all about midrange so try to enhance that region that best suits the sound you are after.
One thing I have been struggling with for a while is I like the fullness of the sound the room gave. Still, it would often introduce various rings (narrow range of frequencies which get amplified to the point where they become distinctly audible) in the mid-range, most notably on the snare hits.
The way to combat this is to either cut only one ring you dislike the most (by cutting multiple rings, you’ll likely kill the precious midrange fullness) or use dynamic EQ, triggered only for the snare hits. Have fun with it and explore the various soundscapes a room provides!


FAQ – How To EQ Drums
These are some of the questions many beginner mixers struggle with, so let me try and give my two cents on the matter.
Hopefully, some of the answers will make some things more straightforward.
Should you EQ drums in the first place?
Even if you already have perfectly recorded tracks, you probably want to carve some space for other instruments to fit. So yes, EQ is probably the one thing you definitely have to use, even if the moves are subtle and sparse.
What dB should drums be?
There is a lot of discussion on forums about how many dB each individual drum kit piece should hit, but in my opinion, it is a waste of time and completely misses the point. The only thing to look out for is not to drive your signal too hot before hitting the master buss. I usually keep my loudest hits at around -6db. But if it goes a dB or two above, it really is no big of a deal.
How loud should hihats be in a mix?
I think it depends on the genre. In rock mixes, I like to have them really loud as they drive the track’s groove. In genres that are not groove-oriented, I pull them up until they give a pleasing high-end ”coating” to a mix.
Should you put reverb on a kick?
It all depends on whether you like the sound of it or not. I am personally more for having a room on a kick instead of reverb, but some ambiance on the kick definitely gives some life and makes it more interesting if the situation allows it.
Should you pan hihats?
Sure! I usually pan hihats halfway, either right or left, to create a more expansive feel.
What frequency should a snare be at?
Most of the snares have their fundamental tone at around the 200Hz region. You probably want that to be present but not necessarily so. As a starting point, make sure you can feel the snare’s body at around 200Hz and have some transient information at about 7k.
Should snare be louder than the kick?
Both of them have to be the loudest part of the mix in most of the genres. Now a ratio between the two could be judged on a case-by-case basis. I personally like having my snare a bit louder, but that’s just me!
Final Thoughts
Hopefully, now you have got a better idea of how to EQ your drums and get them sounding nice. Remember, everyone’s original drum tracks will sound slightly different, to begin with, so your EQ may look different from the screenshots above.
Just play around using these techniques until you get your drum elements sounding just how you want. But don’t solely rely on your ears. Use the spectrum analyzer so you can also see what frequencies you are hitting.
Like everything, the more you practice, the more in tune you will become. And even if you don’t nail it straight away, keep at it!