Beatmatching is probably the single most important skill for a DJ to master. It’s what allows you to switch between songs seamlessly, and it can make or break a set.
If you are new to DJing, mastering how to beatmatching should be your number one goal.
In this tutorial, I will teach you everything you need to know about beatmatching in an easy-to-follow, step-by-step guide, but first, let’s look at what it is and how it came about.
What Is Beatmatching?
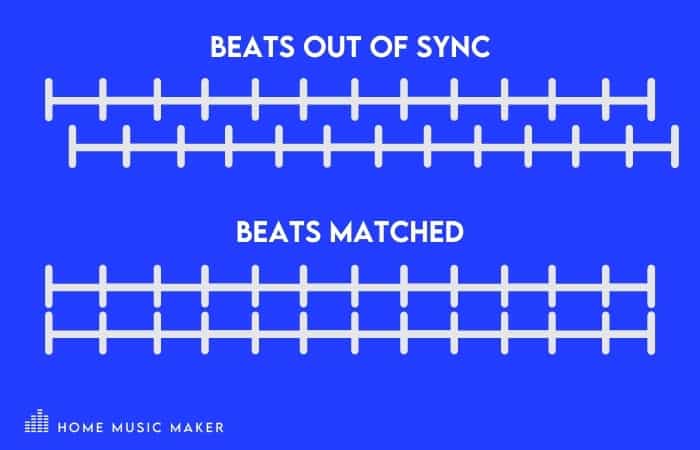
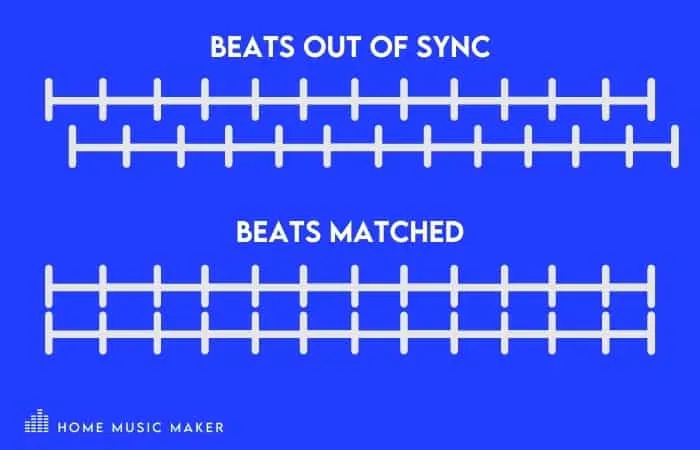
The basic idea behind beatmatching is to get two songs playing together at the same BPM (beats per minute) seamlessly. This enables a smooth transition from one song to the next without any gaps or clashing of beats, strings, and other song elements.
DJs have one of the toughest jobs in live performance; they need to be savvy enough to efficiently manage switching from one song to another and keep the flow of a party moving forward. As far back as the ’60s, Francis Grasso is credited with developing the technique of beatmatching that became fundamental to DJs around the globe today.
There are a few different ways to match the BPM of two songs, and we will cover them all in this tutorial. We’ll also show you how beatmatching is carried out on turntables, CDJs, or DJ Controllers (depending on your preference).
How to Beatmatch
What DJ Equipment Do You Need?
I’m sure you already know this, but we’ll quickly go over what gear you need to master beatmatching.
The basic setup will consist of at least two decks (turntables/CDJs), a DJ mixer, a pair of headphones, and some DJ monitors (speakers). Alternatively, you can use a DJ Controller and your chosen DJ software along with just some headphones and monitors.
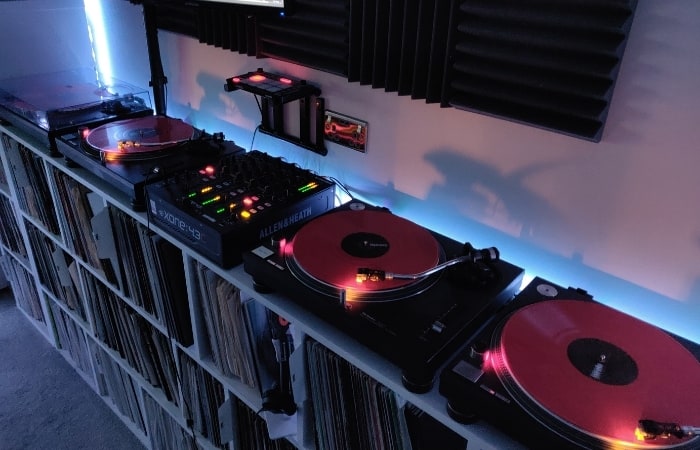

There are tons of different options available to you, from under a hundred dollars right up to several thousand dollars; From old school turntables to the latest DJ controllers. It really is just a matter of what method you prefer and how much you are willing to shell out!
Step One – Selecting The Best Tracks To Use
Whether you are mixing digitally or on vinyl, selecting two tracks roughly the same BPM will go a long way in how successful you are with your beatmatching. You will not be able to get a 128BPM Dance Music track sitting nicely with a 175BPM Drum & Bass track.
However, this isn’t usually a problem, as most DJs tend to play one style of music in their sets, and tracks with a 5-10BPM difference should be fine.
Select two tracks with relatively simple intros, ideally just some simple beats without too many different elements. If the tracks have strings or vocals, making sure they are the same key is essential, as clashing keys really won’t sound very nice to listen to.
The key here is to keep things simple. Once you become more confident, you’ll be able to start pulling out more technical songs.
Step Two – Look At The Songs Structure
To start, let’s talk about bars and beats, which will involve a little bit of music theory.
What Are Bars In A Song?
I know I know you haven’t come here to learn about music theory, but trust me, understanding beats and bars will help you with the beatmatching process.
A bar is a measure of time in music that lasts for four counts or the space between two vertical lines on sheet notation (the “bar” symbol). Beats are individual pulses within each bar/measure which help to count out how much musical duration has passed since you started counting them – they’re also what makeup rhythms.
For example, count – 1 and 2 and 3 and 4; that is one bar.
Luckily most dance Electronic Music is written in a 4/4 time signature, meaning:
- The first 4 – How many beats in each bar.
- The second 4 – The type of note that gets the beat, for example, a quarter note.

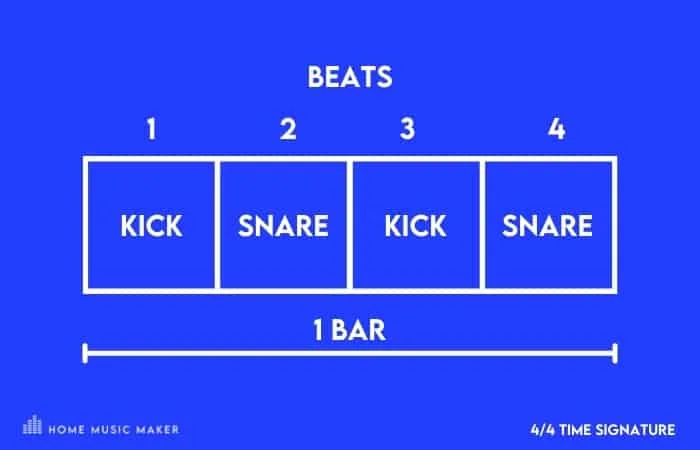
This means there are a total of four beats per bar, and one-quarter note equals one beat.
So 1,2,3,4,1,2,3,4 and so on.
This is just a fundamental guide to how bars and beats work, so next, you need to check out the tracks’ structure, where the breakdowns, builds, and drops are.
How Is The Song Structured?
If we use a Drum And Bass track as an example, you will typically find the same song structure across the genre. Those are:
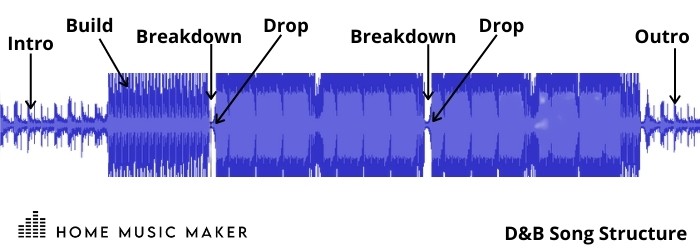
Each complete section that makes musical sense when listened to is called a phrase.
These phrases are written in blocks of bars; for example; sixteen bars are made up of smaller blocks of four bars.
When it comes to beatmatching, it’s important to know which part of the phrase you should be mixing into. For example, if you were to start mixing halfway through a phrase, it would sound odd as one tracks phrase would change in the wrong place, even if the timing of the mix is perfectly in time.
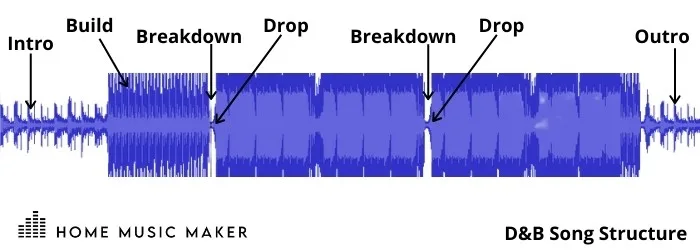
A good method to keep track of where you are in a song is to count the bars as mentioned above but change the first number to correspond to where you are in the phrase, starting at one at the start of each phrase.
This would look like this:
1234, 2234, 3234, 4234, and so on.

It may sound a bit complicated at first, but it much easier in practice once you get a feel for it and listen to the song’s structure.
What Does BPM Mean?
Finally, we have Beats Per Minute (BPM), which is pretty self-explanatory. This is the tempo of the song. The best way to look at this is a 60BPM track will have a beat every second. 120BPM would be twice as fast as that with two beats every second.
The beat corresponds to the time signature we discussed above.
If you are using digital DJ software like Serato, Rekordbox, or Traktor, you can visually see a song structure, including beat grid markers and BPM, making the process much easier.
If vinyl is your jam, then much of what we have just discussed will have to be done by ear, although if you look closely at the piece of vinyl, you will be able to see the song’s structure from the grooves. We’ll park that for a separate article for now.


Although music has a mathematical structure, it’s important to remember to try and not be so rigid when it comes to bar counting. Rather than simply counting in your head, feel the music, rock back and forward, nod your head or do whatever you feel like.
You’ll find yourself in a much better zone and enjoy the process so much more.
Now we know how tracks are structured, let’s look at how that helps with beatmatching.
Step Four – Cueing And Monitoring
Cueing is preparing the track you want to play next before mixing it in. This is done through your headphones and not through the main mix output. In other words, if track A is what is coming through the speakers, track B should only be playing through your headphones.
This is where knowing the tracks can really pay dividends, as you should be able to distinguish the different elements of the individual tracks.
This is probably one of the most challenging parts of beatmatching, as it is easy to get confused as to what sound is coming from what song, but over time this really does get easier.
There are two main ways you can cue your tracks. The old-school manual way using vinyl or even a jog-wheel, or the modern approach of using Cue / Hot Cue buttons.
My personal favorite is using a combination of both these methods.
Cueing With Vinyl
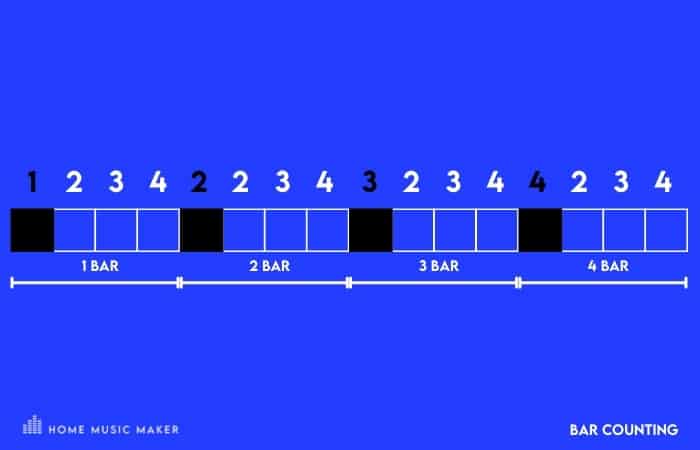
This is the most traditional way of cueing a track and requires you to get hands-on with the vinyl. Using your fingertips, spin the vinyl (track B) until you find the first beat. (Depending on where the needle is on the record, this might mean spinning the record backward).
Once you find the first beat, you need to hold it at that point by gently pulling the vinyl back and forth in time with track A playing through the speakers. You will hear a “scratching” sound through your headphones as the first beat is played back and forth.

The advantage here is that it forces you to know your tracks inside out before starting a mix, as you will have no visual cues other than the grooves on the vinyl.
Using the bar counting mentioned above, release track B with a gentle push forward on the correct bar.
If you’re using a jog wheel, the process is similar, and most will have LED lights to help navigate the track.
Cueing With Cue & Hot Cue Buttons
This method is the more modern approach than playing with vinyl and instead relies on pushing buttons rather than physically moving your hand back and forth.
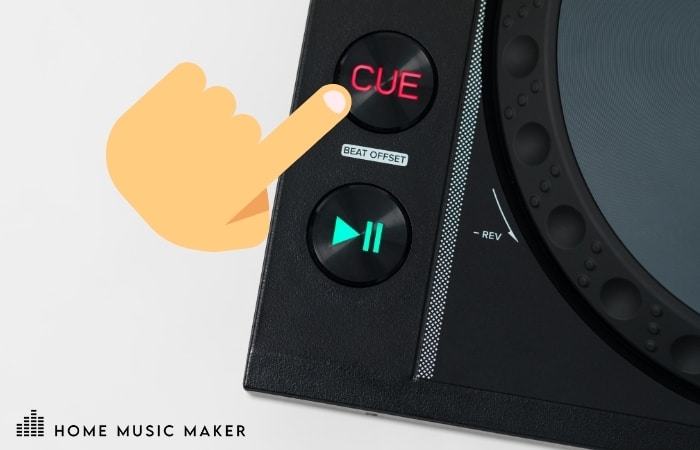

If you already have cue points saved, this method is a breeze; press the cue button to find the cue point (in this case, the first beat on track B) and keep pressing it in time with music playing on track A pushing it one last time when it’s time to release it.
If you haven’t already set a cue point, use the jog wheel/control disc to find the first beat and hit the cue button.
Step Five – Get The Pre-Fade Mix Right
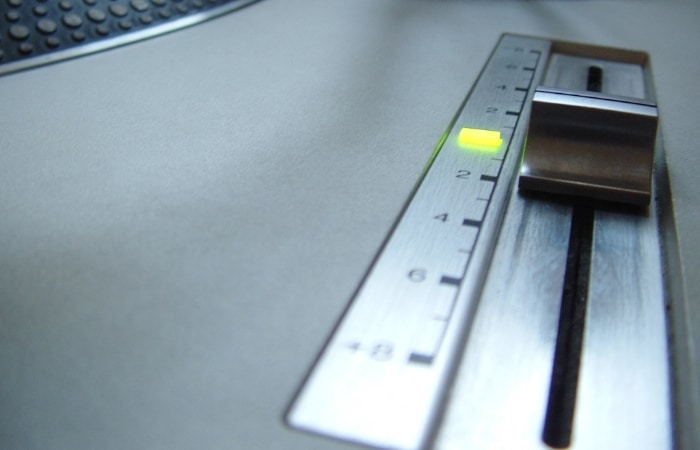
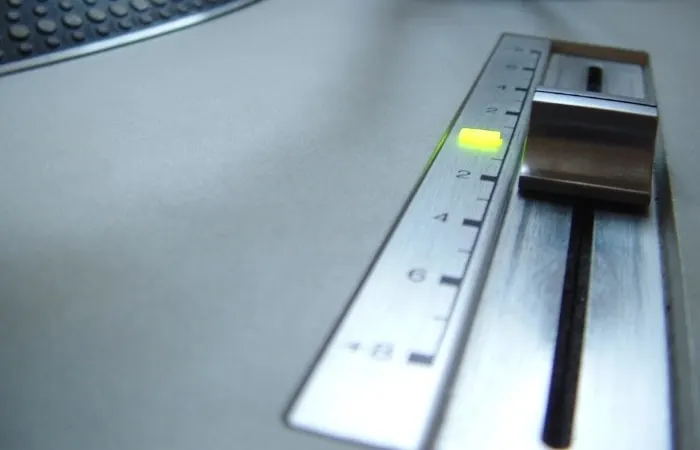
Once you release track B, use the pitch controls (tempo fader) to adjust its speed until it matches the tempo of track A.
Move the pitch slider down to speed the track up and move it up to reduce the speed.
You’ll know when the mix is in time as both tracks will play together and sound like one song without you having to make any more major adjustments to the pitch control.
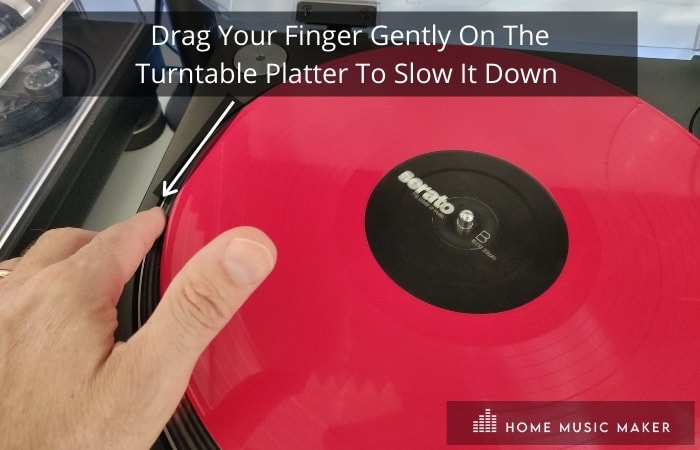
For quick minor adjustments, gently nudge the track forward to speed up the track or pull it back to slow it down.
There are several ways of doing this, depending on what format you are using and your preferred method.
If you use vinyl or timecode, you can use your finger on the middle record to increase the speed of the music.

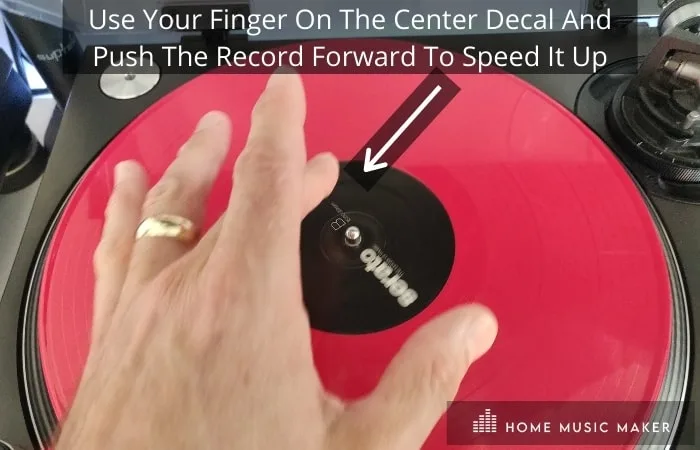
You can also gently touch the platter on the turntable to slow it down.

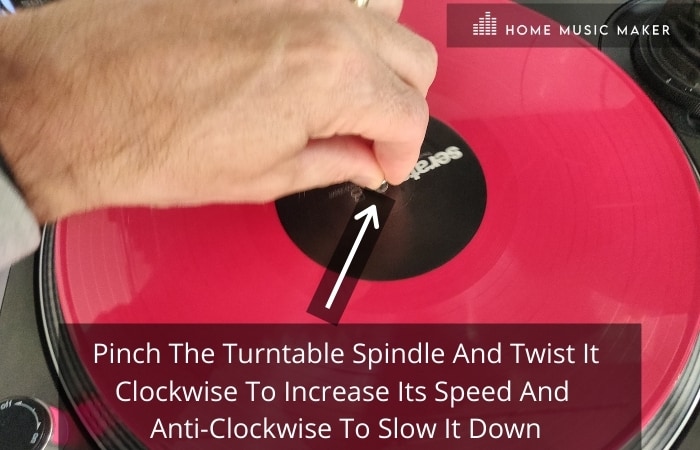
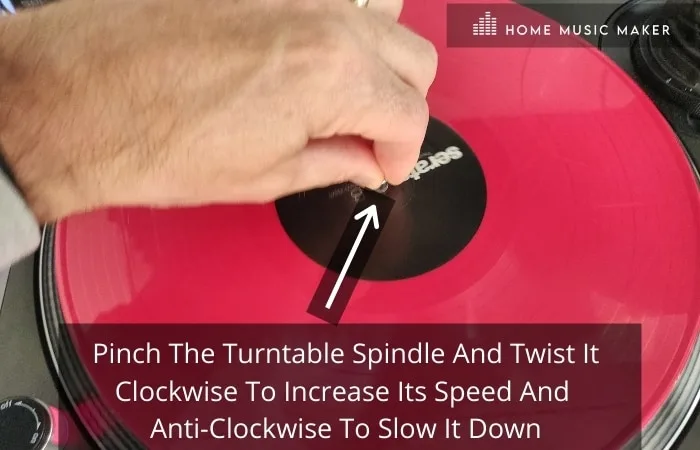
This is the method I use; however, there are plenty of DJs that like to pinch the spindle on the turntable and twist it clockwise to increase its speed and anti-clockwise to slow it down.
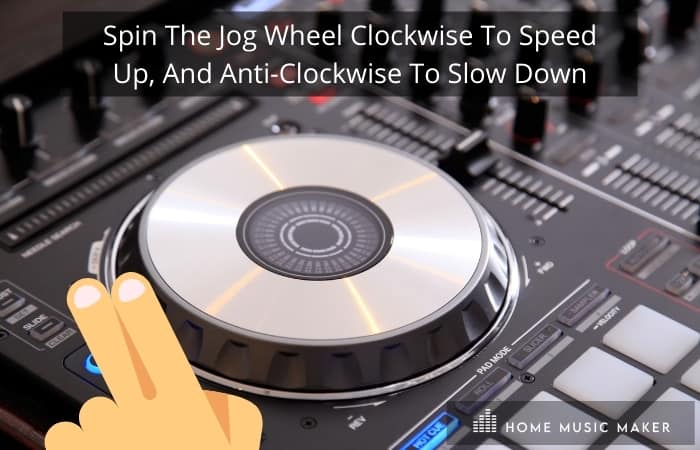
If you are using CDJs or a controller, you can still use similar techniques flicking the edge of the jog wheel back and forth with your finger for quick increases or decreases in tempo.

Keep tweaking this process until both tracks are at the same speed, and you do not have to make any major adjustments to keep them there.
Even if this means going back to the first beat and doing it several times, it is much better to get it right at this stage than during the main mix.
Step Six – Time For The Main Mix
All the hard work is done; your mix should be fully prepared and ready for the main mix.
Depending on how long this took, it will determine how long left you have on track A that is still playing through your main speakers. If you find you don’t have much time left and you are in a practice situation (not live in front of a crowd), don’t worry; start track A again and carry on.
Now it’s just a case of repeating everything you have learned above, only this time you will play both tracks A and B out of the main speakers.
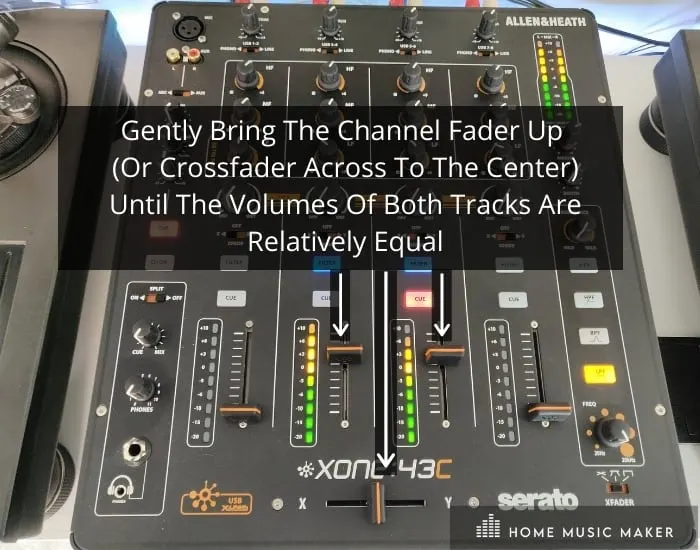
To do this, gently bring the channel fader volume up (or crossfader across to the middle) until the volumes of both tracks are relatively equal.
Remember to focus your attention on a key element; try not to get lost in different sounds.

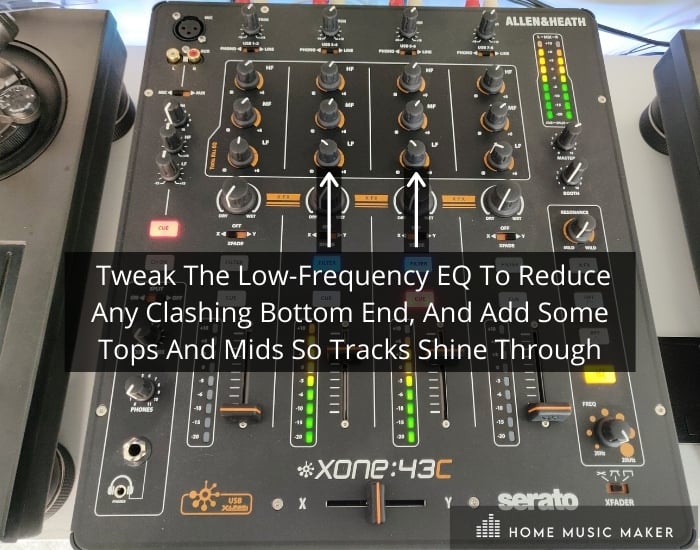
At this stage, you might want to tweak the EQ to reduce any clashing bottom end with the low-cut EQ or add some tops and mids; however, your main focus should be keeping both tracks in time.
If you prepped the mix well enough, you might only need some slight finger adjustments without having to touch the pitch fader.

Step Seven – The Transition
The final stage is to transition out of track A and into track B. This is normally as simple as cutting the crossfader across when track B’s breakdown or drop happens or gently fading track A out of the mix until it is no longer audible.
One technique you can use to transition between two songs is to use a hi-pass or low-pass filter.
Why Should You Learn To Beatmatch By Ear?
There has never been a better time to learn to beatmatch than now. There’s some amazing modern DJ equipment available, and it makes the process so much more straightforward.


Ask any vinyl DJ that learned to DJ in the early nineties on belt-driven Soundlab turntables or, if they were fortunate, a set of Technic 1200s or 1210s… the struggle was real!
A good friend of mine had recently played around on a Hercules DJ controller for a year or so using the Sync feature. He enjoyed it and decided he wanted an upgrade and bought himself a Pioneer controller (take a look HERE, it really is an awesome bit of kit and great for beginners).

After a few conversations with my friend and giving him some pointers, he decided to mix without using the sync feature. Yes, initially, it sounds like a bull in a china shop, but it didn’t take long for him to get the hang of it.
Anyway, to cut a long story short, my friend is now enjoying DJing more than he ever has; honestly, he really can’t get enough of it at the moment.
Learning to beatmatch by ear is vital if you want to be taken seriously as a DJ and is still as relevant as ever, even with new technologies that can make this traditional skill seem redundant.
Now I’m not saying you shouldn’t take advantage of the various visual features available on most new DJ equipment. In fact, when you are just starting, being able to see the tracks waveform, BPM counter, and beat grids can really help you get to grips with everything we have already talked about.
Just try not to become too reliant on them, especially the sync button!
Here are a few reasons why:
- It’s more fun to mix on your own and not rely on someone else’s software or hardware to do the job for you.
- The sync feature on most modern DJ equipment is known not always to analyze a track correctly. This could potentially leave you standing there in front of an audience, not knowing what to do. It might be the last time you get that opportunity again!
- When you learn to beatmatch on your own and get the hang of it, you will see how songs are structured and what songs work well together in a mix.
- You will also instantly recognize when a mix starts to go wrong and how to rectify it.
- Even if the waveforms of two tracks are lined up, this doesn’t mean they are correctly synced.
- One of the main reasons you should learn to beatmatch is to be taken seriously amongst your peers. Let’s be honest, no one wants to be known as that DJ that turns up, presses a button, and lets a computer do the heavy lifting.
To be known as a “proper” DJ, you must learn the fundamentals and earn your DJing stripes.

How To Beatmatch – FAQ
How long does it take to learn to beatmatch?
There is no set timeframe on how long it will take to master. It can take anywhere from a few hours to a couple of days, to even weeks. It’s like anything; the more you practice, the better and quicker you will get.
If you have the patience to commit yourself to it, you will find your skills rapidly improving.
How can you improve your beating matching?
Practice, practice, and more practice. Manual beatmatching is a skill that can be easily mastered with consistent repetition.
It’s also worth doing some of the following:
Watch videos on YouTube or live Facebook streams of other DJs performing.
Listen to DJ mixes, and pay close attention to where they bring mixes in, along with their transitions.
Practice playing different genres of music.
Mix on a variety of equipment – turntables, CDJs, and DJ controllers.
Why is beatmatching still important?
Beatmatching is an integral part of DJ culture and is an art that takes time and dedication to master.
You may think beatmatching has become obsolete with all of the technological advances in DJ equipment over recent years, but this couldn’t be further from the truth!
As you have just read, technology can have its issues, and if you are unable to spot when something sounds wrong or know how to solve it manually, this can quickly get out of hand.
Why is beatmatching so hard?
When you’re beatmatching, the link between two songs is extremely delicate. This task requires a lot of focus and attention to detail. Even small discrepancies in tempo variation or timing will lead to an unpleasant experience for both DJ and audience alike.
At first, this process can feel confusing and be difficult to recognize what small adjustments are needed and how to carry them out.
However, with a few pointers and practice, it will soon become second nature.
How do you beat match songs with different BPM?
Mixing songs with different tempos can be tricky but not impossible.
One method is to reduce the tempo of one song whilst pitching up the track you want to bring in. Be careful with this method, though, as large changes in pitch can distort the song.
Another way is to transition during a section of the track where no beats are playing, like a strings breakdown.
Finally, you can cut the second track over with the crossfader without blending them. If your timing is bang on, the change in tempo shouldn’t sound massively noticeable.
Can someone be a DJ and not know how to beat match?
Yes, technically, a DJ doesn’t need to know how to beatmatch and can rely solely on the tempo detecting algorithm and sync feature to do it for them. However, as we’ve already covered, in my opinion, this is a bad approach.
Can you learn to DJ on your own?
Absolutely, with some basic DJ kit and a little know-how, you are good to go! Having said that, getting together with some friends for a mixing session is great fun and will help you to up your game.
What are the best ways to learn how to DJ?
I think we’ve covered this thoroughly in the article, but there are plenty of other resources for learning on YouTube and through online tutorials. There are even DJ courses available if you really want to supercharge your progress.
The most important thing to remember when DJing is that it’s about fun and experimentation.
Final Words
When I first set out to write this article, I honestly thought it would only be a few paragraphs long. As I sit down and write this, I realize there is more to beat matching than I originally thought.
Beatmatching by ear is the most natural way of learning to DJ. It takes time and patience, but it’s worth every minute spent practicing, as you will become able to hear what tracks work together without any visual cues from a computer or mixer screen.
It’s important not to worry about being perfect from day one – have fun experimenting until things start sounding great for both yourself and your listeners.
Want to take your DJ techniques to the next level? Learn how to Double Drop by reading our step-by-step guide HERE.